Return to Home Return to Overview Mechanical Reference
Ura Recommended Strategy
Table of Contents
This strategy for Challenge Mode focuses on smoothing out communications regarding everything that has to do with Bloodstone Shards and Dispel. This is often the hardest part of the encounter: making sure a shard is available, used, and then picked up as fast as possible every time it becomes necessary for a new mechanic.
This is best achieved through a proper division of roles, where different parts of the squad circulate different shards to take care of specific threats, while also trying to provide good damage, boon uptime, and defensive utility.
This is an in-depth guide: if you are looking for something fast to read and less comprehensive, check out the Ura Fast Guides.
Main Points
- The squad divides into a ranged group and a melee group. Each of these groups rotates a single Bloodstone Shard to manage different mechanics.
- The arena will progressively fill with enemy structures that must be cleared.
- Ura’s defiance must be regularly broken to reset
Rising Pressure.
- Ura is tanked from the third phase onwards to control her position.
- The boss’s
Defiance Bar must be broken only at specific intervals from the third phase onwards.
General Information
Bloodstone Juggling and Groups
One of the defining characteristics of the encounter is Bloodstone Shards and their associated mechanics. Shards must be used at regular intervals to manage Pressure Blast, Toxic Geysers and Titanspawn Geysers, which otherwise have little to no counterplay. However, players who use a shard cannot pick one up for 45 seconds due to Bloodstone Saturation: thus in order to cover all mechanics, it is necessary to rotate the shards throughout the entire squad. Getting the hang of this “juggling” and performing it smoothly is the key to clearing the encounter, and is also the main reason why voice communications are so highly recommended.
To smooth out this process, most strategies divide the squad into two groups:
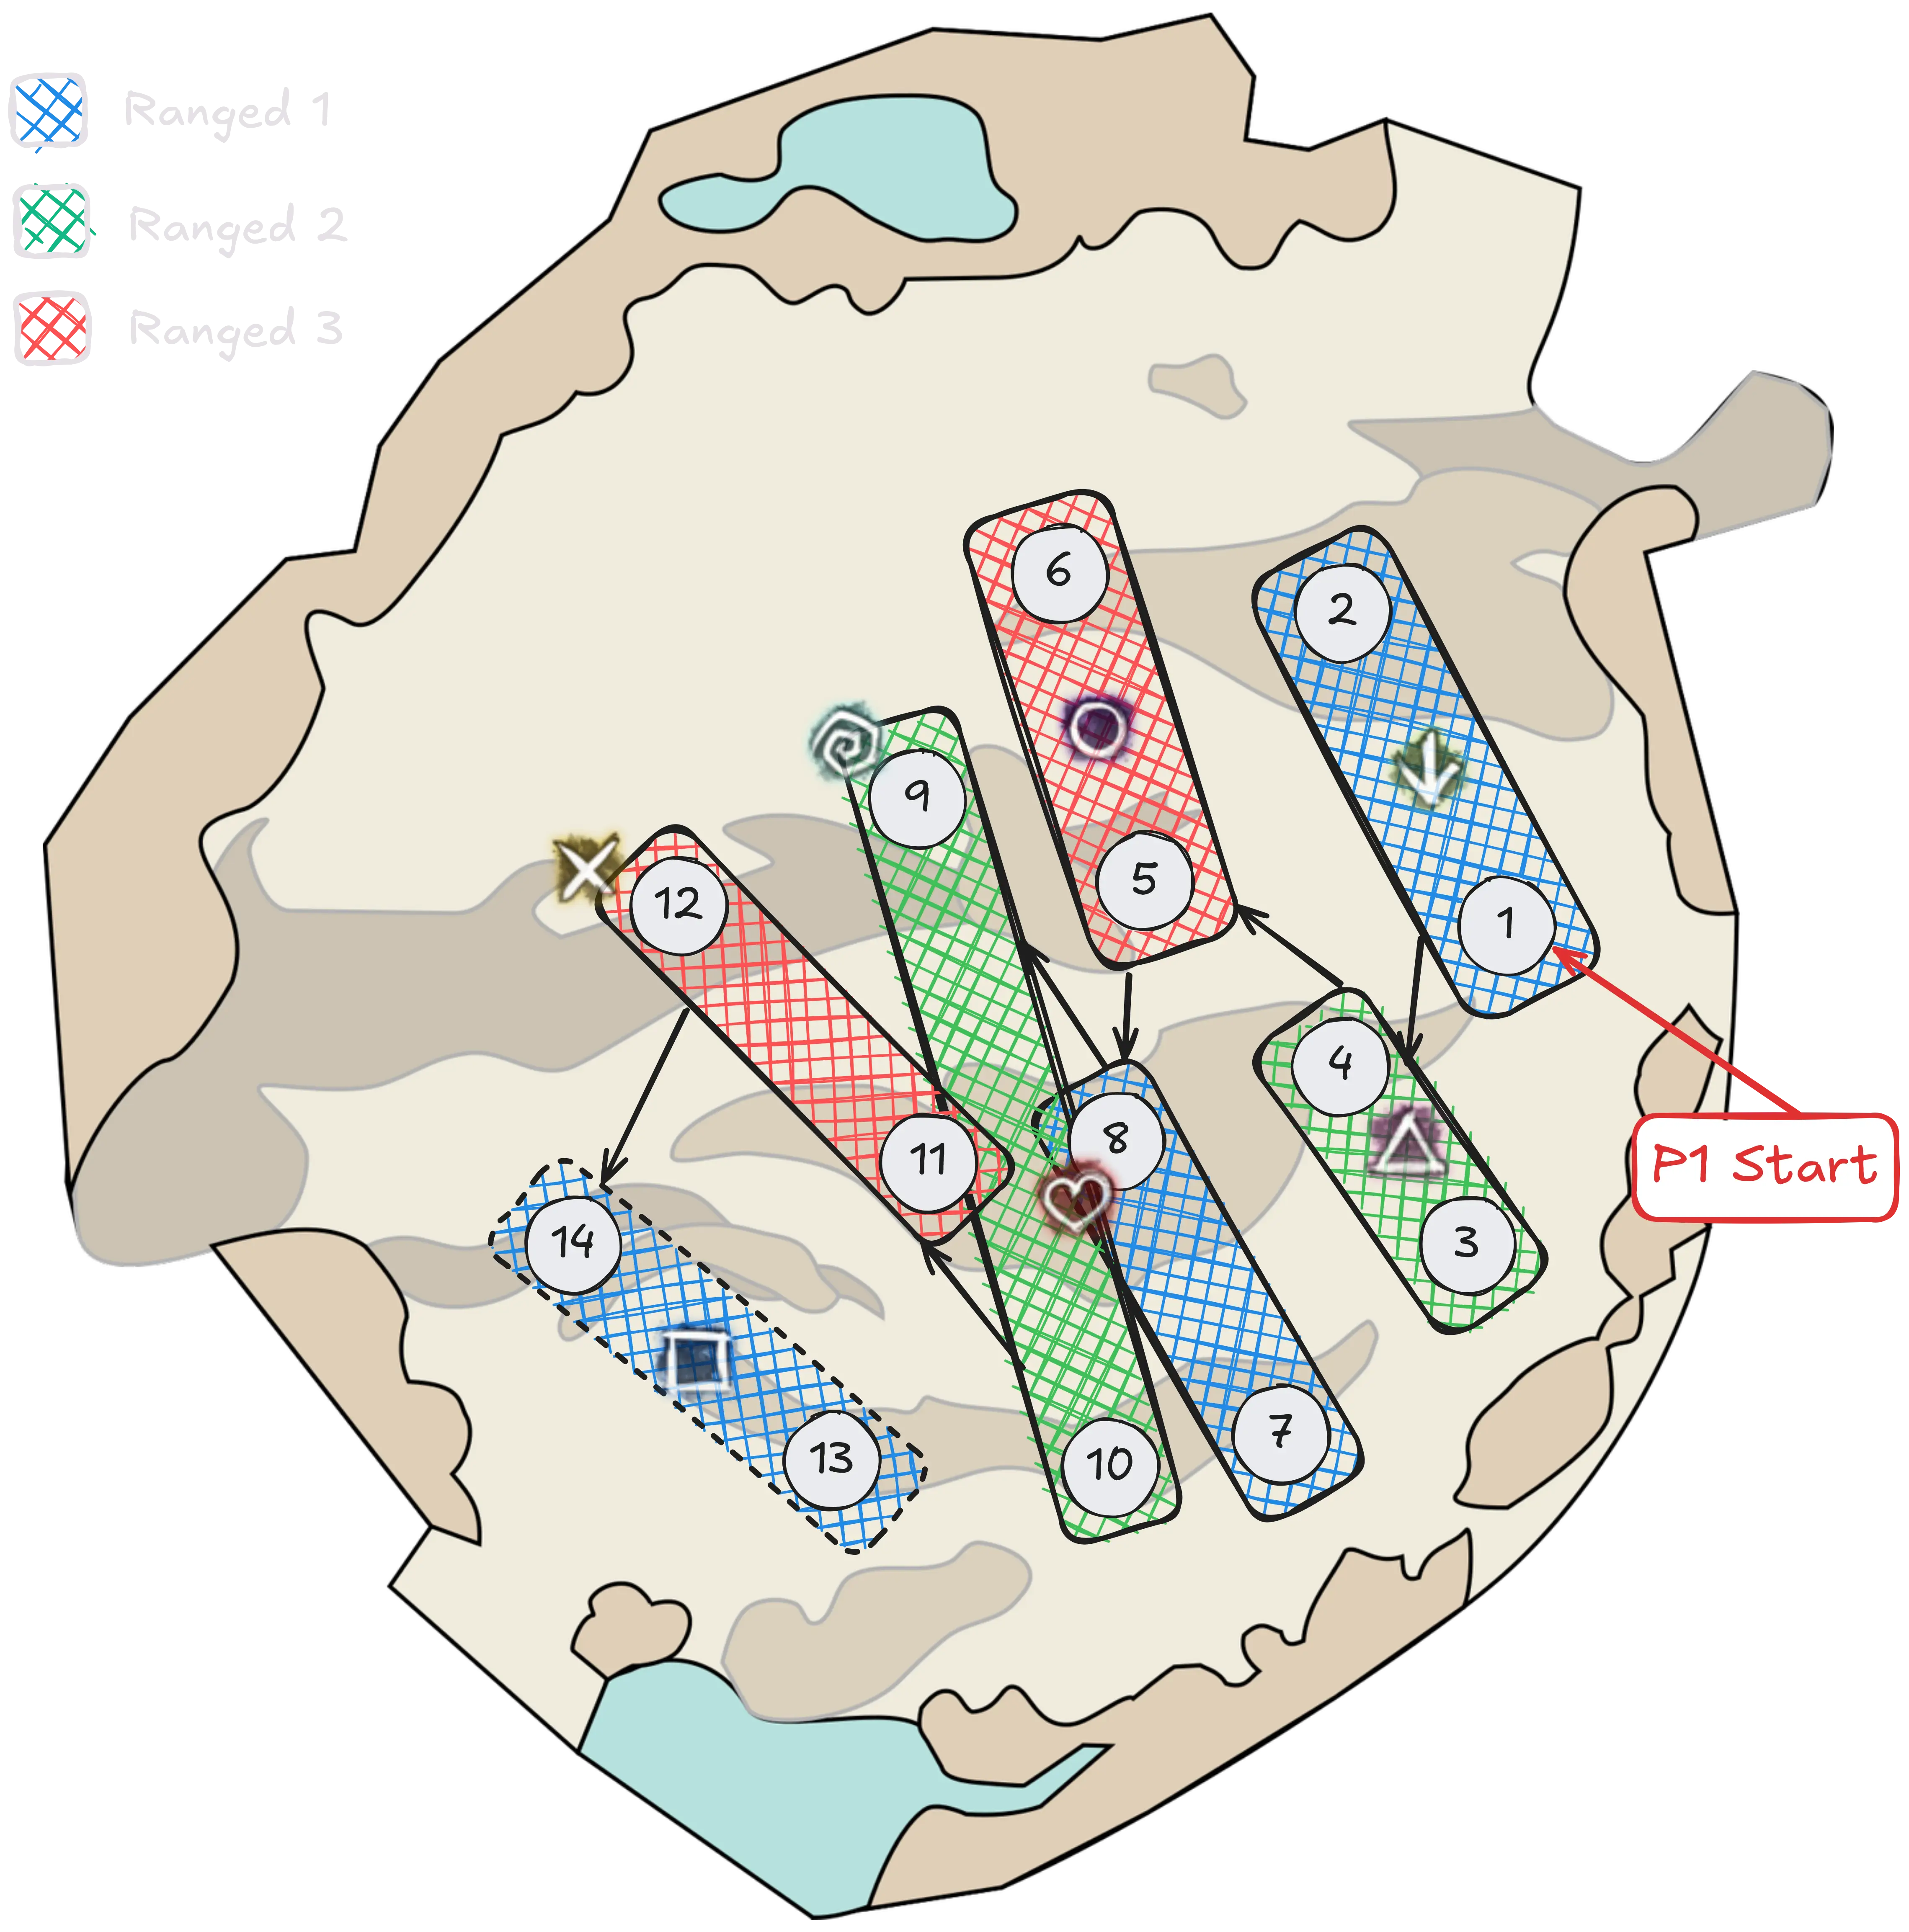
- A ranged group containing the three healers shares one shard (ranged shard), using it to
Dispel all Toxic Geysers throughout the fight.
- A melee group containing everyone else minus the tank, shares the other shard (melee shard), using it to
Dispel the Pressure Blast (aka Friends, Bubbles) and Titanspawn Geysers.
Before the fight starts, it is common practice to set up the order in which players will use the shard, often called the “rotation”. In this way, whenever a player is about to use a shard, they can call out the next person in the rotation and the location where it will be dropped, so that they can be prepared to pick it up.
Having a rotation is extremely important for the ranged group, but confident squads often forgo an explicit melee shard rotation; instead trusting players to pick up the shard whenever their Bloodstone Saturation debuff runs out.
Usually the tank is exempt from any duties regarding shards. Having them participate can even be detrimental in some cases, as players will get used to their aid and then struggle when they no longer participate from the third phase onwards.
Geysers and Arena Management
An important facet of the encounter is area denial. Throughout the fight, the boss will summon Geysers: stationary structures that affect an area, buffing herself and harming the squad in some manner. Learning to kill or otherwise handle these quickly and efficiently is extremely important, as the eventual lack of space and additional damage pressure they inflict can quickly escalate.
Based on the division into melee group and ranged group, melee players usually handle Titanspawn Geysers, while ranged players handle Toxic Geysers as part of their duties. Sulfuric Geysers must be managed correctly by whichever player gets targeted by them.
Managing these mechanics will usually see players moving around the arena to wherever they are occurring as the fight progresses.
Defiance Management
Throughout the fight, Ura will periodically gain stacks of Rising Pressure. These increase her outgoing damage while reducing all incoming damage.
Breaking her Defiance Bar resets the number of stacks to zero. However, this will also grant her a stack of
Titanic Resistance, a permanent buff which reduces incoming defiance damage and makes breaking successive bars more difficult. Managing outgoing crowd control is therefore very important and requires decent coordination to only break the bar at specific intervals.
Usually the tank is responsible for calling out CC. In phases 1 and 2, Ura should be CC’d whenever she has at least five stacks of Rising Pressure. In phases 3 and 4, CC must be approached with more attention, and the bar must be broken only at specific intervals. More information can be found on this here.
Marker Packs
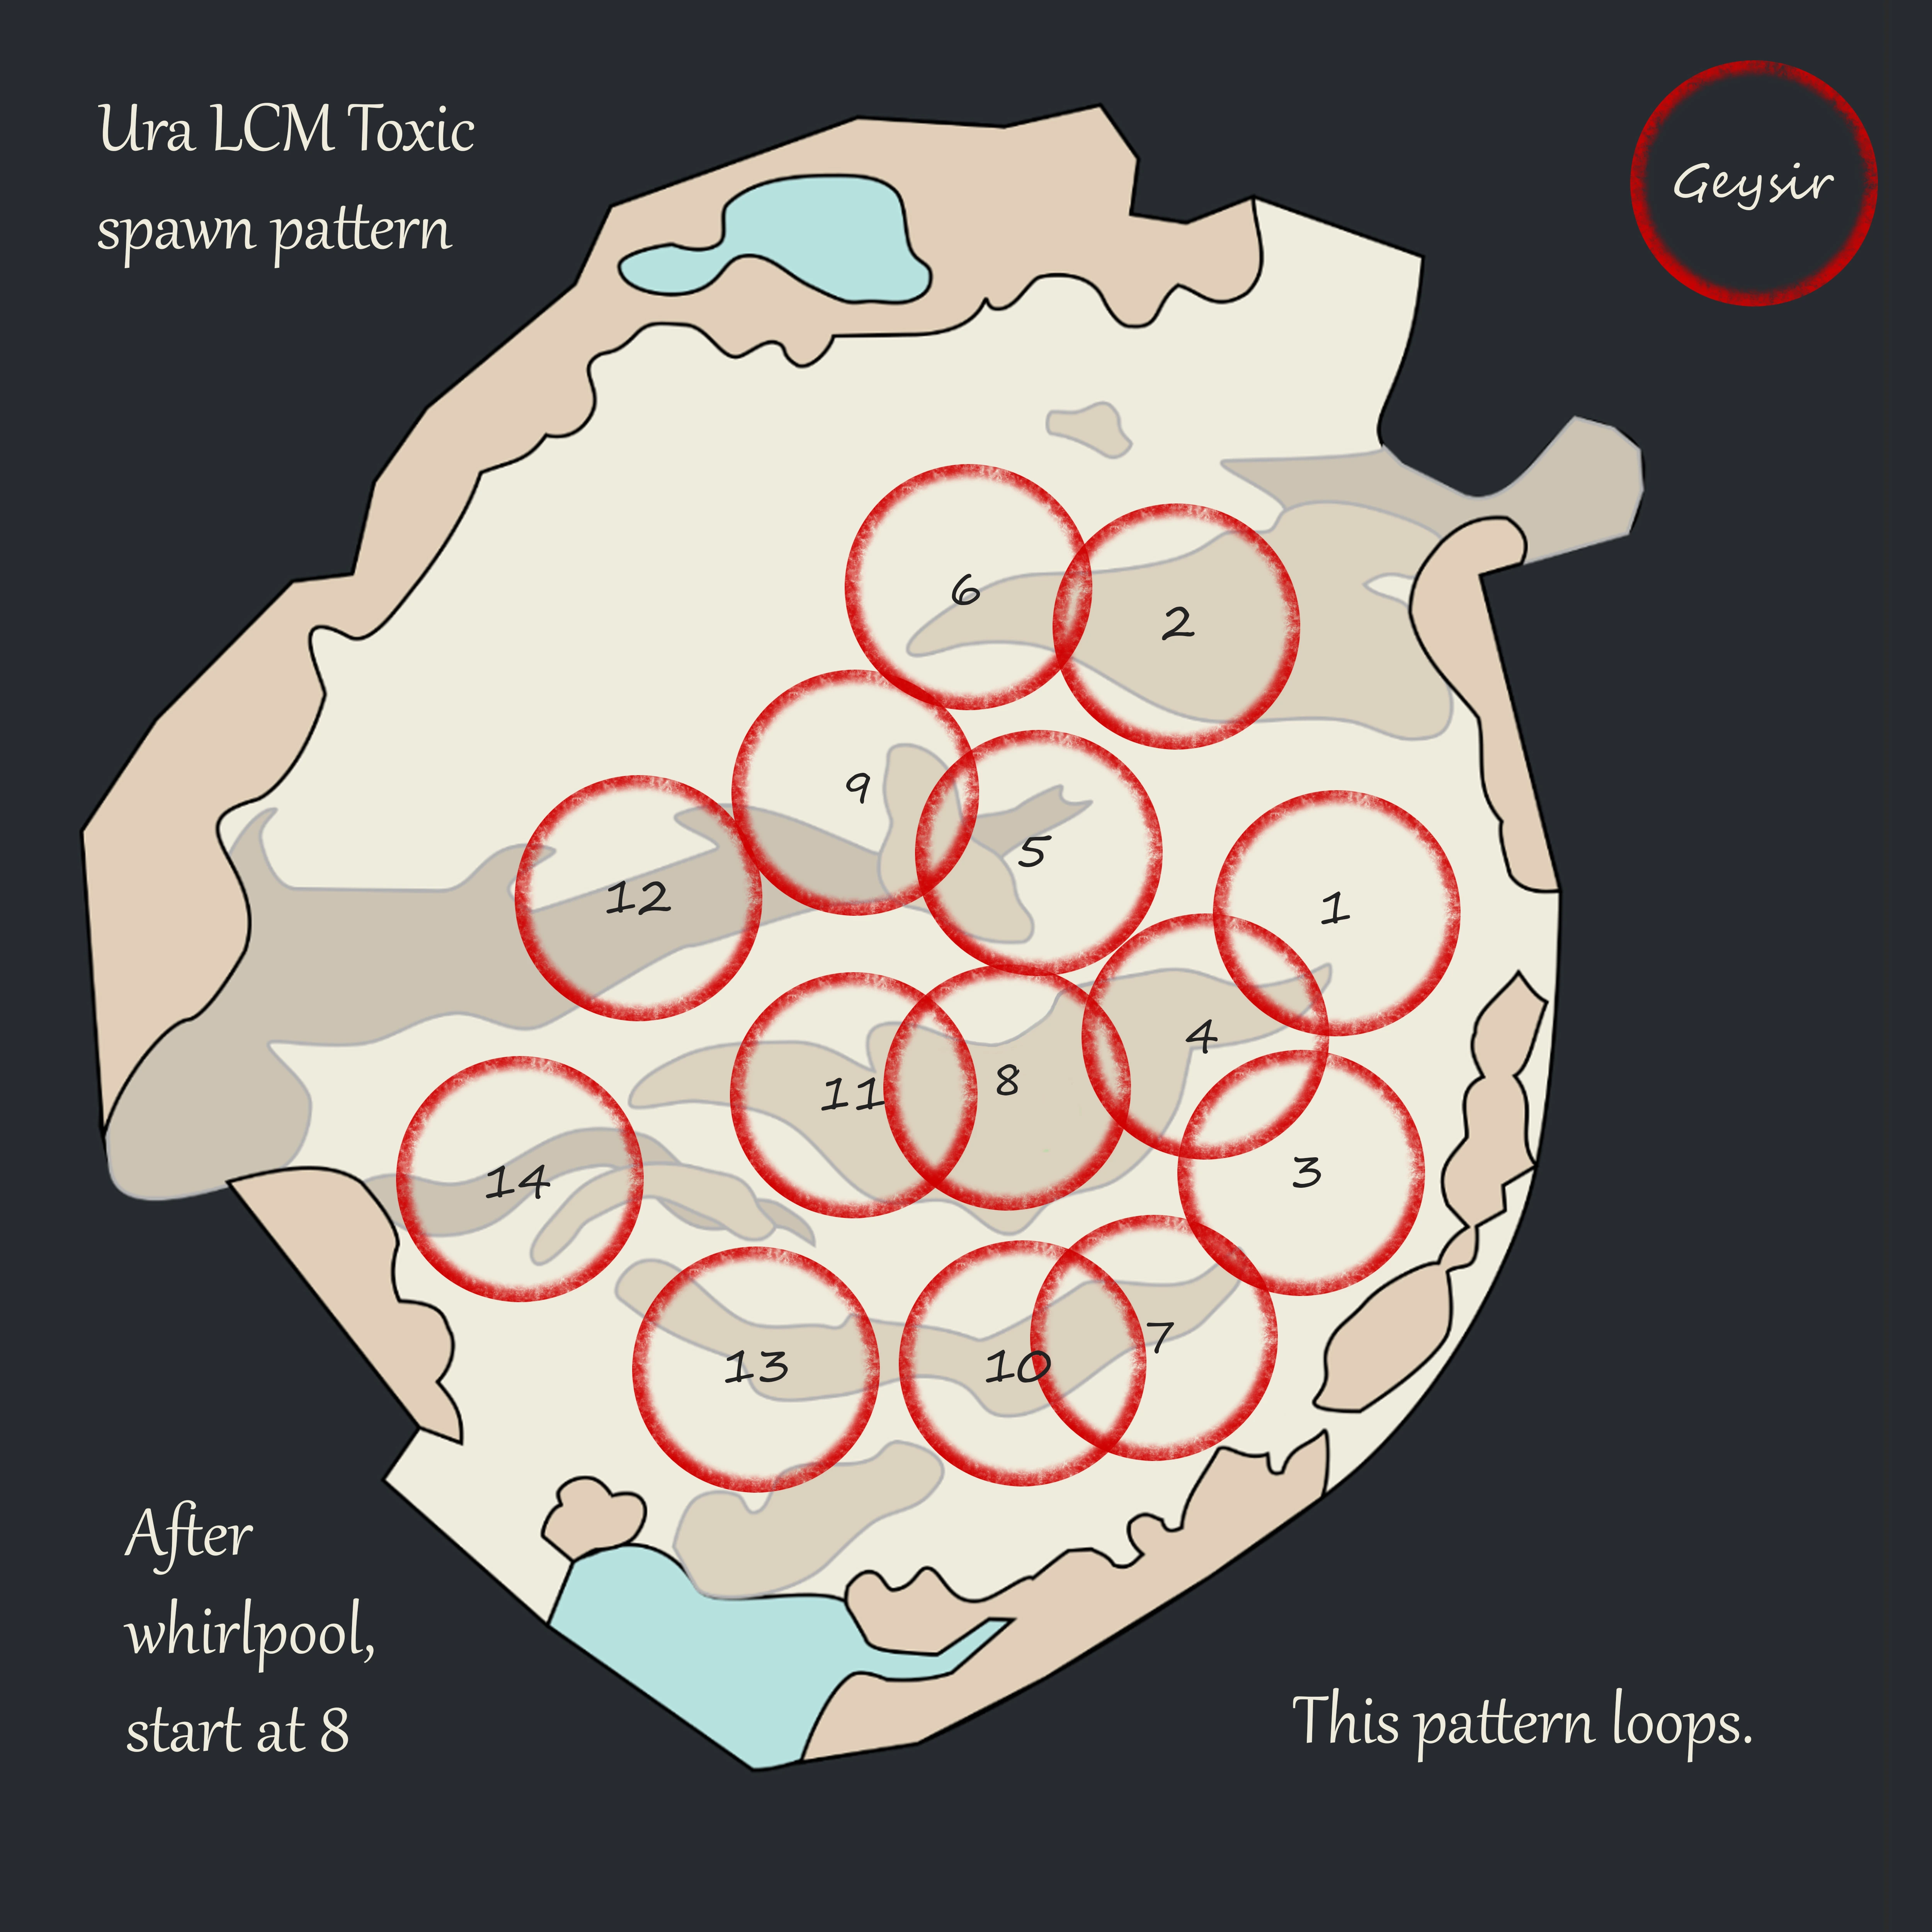
Especially for the ranged group, it is extremely beneficial to install HasKha’s Markers for Blish HUD’s Pathing Module. This pack will show an overlay for geysers, allowing players to use numbered Toxic Geyser spawn positions as shown here for callouts. The pack can be installed directly from the Pathing Module’s marker repository.
The marked pack also shows safe Sulfuric Geyser drop areas, making it useful for all players in general.
Alternatively, groups can use in-game markers. This is a less desirable option compared to the overlay, since there are 14 spawn locations and only 8 different markers available. The following marker pack (requires Blish HUD’s Commander Markers module to be placed) makes the certain optimizations to manage this issue:
- Markers on Toxic Geysers number 5, 8, 9, and 12.
- Markers between Toxic Geysers that are usually double dropped: 1 & 2, 3 & 4, 13 & 14.
- No marker on 11 because it’s in the boss anyways, so it’s an easy one to remember, especially when you have the marker on 8 as reference point.
- Safe Sulfuric Geyser drop area marked out with
and
.
Click to view markers
Paste the following code into Commander Markers to use this marker pack:
eyJlbmFibGVkIjp0cnVlLCJuYW1lIjoiVXJhIENNL0xNIiwiZGVzY3JpcHRpb24iOiJUaGVzZSBtYXJrZXJzIHNob3cgdGhlIG1vc3QgaW1wb3J0YW50IFRveGljIEdleXNlcnMgYW5kIGFyZSBhbHNvIHVzZWZ1bCBmb3IgZ2VuZXJhbCBkaXJlY3Rpb24uIiwibWFwSWQiOjE1NjQsInRyaWdnZXIiOnsieCI6MTU3LjI0Njc1LCJ5IjoyMzkuOTE4MTgyLCJ6IjoyNjkuOTI4OTI1fSwibWFya2VycyI6W3siaSI6MSwiZCI6IlRveGljIEdleXNlciAxLzIiLCJ4IjoxODguOTI1NzIsInkiOjI2MS42MDE2ODUsInoiOjI2OS45MjkxNjl9LHsiaSI6MiwiZCI6IlRveGljIEdleXNlciAzLzQiLCJ4IjoxODguMDQ5OTQyLCJ5IjoyMjYuMTQwMDMsInoiOjI2OS45Mjg5MjV9LHsiaSI6MywiZCI6IlRveGljIEdleXNlciA4IiwieCI6MTYyLjA0NjYzMSwieSI6MjI4LjI3MTc0NCwieiI6MjY5Ljk5MDg3NX0seyJpIjo0LCJkIjoiVG94aWMgR2V5c2VyIDEzLzE0IiwieCI6MTI0LjM0Njc5NCwieSI6MjA5Ljg0OTY0LCJ6IjoyNjkuOTg2NDJ9LHsiaSI6NiwiZCI6IlRveGljIEdleXNlciA5IiwieCI6MTQ1LjgzMTc3MiwieSI6MjU4LjQ0MDgyNiwieiI6MjY5LjkzNDc4NH0seyJpIjo1LCJkIjoiVG94aWMgR2V5c2VyIDcvMTAiLCJ4IjoxNzAuOTA3MzY0LCJ5IjoyMDIuNDc5NTUzLCJ6IjoyNzAuMDYyOTU4fSx7ImkiOjcsImQiOiJUb3hpYyBHZXlzZXIgNSIsIngiOjE2NS43MjUyMzUsInkiOjI1Mi41NTQ5NjIsInoiOjI2OS45MzQ3ODR9LHsiaSI6OCwiZCI6IlRveGljIEdleXNlciAxMiIsIngiOjEyMi40NDU4MTYsInkiOjI0OS43ODIxMiwieiI6MjY5LjkyODkyNX1dfQ==
Composition
Godscream Ura is generally played with three healers, who must bring high amounts of crowd control to deal with Toxic Geysers and Titanic Resistance. Furthermore, they benefit from high survivability and mobility to facilitate mechanics, and should provide
Stability for their subgroups. For these reasons, the most commonly played specialization in this role is
Chronomancer, followed by
Troubadour,
Specter and
Scourge (often with a Celestial build).
BoonDPS can bring additional utility to the fight, such as extra CC and Stability, but this is not usually a limiting factor. Damage players can bring both
Power and
Condition builds, though it is beneficial to bring a couple of
Power builds to handle Titanspawn Geysers, since they have lower overall
Toughness.
The fight also benefits builds with high cleave damage for both Titanspawners and Champion Fumarollers, and extra mobility for easily placing Sulfuric Geysers.
Usually, one of the DPS players will have the additional responsibility of being a tank through the third and fourth phase of the fight. They should play a high damage build, since they will not participate in some mechanics and thus will have the greatest damage uptime on the boss.
See tanking Ura for more information.
A sample composition could be as follows:
| Heal | DPS/Hybrid Support | DPS | DPS | DPS | |
| Sub 1 | DPS Support | Any DPS | |||
| Sub 2 | Hybrid/Full Heal | Any DPS | Any DPS | Any DPS |
Builds and PoVs
This is a non-exhaustive list of playable builds on the encounter. If anything is outdated, you can find up-to-date information on Void Lounge.
| Build | Role | PoV | Last updated |
| Ranged & Heal | Single Drop, Double Drop | November 2025 | |
| Ranged & Heal | Single Drop | April 2025 | |
| Ranged & Heal | Double Drop | November 2025 | |
| Ranged & Heal | March 2026 | ||
| Melee & Boon | PoV | September 2025 | |
| Melee & DPS + Titanspawners | PoV | July 2025 | |
| Melee & DPS | PoV | April 2025 |
Phase 1
100% - 70%
The fight starts when both Bloodstone Shards are picked up. Usually a player from the melee group picks up the first one, then a player from the ranged group picks up the second when everyone is in position to start the fight.
Throughout this phase Dispel must be used to manage Pressure Blast (aka Bubbles) and Toxic Geysers.
Handling Bubbles
The two players targeted by Pressure Blast should stack together, separate from the rest of the group, ideally in melee to upkeep DPS.
Stacking, regardless of where, allows the melee shard holder to save both players with a single Dispel. The shard holder will not be affected by Pressure Blast, meaning they can stack on top of their affected teammates.
If there is a rotation, players should call out the next person after using their shard, who should then quickly pick it up. Since there is little other pressure for the melee players in this phase, groups progressing the fight should use it to practice their rotation and get it perfect for the following phases.
Baiting Propel
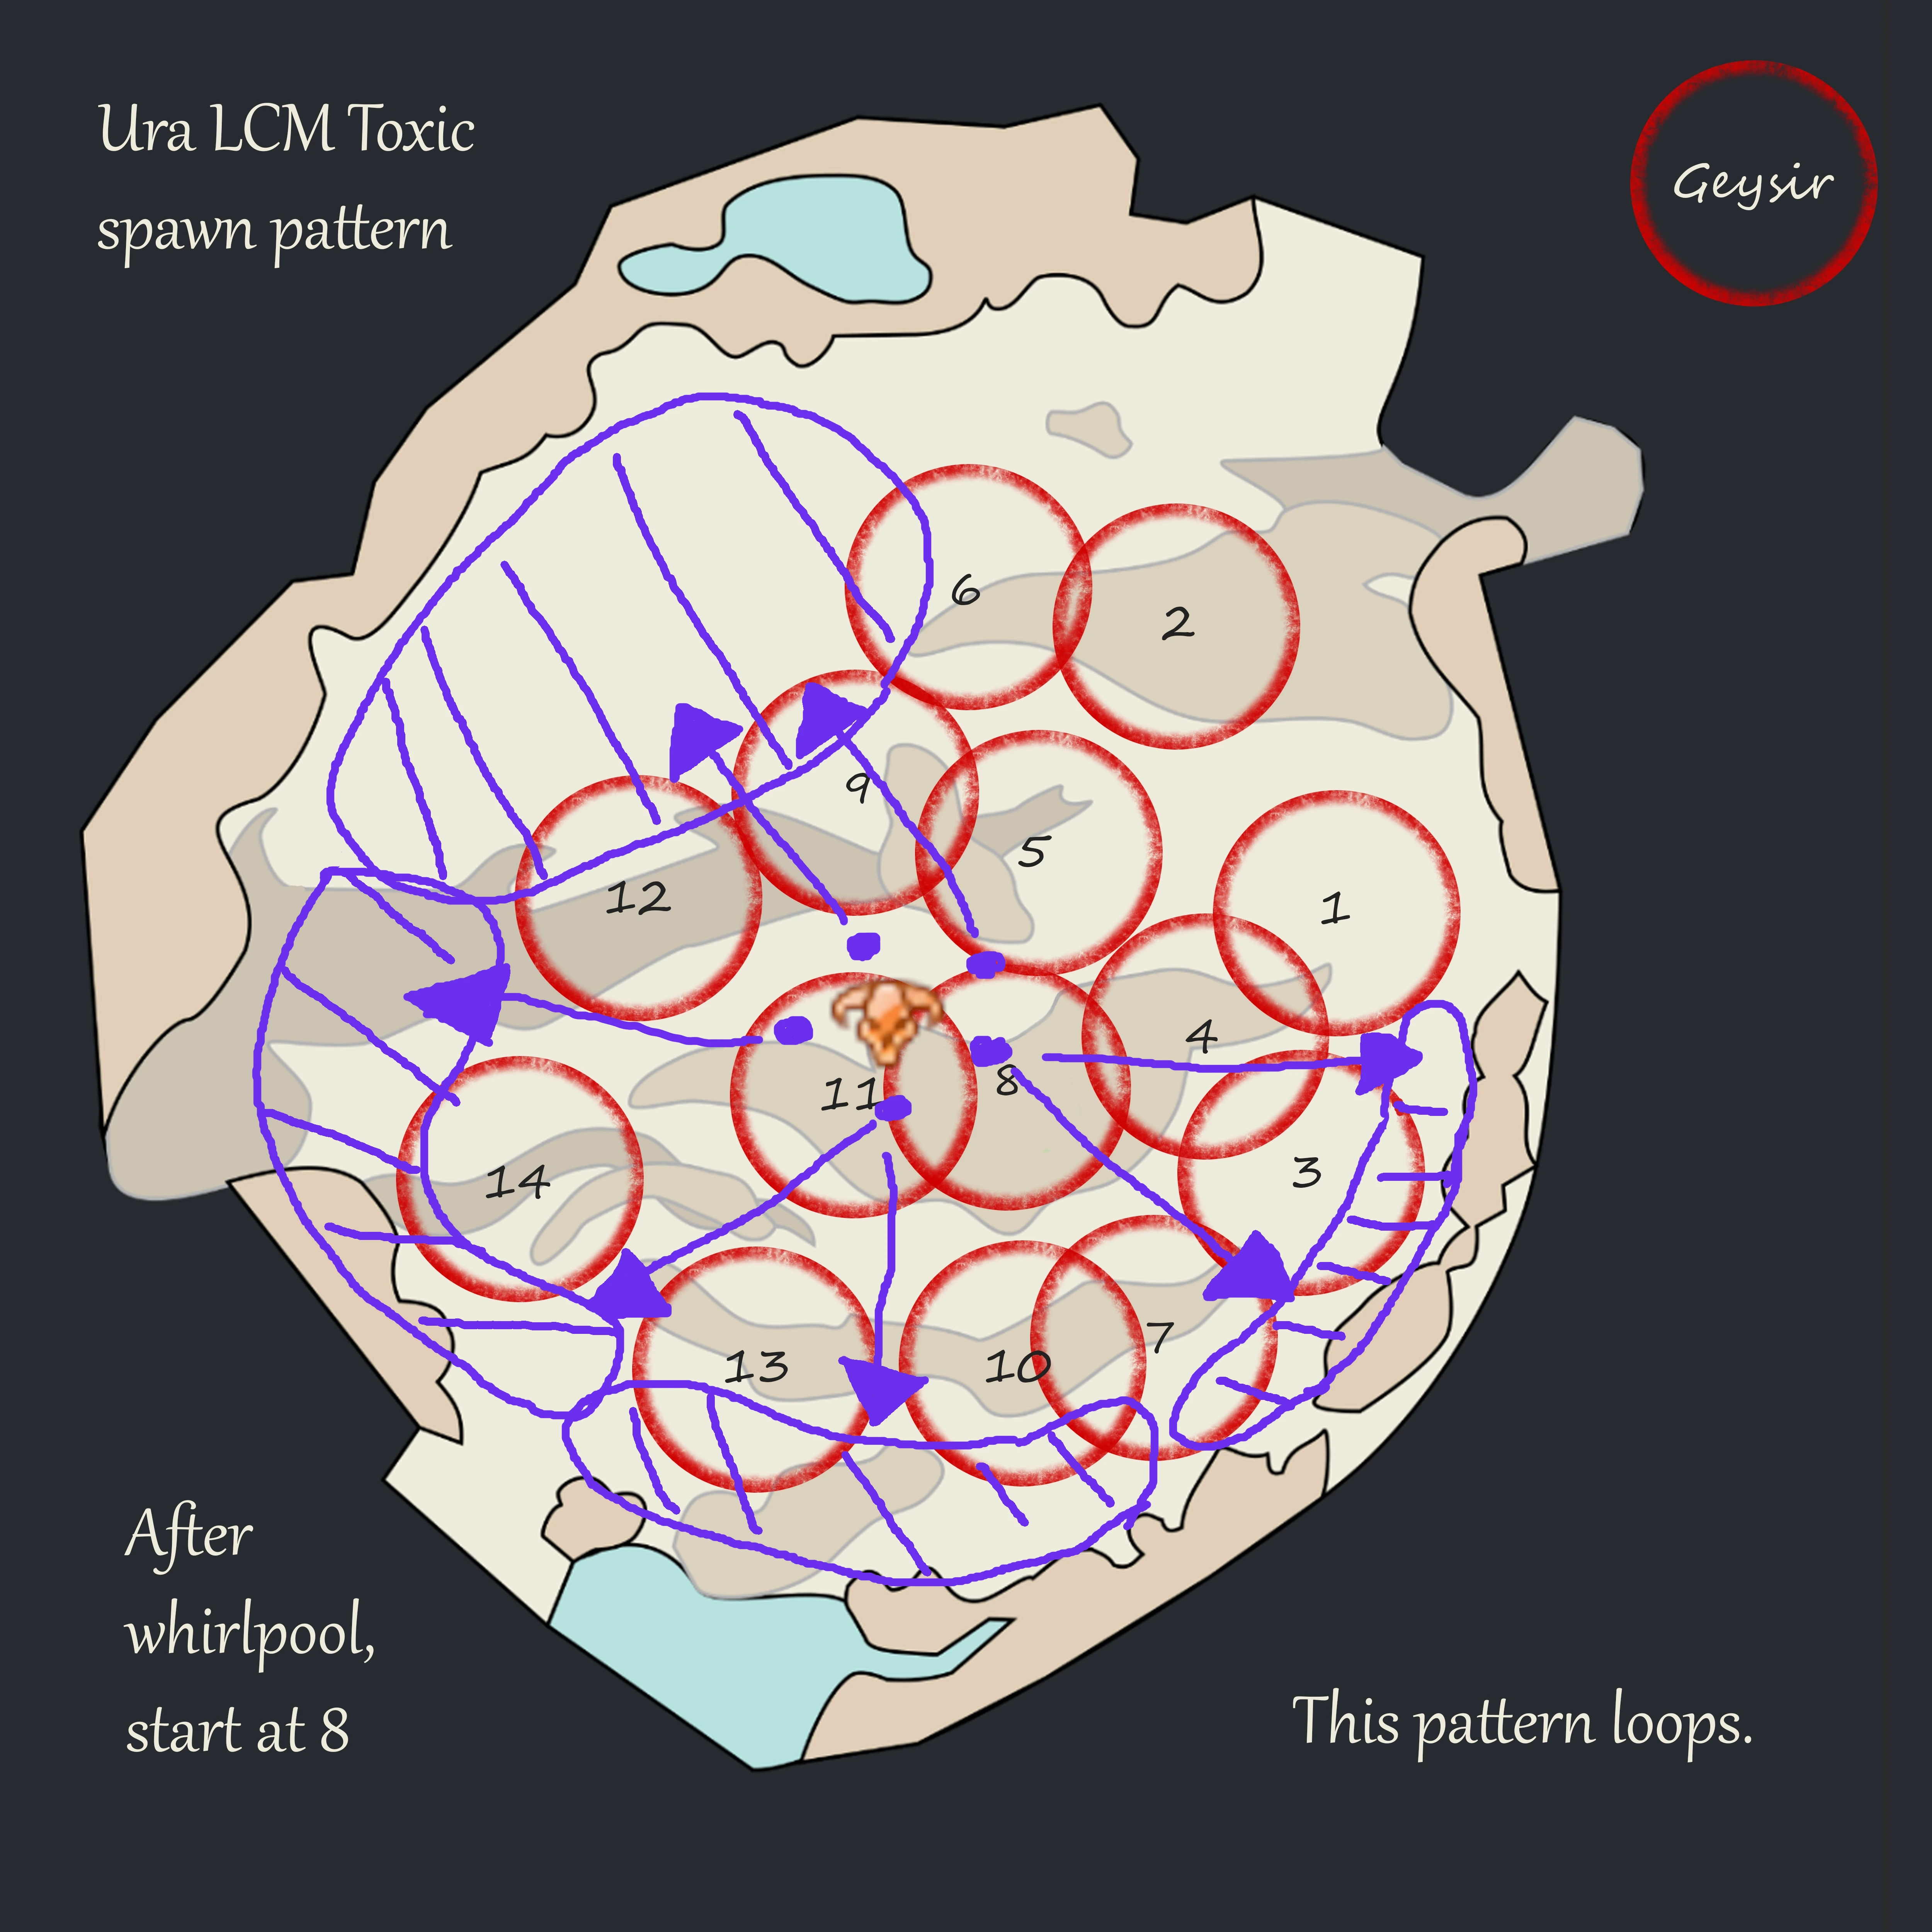
Throughout this phase, Ura will usually use Propel after every Pressure Blast (this can change). Players in the ranged group should be aware of this and try to bait the jump away from geysers into potentially advantageous positions. The standard movement pattern is shown in the image below:

This corresponds roughly with the following timings:
- Initial jump towards #4: bait it by standing slightly to the right of #8 after the first Bubbles.
- Jump towards #2, should happen when the same geyser is being CCd. Otherwise, whoever
Dispelled the geyser baits the jump.
- Jump back from #2, which should naturally place the boss between 4 and 5.
- Jump towards #6 should happen when the same geyser is being CCd. Otherwise, whoever
Dispelled the geyser baits the jump.
- Jump back should be baited towards #3, otherwise you risk the boss landing on top of #7 or #8, which can delay your phasing and possibly lead to issues.
Double Sharding Toxic Geysers
Throughout the first phase, the spawn rate of Toxic Geysers is doubled compared to the rest of the fight. This means that players in the ranged group must Dispel two Toxic Geysers every time it’s their turn in the rotation. This is called “Double Sharding”, and involves using
Dispel on a geyser, quickly picking up the Bloodstone Shard, moving to a second geyser, and using
Dispel again. In between the two uses, the shard holder must survive the ticking damage from
Bloodstone Saturation, which removes 20% of their maximum HP per second.
To simplify double sharding, it is best to wait for both Toxic Geysers to spawn before using Dispel on the first, so as to not have to wait between casts. Mobility skills are also extremely useful for quickly moving from one geyser to the other, though not strictly necessary.
As an alternative strategy: groups can “single shard” by assigning one subgroup to the ranged rotation and the other to the melee rotation. While this is much safer, as the ranged group will not take any damage from
Bloodstone Saturation, it is also less common in kill runs as it does not provide the same role compression as double sharding.
Furthermore, if you are interested in clearing the Legendary Mode, learning how to double shard will help you in the long run.
Once a geyser has been Dispelled, breaking its
Defiance Bar will kill it. Analogously, using
Dispel on a geyser with a broken
Defiance Bar will kill it. Since geysers do not regenerate defiance in Challenge Mode, as soon as one spawns the ranged group can start doing some CC damage to it, so that it is more easily broken later on.
When double sharding, it is normal to CC whichever Toxic Geyser that you first pick the Bloodstone Shard from, and the first geyser in your double drop sequence.
Other Information
After using Propel, Ura will generally use her Autoattack Chain, which requires Aegis or
Stability for the last hit. Players should always try to sidestep this skill, as their healers will often be off-stack doing mechanics.
Ura should be CC’d roughly whenever she gains 5 stacks of Rising Pressure. This will help to keep the pace, while also not getting overwhelmed by the required amount of CC in the later phases.
Phase 2
70% - 40%
Ura will begin this phase by casting Return and then trapping everyone in Bubbles. This must be Dispelled by the player holding melee shard.
If Ura used Pressure Blast just before this transition, this player should keep their shard and use it to save both the targeted players and the rest of the group.
Continuing the Ranged Rotation
The ranged group will overall have an easier time managing Toxics in this phase, since their cooldown will increase from 12 to 24 seconds, no longer requiring double sharding.
The order of geysers will restart from #8. Depending on how fast you were in the previous phase, you can begin this one in several ways:
- If you have high DPS, you will not get #9. If #8 spawns during the transition, reset it once with CC, wait for it to regenerate, then reset it a second time and
Dispel it. You can then continue the rotation from #9 normally.
- If #9 spawned but not #10, then it is convenient to wait until #8 spawns and then double drop #9 into #8. You can then continue the rotation normally from #9 when it respawns.
- If you get #10, you can double drop #9 into #8 as in the previous point, and then do #10 into #9 when #9 respawns (resetting #10 in the meanwhile if it becomes annoying). You can then continue the rotation normally from #10.
- If any more geysers are spawning in the first phase, then you will have time to double drop #9-#10 in the first phase. However, you may have a serious DPS issue which should be addressed before progressing.
Managing Titanspawners
Ura will use Create Titanspawn Geyser immediately after Return and as part of her rotation thereafter. Players should try to dodge the Knockback; as soon as the skill cast is done, the squad should move to the Titanspawn Geyser’s location to quickly
Dispel it and burst it down.
Remember to pick up the Bloodstone Shard!
After the Titanspawner is dead, the squad should restack at the boss, and try to kill the Champion Fumaroller while still damaging Ura. Fumarollers target players and their summons; to draw one close enough to cleave, it is beneficial to stack opposite Ura from them and recall summons/pets. Future casts of Create Titanspawn Geyser should be handled in the same manner.
Ideally the Titanspawner should be killed within 15 seconds, so that it doesn’t spawn a second Champion Fumaroller. Since these adds inflict large amounts of crowd control and damage, having multiple can quickly snowball the fight out of control.
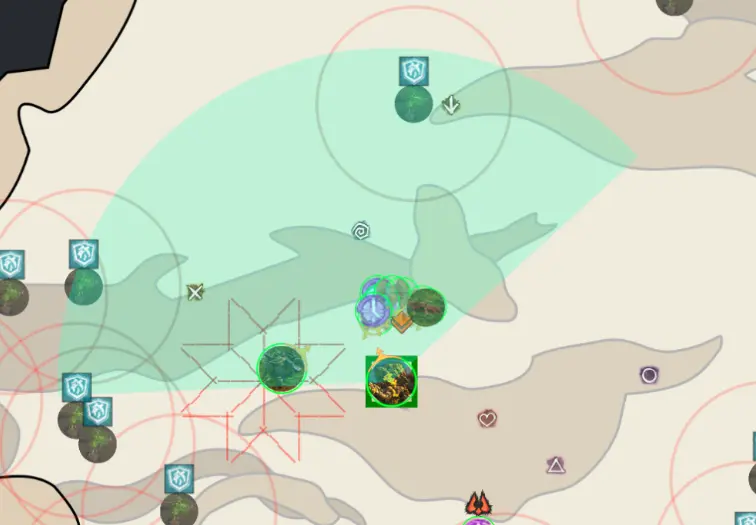
Placing Sulfurics
Sulfuric Geyser casts will start in this phase, targeting random players. Depending on where the player is standing, they will want to run out and drop them at different locations.
Below is a map that shows areas which are good locations to drop Sulfurics. Alternatively, HasKha’s Marker Pack also has indicators for safe sulfuric drop zones which are extremely useful.
Players should try to avoid running out in the North-East direction as the Toxic Geysers #1 and #2 are so far out, that you cannot make the distance without movement skills. This can cause geysers to drop on top of #1 or #2, making the ranged group’s unnecessarily harder.
Conversely, the most convenient position to drop Sulfurics is to the North-West: there is a large area there beyond the spawning points of #9 and #12 that is often close to the stack. This is further facilitated by the squad facing Ura in that direction (see tanking Ura).
Players will gain Superspeed whenever they are targeted, which lasts right up until the final drop position is reached. The geyser will then spawn after a short time interval. Players can use this to know exactly when they can return to the stack.
If you have movement skills, always use them to get away from the boss and don’t save them to get back quickly; getting further away and placing the geysers in safe spots is more important.
Chronomancer and
Troubadour players running rifle should try to provide returning players with a
Dimensional Aperture (Rifle 5) to quickly bring them back to the stack.
Managing the Steam Prison
Steam Prison should be placed far enough from the boss so that players can navigate around her without danger of going inside the arena.
Pay attention to not overlap the arena with any other structures, such as Toxic Geysers! This becomes extremely importand in Legendary Mode, as the arena will reflect CC skills such as Distracting Throw.
For the most part, players can turn 180° degrees and run away from the boss immediately. A few seconds before the arena becomes active, its position becomes fixed. Within this brief period you can use a movement skill or Superspeed to get out of its area before becoming trapped. This removes the need for
Stability, but requires precise timing. Try to practice this, as being stuck inside the arena in phase 3 and onwards can quickly become fatal.
Other Important Information
It can happen in this phase and the following that Pressure Blast overlaps with Create Titanspawn Geyser or Sulfuric Geyser cast and you have a Bubble on the Titanspawner and one on Ura; especially if the tank is one of the targets!
Each player who gets targeted should always look for the other immediately and move to a convenient position together. In the case of a Titanspawner and Bubbles overlap aiming to free the players on top of the Titanspawn Geyser itself is most efficient; this allows players to Dispel both the Bubbles and the spawner with one shard.
Phase 3
40% - 1%
Once Ura hits 40%, she self-interrupts and will immediately cast Pressure Blast. This transition can be very hectic, especially if it occurs in proximity to Create Titanspawn Geyser, as melee shard management becomes difficult. Calling it out in voice helps players prepare for the Bubbles and not be caught off-guard.
Starting from this phase, Ura has access to all mechanics from the previous two phases; including Propel, it is therefore necessary to tank her and only CC at specific intervals.
The melee group will have to handle both Pressure Blast and Create Titanspawn Geyser for the rest of the fight. In particular, managing the Bubbles as soon as possible is important to make the skill to go on cooldown.
Continuing the Ranged Rotation
The transition into this phase resets Toxic Geyser spawn patterns: #7 will spawn immediately and the timer will be reset. This means the ranged group may have to handle two Toxics in rapid succession.
This can be managed by double dropping whatever geyser is currently active into #7, or vice versa if convenient. Alternatively, since #7 is relatively remote, it can be convenient to do #7 into #8 to gain a bit more buffer before continuing the rotation normally.
Preventing Propel
In the third and fourth phase, Ura regains access to Propel. It is possible to entirely prevent her from casting this skill and keep her stationary in a central position. This allows for easy access to Titanspawn Geysers, safe drop-points for Sulfuric Geysers, prevents her from entering the area of Toxic Geysers and Sulfuric Geysers, and by extension also increases damage uptime.
The reason why this is possible is that Ura has many skills with a higher priority than Propel. The table below contains rough times for several of her skills:
| Skill | Priority | Cooldown [s] | Cast Time [s] | Aftercast [s] |
| Pressure Blast | 1 | 25 | 5 | 1.5 |
| Create Titanspawn Geyser | 2 | 30 | 5 | 2 |
| Sulfuric Geyser | 3 | 20 | 5 | 4 |
| Steam Prison | 4 | 15 | 7 | 5 |
| Propel | 5 | 12 | 4 | 2 |
The total cast time for all of the higher priority skills comes down to around 34.5 seconds: enough for the first one cast to come off cooldown as the last ones are concluding. This means that there will always be a higher priority skill in Ura’s queue, which will always be selected over Propel.
Ura can still use her jump in situations where she goes through her skill queue faster than usual, which can happen in two conditions:
- If a higher priority skill is skipped due to having no valid targets.
- If a higher priority skill gets interrupted, removing the skill’s cast and aftercast from the queue.
To avoid these two situations, the appropriate countermeasures are: tanking Ura and controlling when her defiance is broken.
Tanking Ura
A “tank” is necessary to always provide a target for Ura’s high priority skills so that she does not skip them to cast Propel. The designated tank should stand at all times in front of the boss, within a 400 range, in a 140° cone.
The tank should not move from this position except if they are targeted by mechanics such as Sulfuric Geysers, Steam Prison, and Bubbles. In this case, they should call for a backup, which is usually provided by a member of the ranged group. They should always prioritize these mechanics over tanking.
In any situation where the tank is targeted by Bubbles and the other targeted player is not on the boss (such as if they are dealing with a Titanspawner), the tank should always move to the other player and call for a backup.
Whenever Ura chooses a random target for Steam Prison and Sulfuric Geyser, she will rotate to track this target: the tank should always be ready to reposition accordingly. This can also be used to face the boss in certain directions. For example, facing her North-West places the stack the shortest possible distance from safe Sulfuric Geyser drop zones.
When to CC Ura
Breaking Ura’s Defiance Bar at an incorrect time can free up her skill queue, causing a cascade effect leading to a Propel.
flowchart LR
    %%{init: {'themeVariables': { 'edgeLabelBackground': 'transparent'}}}%%
    linkStyle default stroke:#e0be00,stroke-width:3px,color:#fff,font-size:13px,background-color:#212325
    classDef grey fill:#686868,stroke-width:0,color:#fff
    classDef default fill:#212325,stroke:#e0be00,color:#fff
    classDef green fill:#164500,stroke-width:0,color:#fff
    classDef red fill:#801300,stroke-width:0,color:#fff

    broken("`Defiance
    Broken`")
    cancel(["`Cancel
    Current Skill`"])
    available("`Is a skill
    available?`")
    next(["`Cast Next
    Skill`"])
    propel([Propel])

    click propel "mechanics.html#propel"

    broken --> cancel
    cancel -->|"`Check
    Cooldowns`"|available
    available -->|Yes|next
    available -->|No|propel

    class broken,available grey;
    class propel red;
The best moments to CC Ura correspond with the following skills:
- Create Titanspawn Geyser - once in the air, and up to 5 seconds after she lands. The safest moment to CC.

- Steam Prison - once she lowers her arms and the arena becomes active, for 3 seconds.

- Sulfuric Geyser - once the indicator starts, which is roughly when she has stretched her arm out front fully, for about 2-3 seconds.
It is not recommended to CC during Pressure Blast as it is the most difficult timing.
Ura’s transition into the third phase also counts as an interrupt, which can have much of the same effect as CCing at the wrong time. This is difficult to play around, as controlling the timing of the phase to such a precise degree is basically impossible with
Condition classes.
The probability of this leading into a Propel cast can be reduced by not CCing Ura in proximity of the transition.
Post-Heal
16 - 0%
On reaching 1% health, Ura will become Invulnerable, clear all
Conditions from herself, and heal by 15% of her maximum HP.
This transition also counts as an interrupt for the purposes of preventing Propel, but is less likely to lead to a Propel cast as it also includes a lengthy animation.
Immediately after the transition, there will always be an additional Titanspawn Geyser spawning independent of the Create Titanspawn Geyser skill. Groups progressing this phase may decide to kill only this titanspawner and additionally 1-2 others, but experienced groups with good Stability uptime commonly ignore all titanspawners that are not on top of the boss, instead focusing on damage uptime and dealing with Champion Fumarollers as they come.
In this phase, Ura will start targeting two players with Sulfuric Geysers instead of one per cast. It’s best to drop the Sulfuric Geysers next to each other instead of in two different spots to use the space efficiently. It is also convenient to orient Ura towards geysers #9 and #12 ( and
) to reduce the distance players have to travel to get to the safe areas.
The Toxic Geyser pattern simply continues from the previous phase without interruptions. The ranged group can continue doing the first few as usual if necessary, but experienced groups will usually ignore Toxics far from the boss as the group gets closer to a kill and they become less relevant, unless they are attempting the No Geysers, No Problem achievement.