Return to Home Return to Overview Mechanical Reference
Greer Recommended Strategy
Table of Contents
Greer is a hectic fight that requires constant attention to mechanics, careful positioning, and on-the-fly decision making and adaptation. For these reasons, it is recommended to play using voice chat.
This is an in-depth guide: if you are looking for something fast to read and less comprehensive, check out the Greer Fast Guides.
All markers referenced in this guide can be set up with the Commander Markers module for Blish HUD, using the marker pack provided below.
Click to view markers
 Paste the following code into Commander Markers to use this marker pack:
eyJlbmFibGVkIjp0cnVlLCJuYW1lIjoiR3JlZXIgQ00geGIiLCJkZXNjcmlwdGlvbiI6ImRlc2NyaXB0aW9uIiwibWFwSWQiOjE1NjQsInRyaWdnZXIiOnsieCI6MC4wLCJ5IjowLjAsInoiOjAuMH0sIm1hcmtlcnMiOlt7ImkiOjEsImQiOiJtYXJrZXIgbmFtZSIsIngiOjM3My40NDgxODEsInkiOi0yMzIuNTQ3MjExLCJ6Ijo3Ny40MTg1NX0seyJpIjo0LCJkIjpudWxsLCJ4IjozOTEuMDg5NCwieSI6LTIzMi44NzAxNDgsInoiOjc3LjU2MzY0fSx7ImkiOjcsImQiOm51bGwsIngiOjM4MC40NiwieSI6LTI0MC4zODM3NzQsInoiOjc3LjUzOTAyNDR9LHsiaSI6MywiZCI6bnVsbCwieCI6MzU5Ljk5NSwieSI6LTE4Ny42NTAxLCJ6Ijo3Ny4zOTU1MTU0fSx7ImkiOjIsImQiOm51bGwsIngiOjM1Mi4wNDc2NjgsInkiOi0xNTEuMzcxNDQ1LCJ6Ijo3Ny4zOTE3NTQyfSx7ImkiOjgsImQiOm51bGwsIngiOjM4OC4wODYzNjUsInkiOi0yNDMuMDk3NjI2LCJ6Ijo3Ny41NTQwMX0seyJpIjo1LCJkIjpudWxsLCJ4IjozNzMuNzU3MDE5LCJ5IjotMjQyLjU2ODU3MywieiI6NzcuNTc5MjN9XX0=
Main Points
- Groups must choose between a full
Power or full
Condition composition.
- Supports provide
Aegis and
Stability for most mechanics.
- Projectile management is required to avoid granting too much
Empowered.
- Careful positioning is used to stack the boss and various adds in advantageous positions.
- A tank is used to occupy the boss in the final phases of the fight.
- The last 10% is a tight DPS check.
Composition
Two strategies are commonly played on the encounter: one with a dedicated tank for the entire fight, and one that uses a tank only in the last 10%. Here we will focus only on the non-Tank version, because it’s the most frequent in pug runs. This strategy, commonly called “cozy strat”, typically uses the following composition:
- Two healers, usually
Chronomancers or
Troubadours, provide important defensive utility.
- A bubble to provide projectile blocks, usually a
Herald or
Firebrand.
- A 10% tank, usually played by a Celestial-hybrid
Scourge,
Specter or any other sufficiently tanky build.
- Six damage dealers.
Healers should focus on providing enough defensive utility to manage all of Greer’s attacks: Stability and
Aegis uptime is fundamental, while boons, CC, healing and access to
Invulnerability for Blobs of Blight are extremely useful.
Chronomancer is the classic pick here due to
Well of Precognition being a natural counter to Stomp the Growth, but
Troubadour provides similar utility with better healing, and can bring
Tale of the August Queen to simplify certain mechanics.
A bubble player is required to manage the copious amount of projectile denial the encounter mandates. This is easiest done by a Herald running
Legendary Centaur Stance, with the
Chronomancers providing backups with
Feedback, but
Firebrand is an alternative pick with higher overall damage and difficulty.
Finally, Scourge is commonly chosen as a tank, usually as a celestial boon provider, due to its high survivability and utility with
Corrosive Poison Cloud and
Signet of Undeath. Alternatively,
Specter has higher damage and can carry CC for the squad using spear’s
Distracting Throw, at the cost of revive power.
Power vs. Condition
Due to how the lesser titans provide boons throughout the encounter, it’s typical to use either a full Condition, or full
Power based squad. By default, enemies will be affected by both
Protection and
Resolution, however:
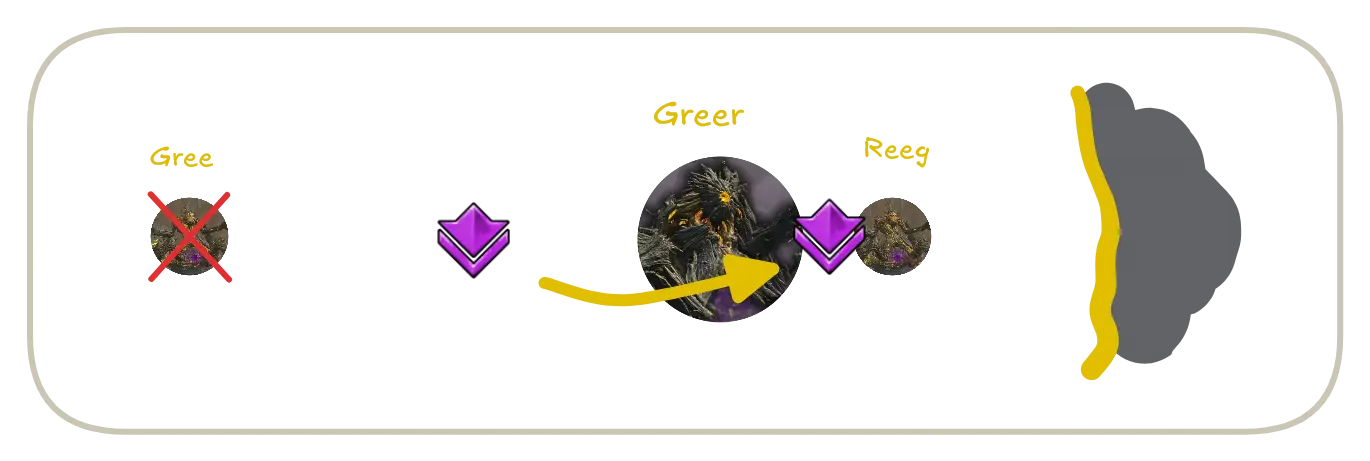
Power compositions can kill Gree first to remove
Protection from all enemies.
Condition compositions can kill Reeg first to remove
Resolution from all enemies.
The choice of composition brings about a noticeable difference in positioning: each strategy will start the fight next to the lesser titan that grants their antagonistic boon, and will focus them down at the beginning of every burn phase and split phase. Apart from this, roles and mechanics function equally for both.
In the following, we assume a Condition based composition. Power compositions can mirror the same strategy with different starting positions and prioritization during split phases.
Hybrid compositions are universally avoided, as it is infeasible to kill both Reeg and Gree, and one of their damage components will be impacted by the titan they leave alive. Similarly, builds that have a hybrid damage profile (such as Condition Virtuoso) will struggle to provide comparable DPS on this encounter.
Builds and PoVs
This is a non-exhaustive list of playable builds on the encounter. If anything is outdated, you can find up-to-date information on Void Lounge.
| Build | Role | PoV | Last updated |
| Heal & Mechanics | PoV | September 2025 | |
| Heal & Mechanics | PoV | February 2026 | |
| Celestial BoonDPS, Tank | PoV | June 2025 | |
| BoonDPS, Tank | February 2026 | ||
| BoonDPS, Bubble | PoV | April 2025 | |
| BoonDPS, Bubble | PoV | September 2025 | |
| DPS | PoV | June 2025 | |
| DPS, Tank | PoV | April 2026 |
First Phase
Beginning of the Phase
The very first part of the encounter aims to quickly phase Reeg and position the squad towards the center of the arena. This is complicated by the dangerous high-priority mechanics that Greer always uses at the start of the phase: Greens, Blobs of Blight, and Enfeebling Miasma.
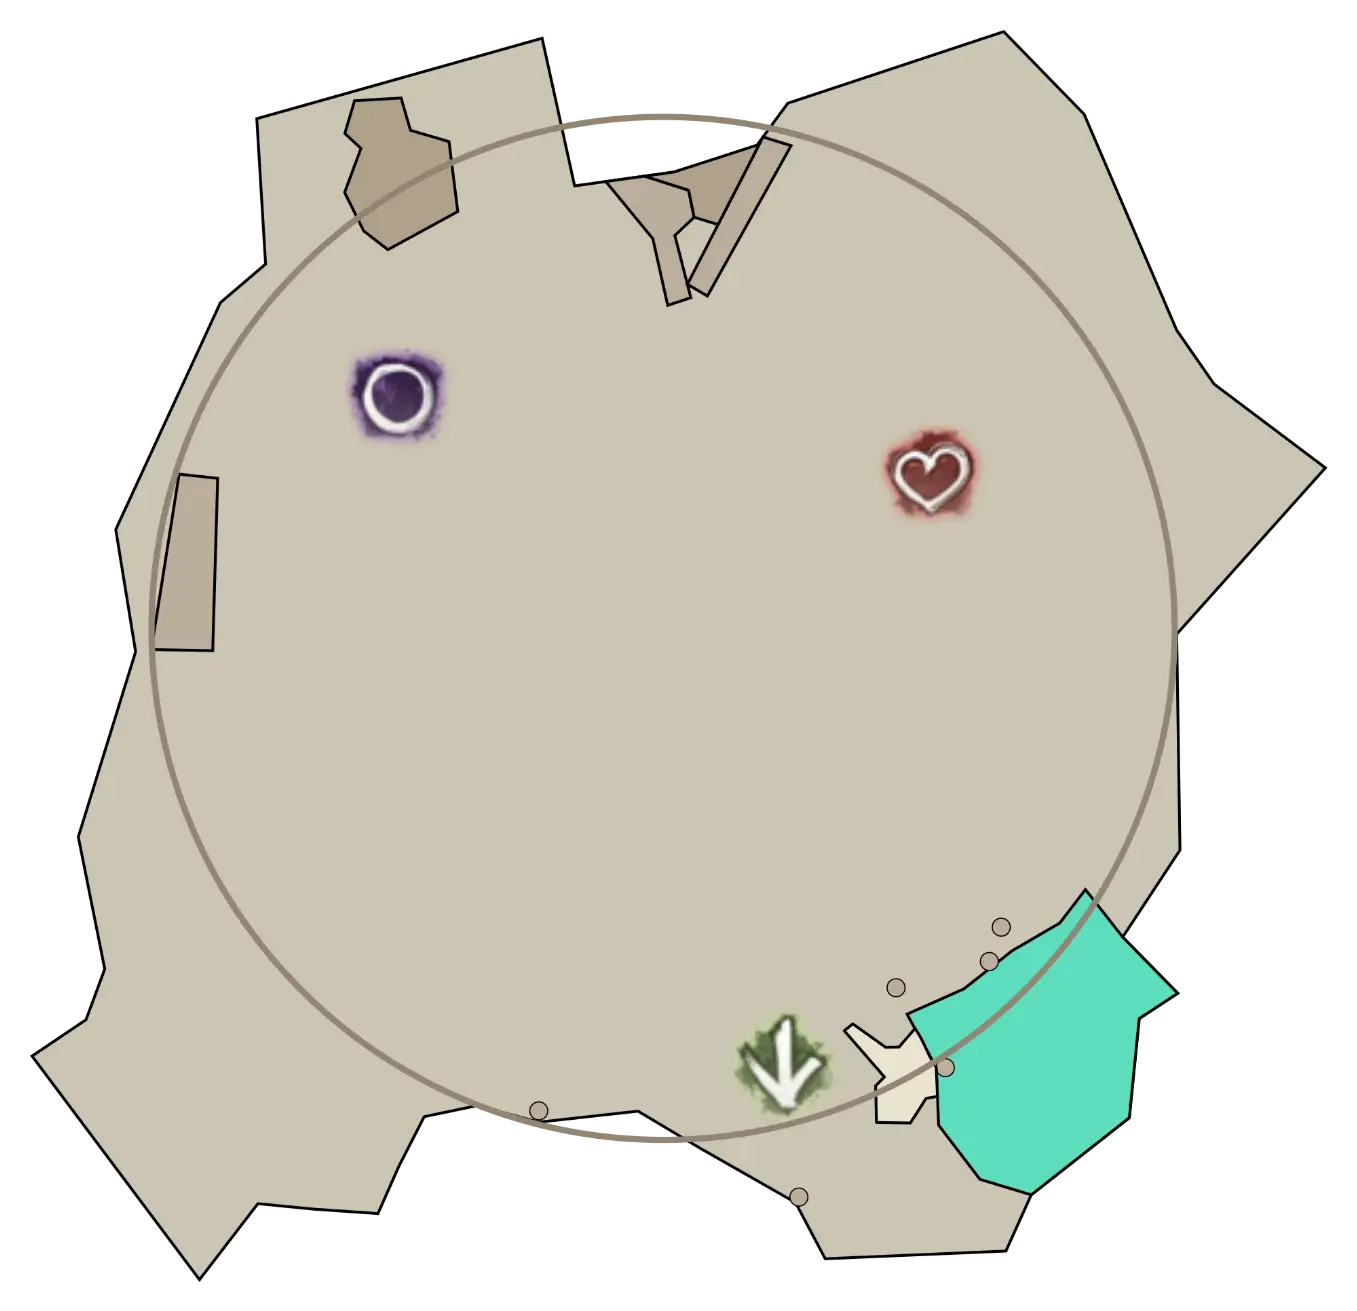
Groups will usually start on the ledge to the right-hand side when entering Greer’s arena: simply jump down to begin. Reeg will spawn in shortly; stand between him and the wall and DPS him down.

A healer will usually deal with the first set of Blobs of Blight coming from Greer. This can easily be done with Distortion, or alternatively you can use a combination of dodges and
Imaginary Inversion to evade all three orbs while conserving clones to provide additional boons for your DPS’s openers.
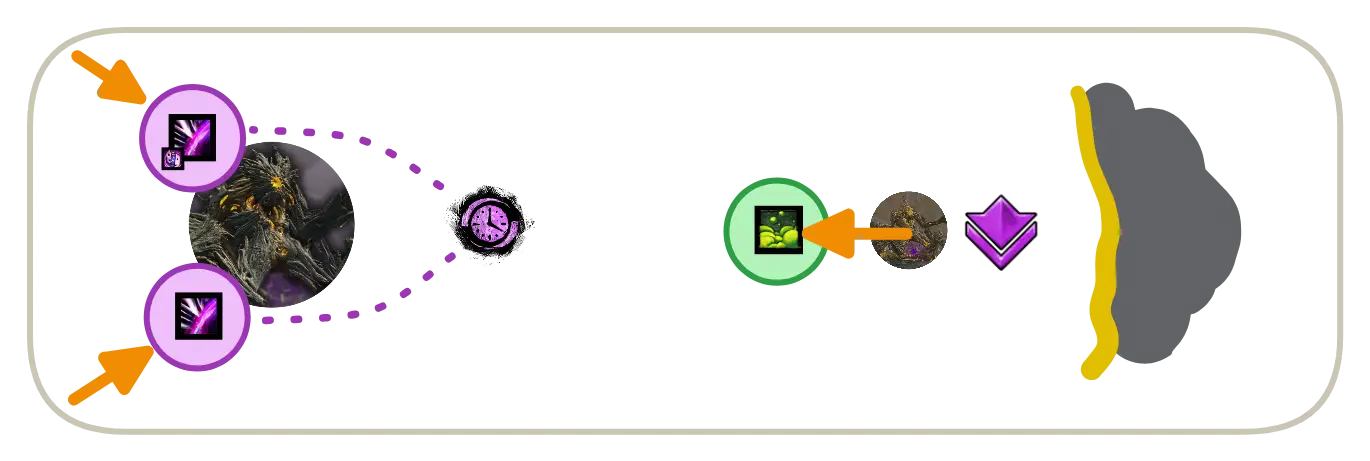
In experienced groups, this is usually done by a Chronomancer that will have the additional responsibility of blocking the first set of Empowering Blasts originating from Gree and Ereg. This is done by using
Continuum Split to double-cast
Feedback so that both directions are covered. The orb originating from Reeg is usually blocked by the bubble player or another player with projectile disruption skills.
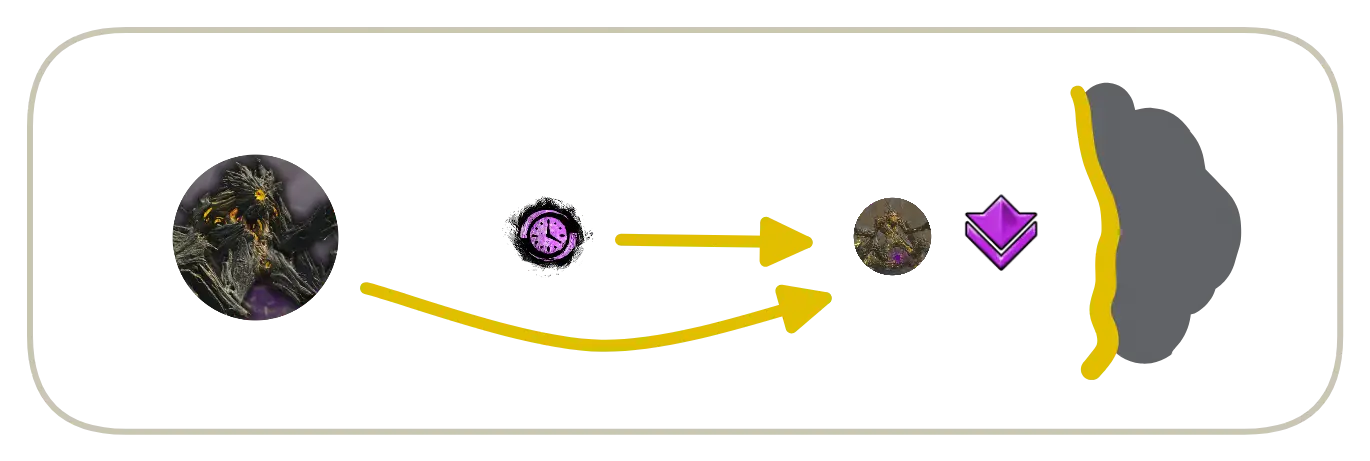
If neither healer is feeling confident with this maneuver, then the bubble player can follow them while they are deleting the first set of Death Orbs and then block the Empowering Blasts themselves. However, this usually severely hurts the squad’s overall boon uptime in the opener, as they will be lacking Quickness.
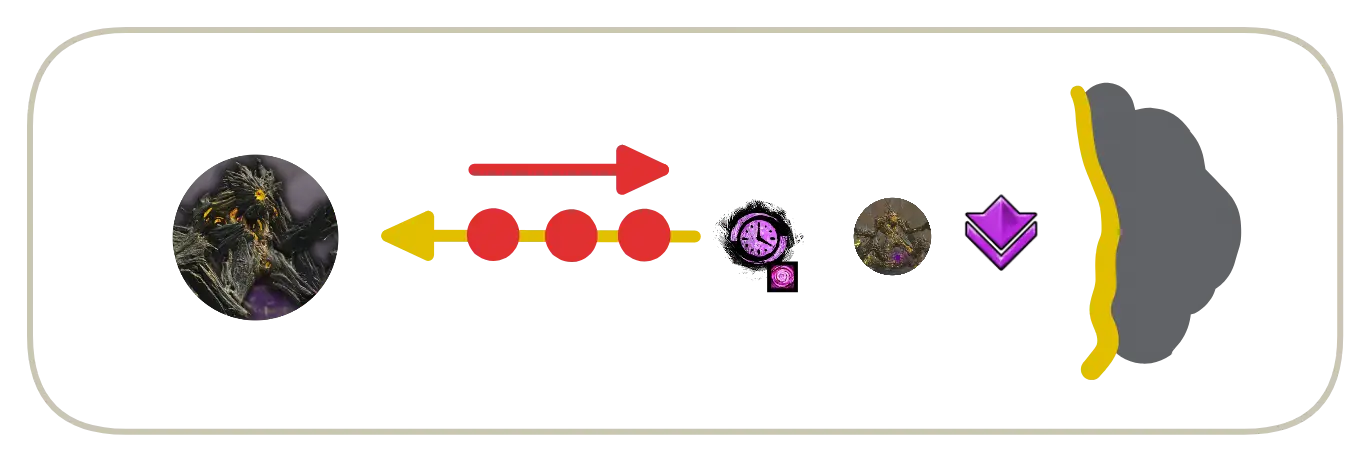
Whoever blocked the Empowering Blasts is also responsible for luring the boss close to Reeg. In order to do this properly they should stay more than 900 range from Greer, otherwise he will start using his melee attacks, delaying his movement. Vice versa, if you get to him too late, he will start casting ranged attacks such as Rain of Spores and Greens before moving. The key to a successful bait is to start moving early and get back to the group as fast as possible.
![]() Chronomancer PoV
Chronomancer PoV
Quickly stacking Greer next to Reeg can massively increase your squad’s overall DPS, and positions him in a comfortable position for the rest of the fight. For this reason it’s important to bait him properly, but the rest of the squad should also stack on the other side of Reeg so that he gets as close as possible.
Meanwhile, the squad at Reeg will have to solve a pair of Greens while bringing the add down to 75%, at which point he despawns. Once Greer is close enough, you can stand between the two and cleave both.

At this point, the bubble player needs to pay attention and regularly block the Empowering Blast coming from Gree and Ereg in order to not grant any Empowered stacks. Whenever they can’t block for any reason, they should call for backup in voice, and other players will backup projectile disruption, usually with
Corrosive Poison Cloud or
Feedback.
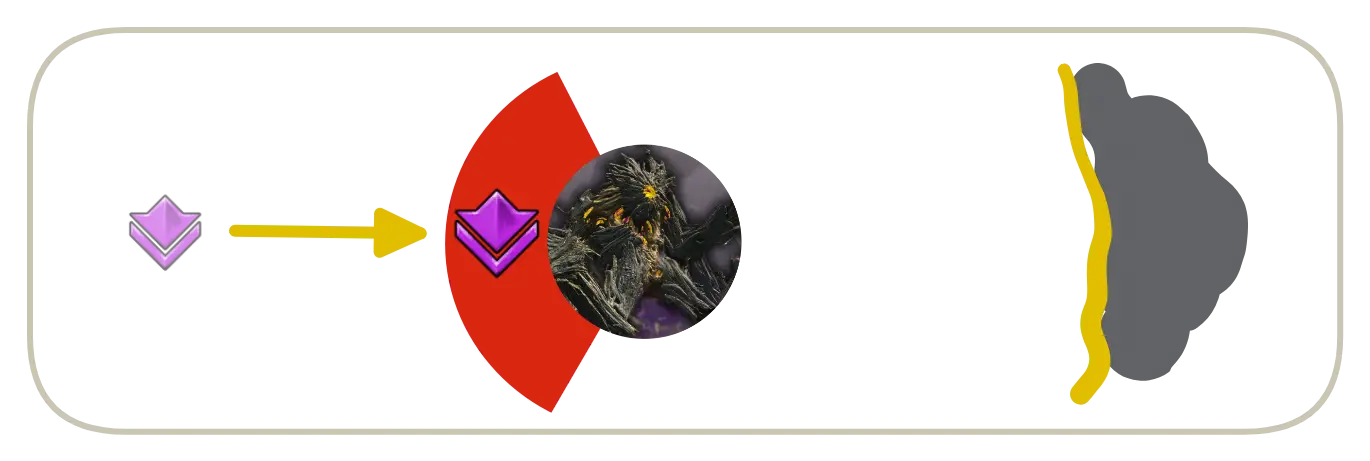
Stay on the outside of Greer until he uses Enfeebling Miasma, baiting it towards the wall. Once he casts this skill, dodge through his hitbox to the safe side. Roughly at the same time, the second healer needs to be ready to Distort the second set of Blobs of Blight coming from Ereg from the North-East.
If the Enfeebling Miasma is cast early and Reeg has not despawned yet, you can stack inside of Greer’s hitbox to finish him.
Main Body
After the opening sequence, Reeg should be dead, Greens solved, Blobs of Blight deleted and Enfeebling Miasma painting the wall. Most of these skills have a long enough cooldown that you won’t have to deal with them until the next phase.
Thus follows the main component of fighting Greer. For the healers this revolves around providing Stability for the Sweep the Mold (or sidestepping if none is available) and using
Singularity Shot to provide barrier for Stomp the Growth. Since
Well of Precognition has a long cooldown, so save it for when you need emergency
Stability, or the boss has many stacks of
Empowered.
It’s important that the squad is stacked tightly so that everyone has access to these boons (especially for Well of Precognition). If any of the healers don’t have defensive utility ready, communicate it in voice so that people can use their dodge. It’s not as important in the early phases when Greer doesn’t deal much damage, but it becomes crucial later on as
Empowered slam attacks can very quickly wipe an unprepared squad.
For the bubble player, they should always be ready to block Empowering Blasts, calling for backup when they don’t have projectile destruction ready.
When Greer uses Cage of Decay, all players should sidestep the arrows. These pulse Knockback fast enough that most forms of
Stability are ineffective.
Once Greer hits 80%, he will gain a Defiance Bar, becoming
Invulnerable until it is broken, which also spawns several Elite Empowering Beasts. Players should be ready to handle the additional Empowering Blasts these adds generate.
This phase continues until 65%, when the first split phase begins. If damage is on the lower side, you may have one final set of Blobs of Blight coming from the North before transitioning.
First Split Phase
At 65%, the boss will become untargetable and the first split phase begins. Conditions will keep ticking on Greer, so no damage will be wasted.
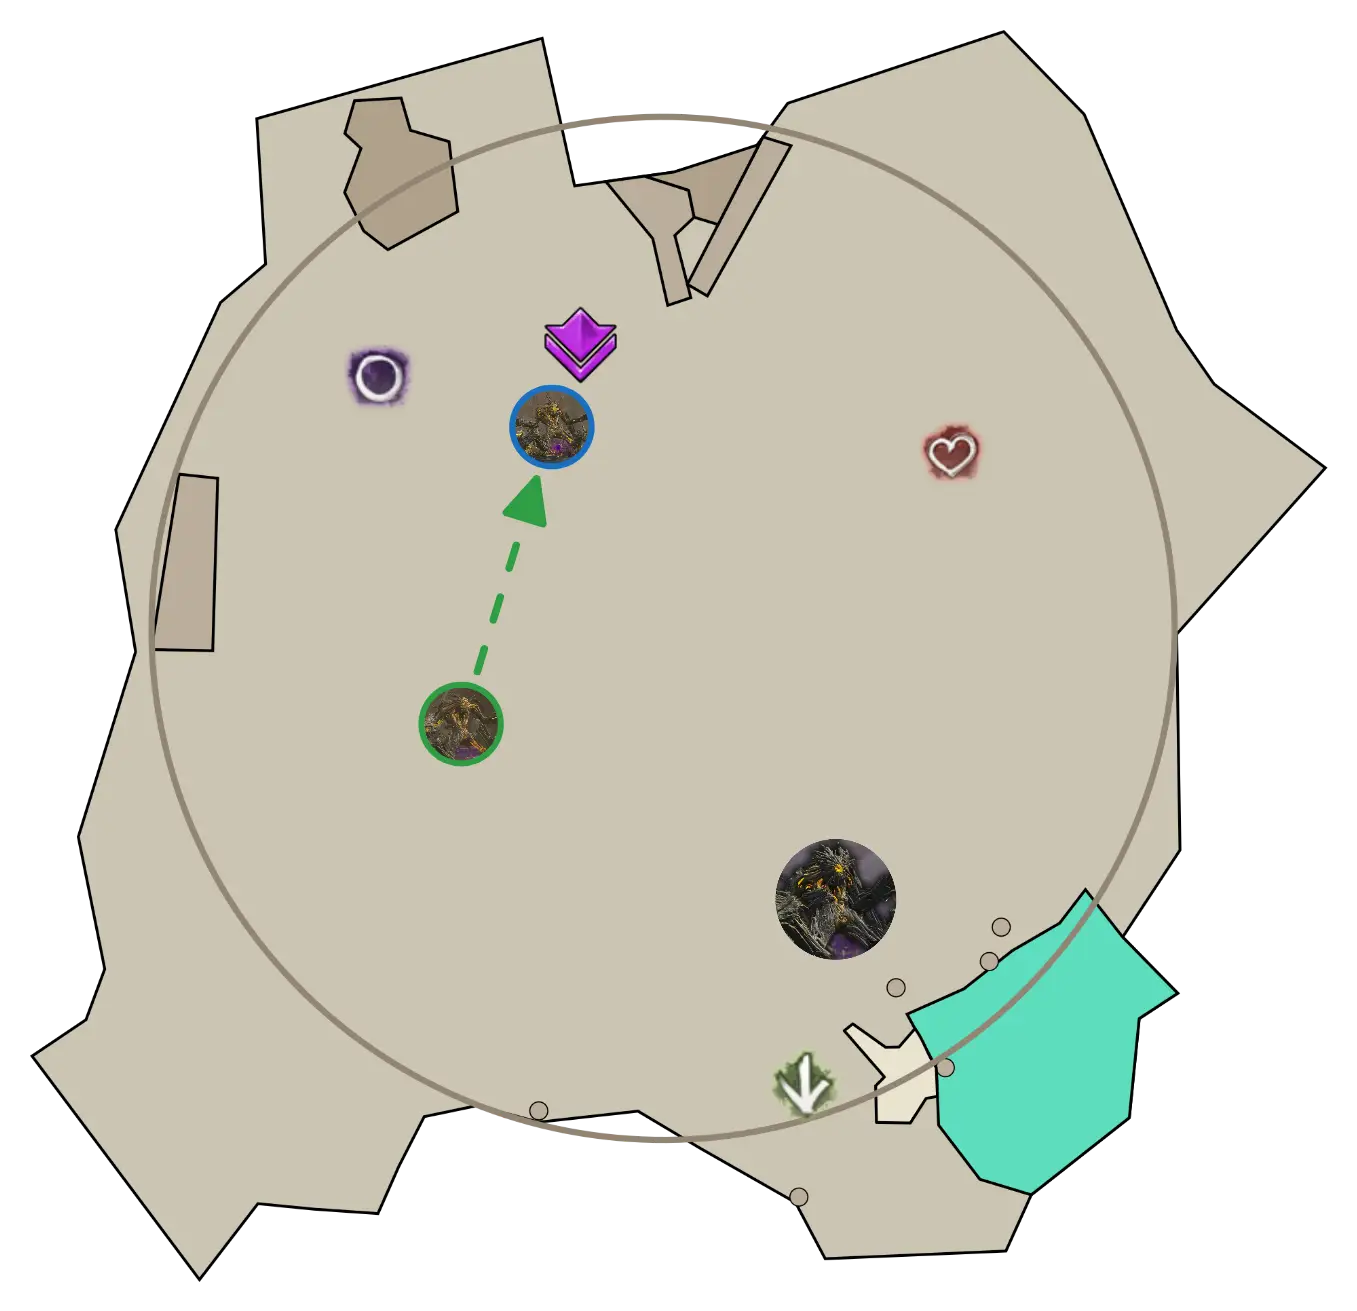
Everyone in the squad will go to Reeg, located on , Except for one player, who will go to Gree on
to capture his aggro and drag him towards the rest of the group on Reeg. This is often a healer or the 10% tank.

Depending on the situation and your DPS, Ereg may cast Blobs of Blight at the end of the previous phase. If this happens, it may be convenient to send a healer to , and let them
Distort the orbs (see here). Otherwise, Ereg will use this skill at the beginning of the split phase, in which case it’s better to keep both healers on stack (see here).
To bait Gree properly and quickly: keep some distance in order to not trigger his melee attacks, similar to baiting Greer at the start of the fight. Gree may use his Ripples of Rot attack, which must be avoided at all costs; if it is cast, just run away, regroup and after the attack is over go back to melee range.
Both Reeg and Ereg can cast Blob of Blight on the squad at this time.
The healer on the stack needs to Distort the Blob of Blight from Reeg. If the Blobs of Blight from Ereg are delayed, they may need to be dodged by the entire squad. If the dodge is failed make sure to immediately walk away; standing under a stationary orb will quickly kill you.
Additionally, there will also be Greens that need to be played at the same time.
There is a high chance that the player who’s baiting Gree gets targeted by a Green as well: it is convenient to dodge it as they will be off-stack. Heal Mesmers running spear can use use
Imaginary Inversion into Dodge for a longer evasion period to make this easier.
Reeg and Ereg will constantly use Rain of Spores, blasting everyone with projectiles. This can be mitigated by having projectile blocks up, communicating accordingly to always have some ready.
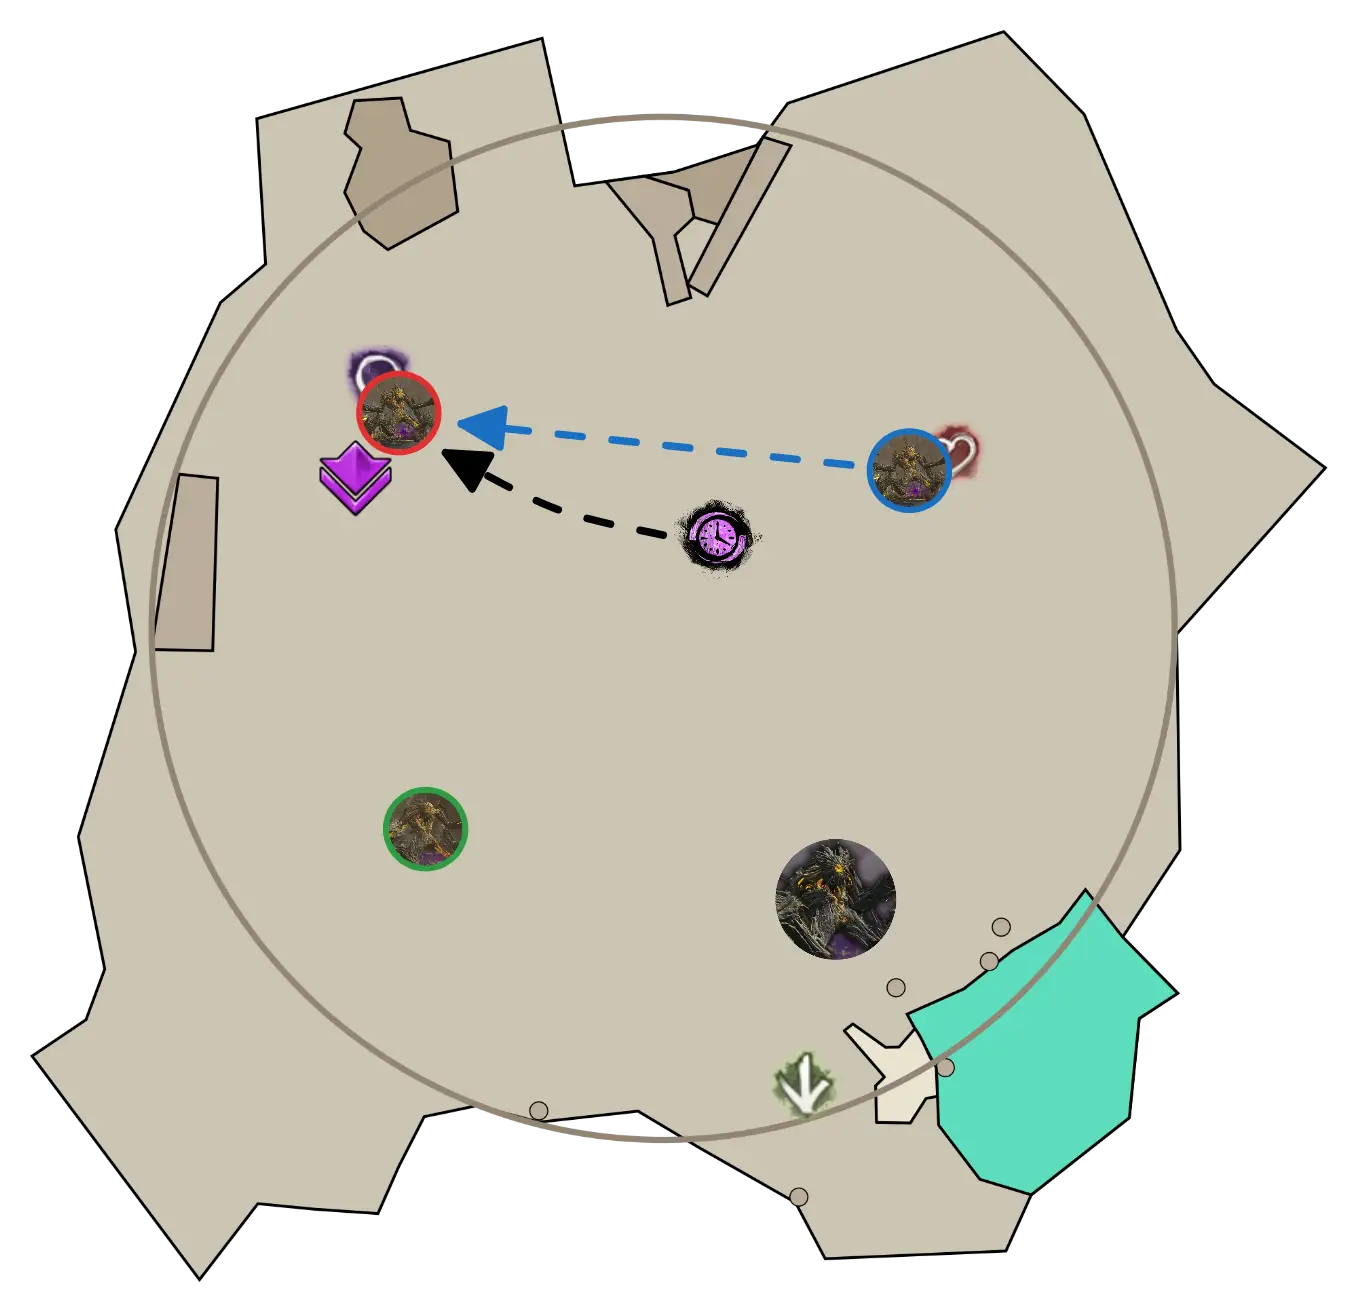
After Reeg has disappeared or is close to disappearing (usually around 56% HP), the focus shifts to Gree and Ereg. Move to Gree and position on the far side of him compared to Ereg. This will bait Ereg to stand on top of Gree, so that you can cleave them together.
If you are doing the achievement to keep Ereg alive, you will only focus Gree, otherwise you can damage Gree until Ereg comes into melee range and then switch, as Ereg will be less healthy at this point.
Soon after getting to Gree, Ereg will cast Enfeebling Miasma. When the cone indicators appear, dodge through the miniboss to the safe side.
Gree will constantly use Sweep the Mold and Stomp the Growth. Provide Stability for the first and
Well of Precognition for the second. Furthermore, Gree will also use the Cage of Decay. Try to always move out of the arrows, as
Stability is not useful with them.
The Arrow projectiles from Cage of Decay stop at the edge of the arena and don’t travel their full distance: meaning when Gree is standing close to the edge of the arena, the large boon corrupt AoE can instantly appear under the squad. For this reason it’s crucial to immediately go toward the inner side of Gree when you see the arrow indicators.
Second Phase
Beginning of the Phase
Once Gree hits 50% hp, the split phase is over. Ereg will despawn, all three adds will re-appear in their original positions and Greer will become vulnerable and start attacking again. The first attack will always be Blob of Blight, so when running back to the boss one healer should be ready to Distort them. Everyone else should run stacked together behind them.
Then follows a sequence that is similar to what happened at the beginning of the encounter. Run past Greer to Reeg, who spawns at his original position next to Greer again.
Very shortly after, there will be a few Greens that need to be solved.
- a single
two-person-green from Reeg
- two
three-person-greens from Greer

If they are desynchronized you can solve all of them relatively easily by stacking the two-person green on top of one of the three-person ones. If they happen simultaneously, it’s better to dodge the two-person-green and solve both three-person-greens. The reason for this is that the three-person-greens give Empowered stacks to the boss when failed, while the two-person-green will give them to the lesser Titan.
It is important to provide Stability while these Greens are happening, since Greer may also cast Sweep the Mold and Stomp the Growth while they are being solved. Be careful to not dodge out of Greens while avoiding the shockwave.
Once greens are done and Reeg is dead, wait for Greer to cast Enfeebling Miasma, then dodge through his hitbox to the safe side.

Main Body
The rest of this phase is similar to the first phase. Deal with mechanics appropriately:
Distort the Blobs of Blight
- Provide
Stability for Sweep the Mold.
- Provide
Aegis or barrier for Stomp the Growth.
- Continue blocking Empowering Blasts.
A Defiance Bar appears again at 50%. Upon breaking this bar, Elite Empowering Beasts will spawn again, and cast Empowering Blast toward Greer; make sure to block all of these and communicate if any backup projectile block is needed.
This phase continues until 35%, when the second split phase begins.
Second Split Phase
The second split phase is similar to the first. The squad will go to Reeg again, while one player has to bait Gree to the group.
If you’re keeping Ereg alive, simply ignore him, otherwise try to focus him down as soon as he’s in melee range.
This time, the phase ends when Reeg and Gree are fully dead. If Ereg is still healthy, the squad should remain on him until he is low, while the tank can go distract Greer. In this case, pay attention to any Blobs of Blight incoming from the boss.
Third Main Phase
Beginning of the Phase
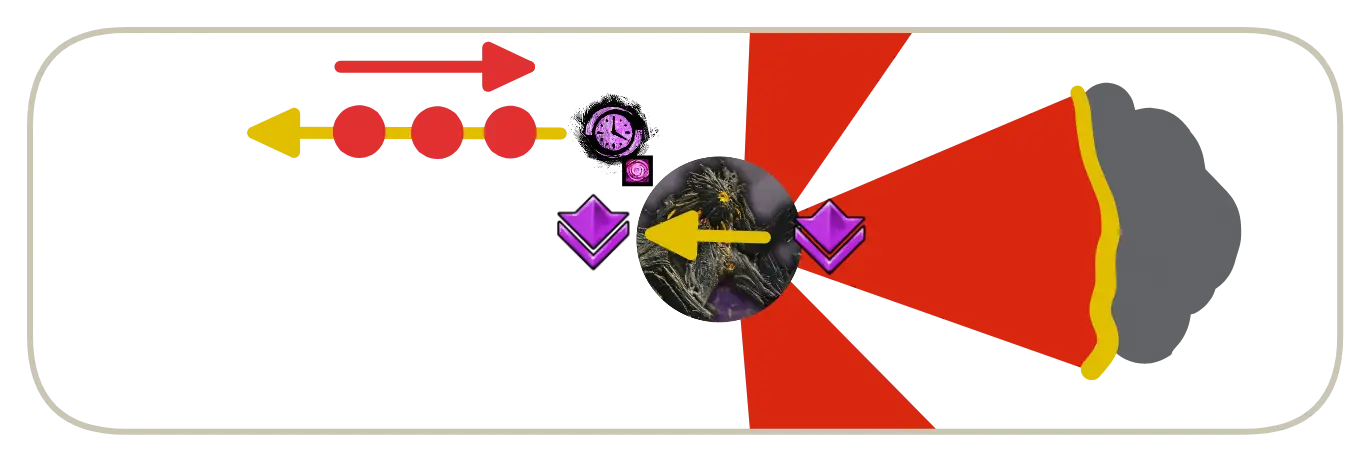
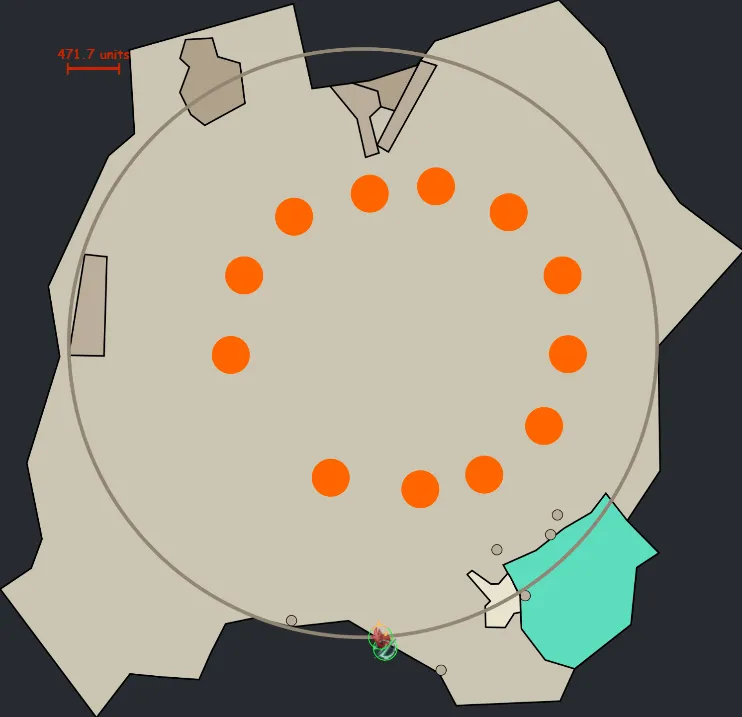
Greer will always open with Blob of Blight, followed by Eruption of Rot. This will be a set of 3 three-person-greens (often called "Triple Greens"). The easiest way to deal with this version of the mechanic is to stack them; all three targeted players should move out of melee range, off the stack, and dodge towards the boss. This will prevent any
Empowered on Greer and any players that are
Downed can be ressed.
Example of dodging triple greens
Alternatively, if you are running a Troubadour, they can completely negate this mechanic using
Tale of the August Queen: the targeted players should stack on top of the
Troubadour far from the main group, and can ignore the greens using the
Distortion this elite skill provides.
Timing wise, Ereg might also use his two-person-green, which can be solved on the stack. At this point, Ereg should be close to dying. With a
Condition based composition, you can leave Ereg and swap to Greer at around 7% of his HP.
At this point, there will be no more regular Empowering Blast, because all lesser Titans are dead. Since you don’t have to cleave Reeg, you can just walk directly to the boss and start DPSing him.
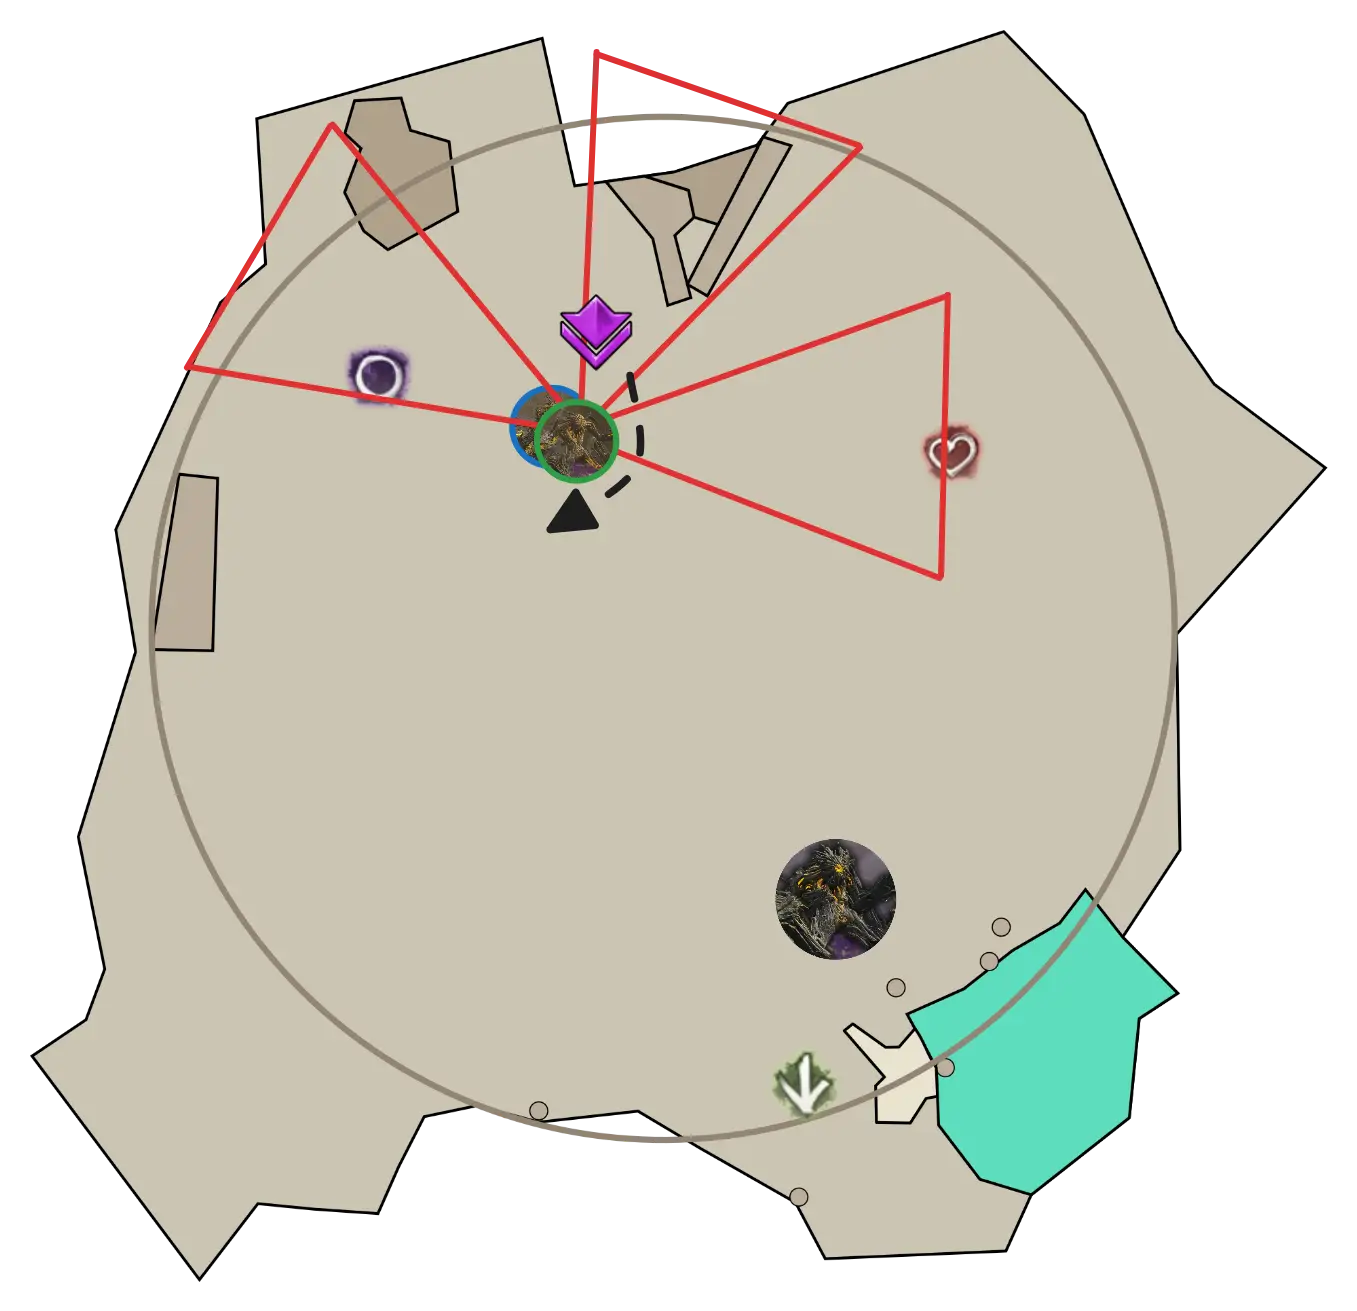
Tanking Setup Maneuver
At 20% there will be another Defiance Bar, and another set of Elite Empowering Beasts will spawn. Groups will usually take advantage of this breakbar to maneuver in preparation for the protoling phase. Once the bar appears, run through the boss and stand between him and the wall.

Once the bar is broken, Greer will turn around towards the wall where the squad is. Wait for his next Sweep the Mold, Stomp the Growth or Enfeebling Miasma: these skills all lock Greer in place for their animation, allowing the group to move back to the inside while the tank stays in place and keeps Greer’s aggro on them.

Once Greer reaches ~11% HP, the squad (minus the tank) should start moving away in preparation for the protoling phase. Conditions will bring Greer to 10% at which point the next phase starts.

Proto-Greerling Phase
Once Greer hits 10% he becomes Invulnerable and three Champion Proto-Greerlings (from here on called Protolings) will spawn at random locations in the arena. All three Protolings must be killed before Greer can be damaged again.
Tanking
The tank’s job is to keep the boss away from the rest of the squad and facing the wall. In order to survive, they should try to evade as many attacks as possible:
- Stand close to Greer and sidestep Sweep the Mold and Cage of Decay.
- Save your dodges and blocks for Stomp the Growth, making sure to jump (or dodge) the wave.
- As you are close to the boss, you will not be targeted by Blobs of Blight or Eruption of Rot. Call out when the mechanics are happening for your squad.
- Make sure to block projectiles from Scattering Sporeblast and Rain of Spores, as these can easily down you.
If you are unlucky and a Protoling spawns close and aggros on you, you may need to come back to the squad earlier. In this case, try to bait out Ripples of Rot. This skill is very dangerous, but has a long cooldown, so having Greer cast it early means that you will not have to deal with it later on.
Killing Protolings
Once the spawn positions are apparent, the squad should move either toward the furthest Protoling from Greer, or towards multiple stacked Protolings if there are any. Any ranged damage dealers can try to bait in extra Protolings that are far from the squad.
The Protolings will constantly spam these attacks:
- Scattering Sporeblast - dealt with by keeping projectile blocks up at all times.
- Sweep the Mold - managed bia
Stability and
Aegis or by sidestep the cones.
- Stomp the Growth - dodge through the caster to the safe side. Casts of this will often overlap, dealing a surprising amount of damage. In emergency situations, this can be mitigated using
Well of Precognition.
It is important to remain stacked throughout the entire phase as closely as possible to benefit from this defensive support and skills: players off the stack will die very quickly, losing valuable time and risking destabilizing the squad while reviving.
Communication of cooldowns for projectile blocks and Well of Precognition is important here. Blocking, sidestepping, and dodging the damage in this section can make or break a run. Stay close together and always use your dodge before you die from the next AoE attack!
Besides this plethora of AoEs, special attention has to be given to two attacks:
- Greer (and Ereg if he is alive) will cast Blob of Blight at some point during the 10% phase, so one of the healers needs to be ready to
Distort when this happens.
- Triple
Greens will also happen at some point toward the end of the 10% phase; Play these similarly to the ones before, by either stacking together, moving to a spot free from AoEs and slightly away from the boss, and finally dodging toward the boss, or negating them through baiting followed by
Tale of the August Queen.
Sometimes it can happen that the last Protoling is close to Greer. In those cases, focus the Protoling while trying to evade all Greer attacks.
Once the last Protoling is close to dying, switch to Greer to pre-stack Conditions.
Final Phase
Greer will become vulnerable once the last Protoling is dead. After 30 seconds, the Protolings will respawn, so groups will generally want to kill before.
Pre-stacking Conditions towards the end of the 10% phase is important, as it effectively removes a large part of the ramp-up time from the squad’s damage profile; this is much more important than quickly killing the final Protoling.
Greer will continue to use his mechanics during this phase. Unless the squad has played perfectly there will be many stacks of Empowered on Greer. The extra damage he gains is extremely dangerous, as such, it is best to avoid as much damage as possible:
- Sidestep Sweep the Mold whenever possible.
- Always provide
Aegis for Stomp the Growth; if it’s not available call it out, and the entire squad should dodge the slams and jump the shockwave.