Return to Home Return to Overview Mechanical Reference
Fast Ura Guides
This page contains some simple guides for several roles in the Godscream Ura encounter. If you want something more in-depth, please read the full Strategy Guide.
All markers referenced in this guide can be set up with the Commander Markers module for Blish HUD, using the marker pack provided below.
Click to view markers
 Paste the following code into Commander Markers to use this marker pack:
eyJlbmFibGVkIjp0cnVlLCJuYW1lIjoiVXJhIENNL0xNIiwiZGVzY3JpcHRpb24iOiJUaGVzZSBtYXJrZXJzIHNob3cgdGhlIG1vc3QgaW1wb3J0YW50IFRveGljIEdleXNlcnMgYW5kIGFyZSBhbHNvIHVzZWZ1bCBmb3IgZ2VuZXJhbCBkaXJlY3Rpb24uIiwibWFwSWQiOjE1NjQsInRyaWdnZXIiOnsieCI6MTU3LjI0Njc1LCJ5IjoyMzkuOTE4MTgyLCJ6IjoyNjkuOTI4OTI1fSwibWFya2VycyI6W3siaSI6MSwiZCI6IlRveGljIEdleXNlciAxLzIiLCJ4IjoxODguOTI1NzIsInkiOjI2MS42MDE2ODUsInoiOjI2OS45MjkxNjl9LHsiaSI6MiwiZCI6IlRveGljIEdleXNlciAzLzQiLCJ4IjoxODguMDQ5OTQyLCJ5IjoyMjYuMTQwMDMsInoiOjI2OS45Mjg5MjV9LHsiaSI6MywiZCI6IlRveGljIEdleXNlciA4IiwieCI6MTYyLjA0NjYzMSwieSI6MjI4LjI3MTc0NCwieiI6MjY5Ljk5MDg3NX0seyJpIjo0LCJkIjoiVG94aWMgR2V5c2VyIDEzLzE0IiwieCI6MTI0LjM0Njc5NCwieSI6MjA5Ljg0OTY0LCJ6IjoyNjkuOTg2NDJ9LHsiaSI6NiwiZCI6IlRveGljIEdleXNlciA5IiwieCI6MTQ1LjgzMTc3MiwieSI6MjU4LjQ0MDgyNiwieiI6MjY5LjkzNDc4NH0seyJpIjo1LCJkIjoiVG94aWMgR2V5c2VyIDcvMTAiLCJ4IjoxNzAuOTA3MzY0LCJ5IjoyMDIuNDc5NTUzLCJ6IjoyNzAuMDYyOTU4fSx7ImkiOjcsImQiOiJUb3hpYyBHZXlzZXIgNSIsIngiOjE2NS43MjUyMzUsInkiOjI1Mi41NTQ5NjIsInoiOjI2OS45MzQ3ODR9LHsiaSI6OCwiZCI6IlRveGljIEdleXNlciAxMiIsIngiOjEyMi40NDU4MTYsInkiOjI0OS43ODIxMiwieiI6MjY5LjkyODkyNX1dfQ==
What are you playing?
Ranged Group Guide
Your responsibilities (excluding basic damage, healing or support as required by your role) consist in:
- Picking up the ranged Bloodstone Shard whenever it’s your turn.
- Using
Dispel on Toxic Geysers to remove
Hardened Shell.
- CC’ing Toxic Geysers to kill them.
- Baiting Propel into the proper directions during the first phase.
It is highly recommended (almost mandatory!) to have a marker pack that shows you where the Toxic Geysers will spawn and in what order.
General Information for all Phases
- Picking up the Bloodstone Shard right after using
Dispel (and thus under the effect of
Bloodstone Saturation) will deal massive damage over time. Be aware.
- Standing in Toxic Geysers and Sulfuric Geysers for too long will afflict you with
Sulfuric Acid. This is a dangerous condition that must be cleansed soon or you will gain
Exposed.
- Check who is before you and after you in the ranged rotation, asking your commander if necessary.
- Set a personal target on the person before you and be aware of where they go so you can pick up the Bloodstone Shard after they use it.
- Whenever you
Dispel, call out the person after you in the rotation and tell them where to pick up the shard.
- Make sure you are always on the group to provide healing and boons whenever you are not doing mechanics.
Phase 1
If you are double dropping, you will have to handle two Toxic Geysers every time it’s your turn in the rotation. To do this:
- When the person before you in the rotation calls out, move to their geyser, pick up the Bloodstone Shard, and CC their geyser.
- CC your first geyser soon after it spawns, then wait for the second to spawn.
- Move to your first geyser and
Dispel.
- Pick up the Bloodstone Shard, quickly move to your second one and
Dispel again.
100% - 70%
- If you are first in the rotation, you will start the fight by picking up the ranged Bloodstone Shard.
- Ura will always begin with Bubbles. If you get a bubble, stack with the other targeted person next to the main group.
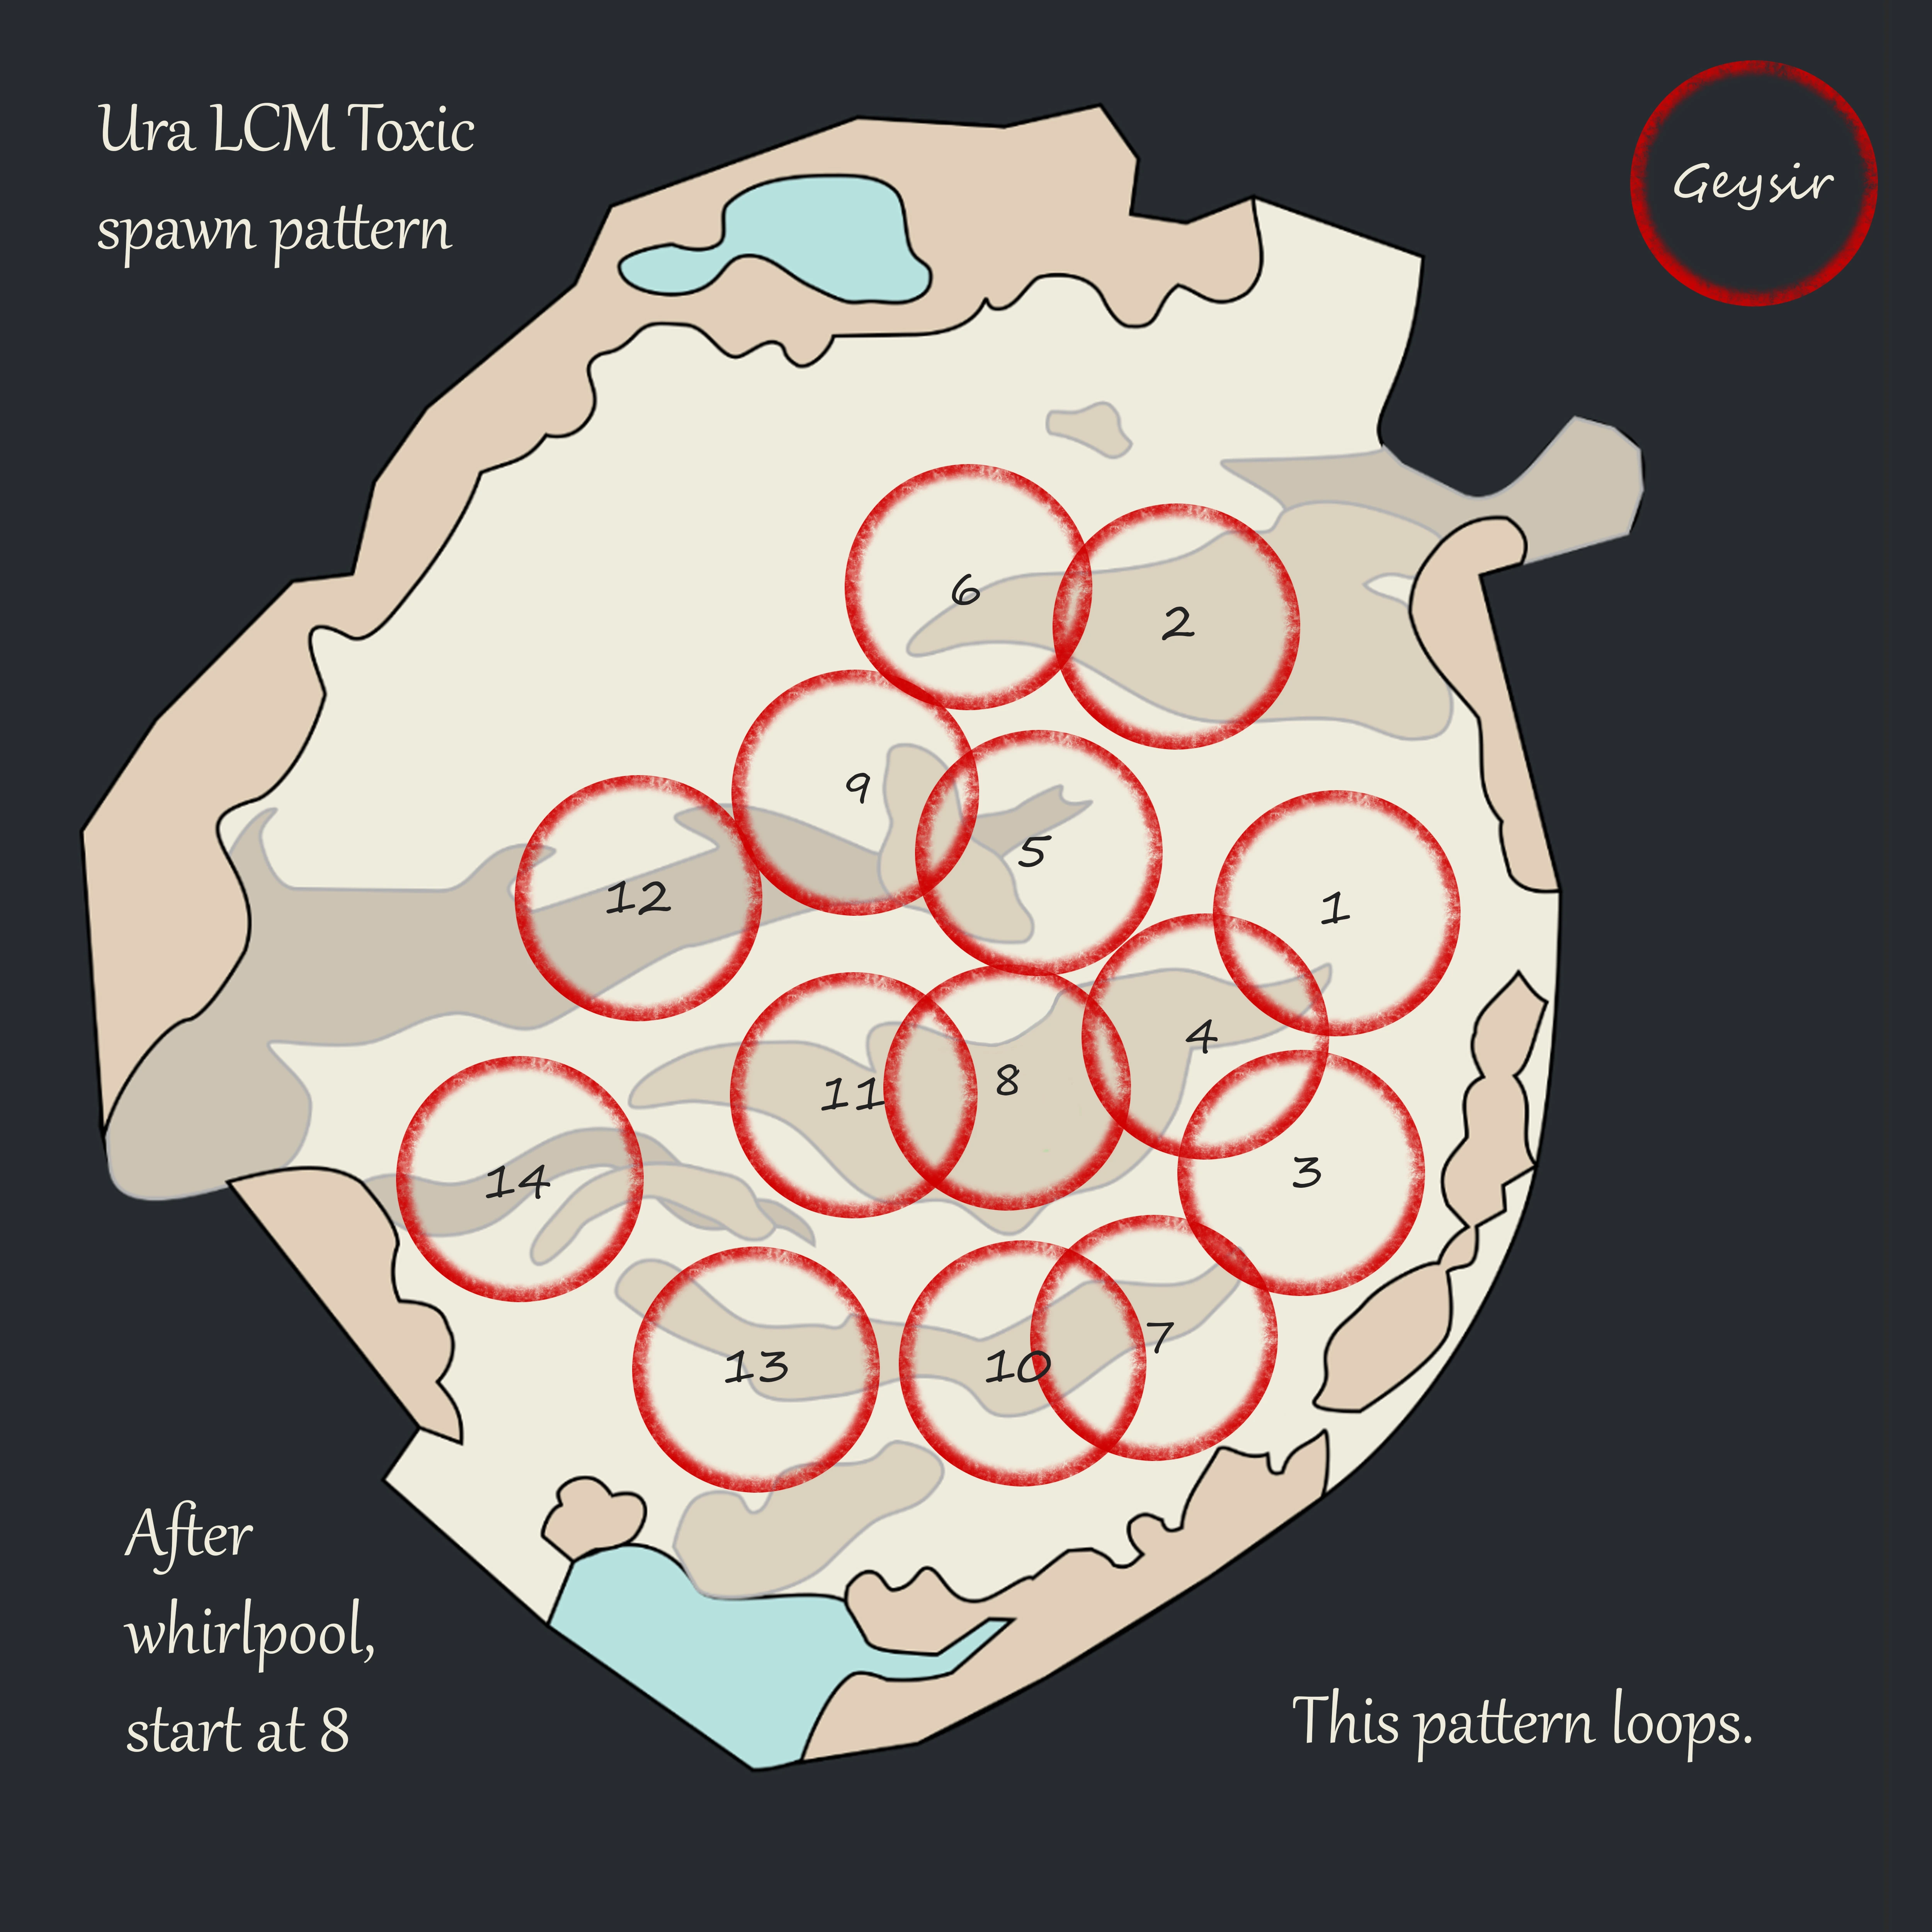
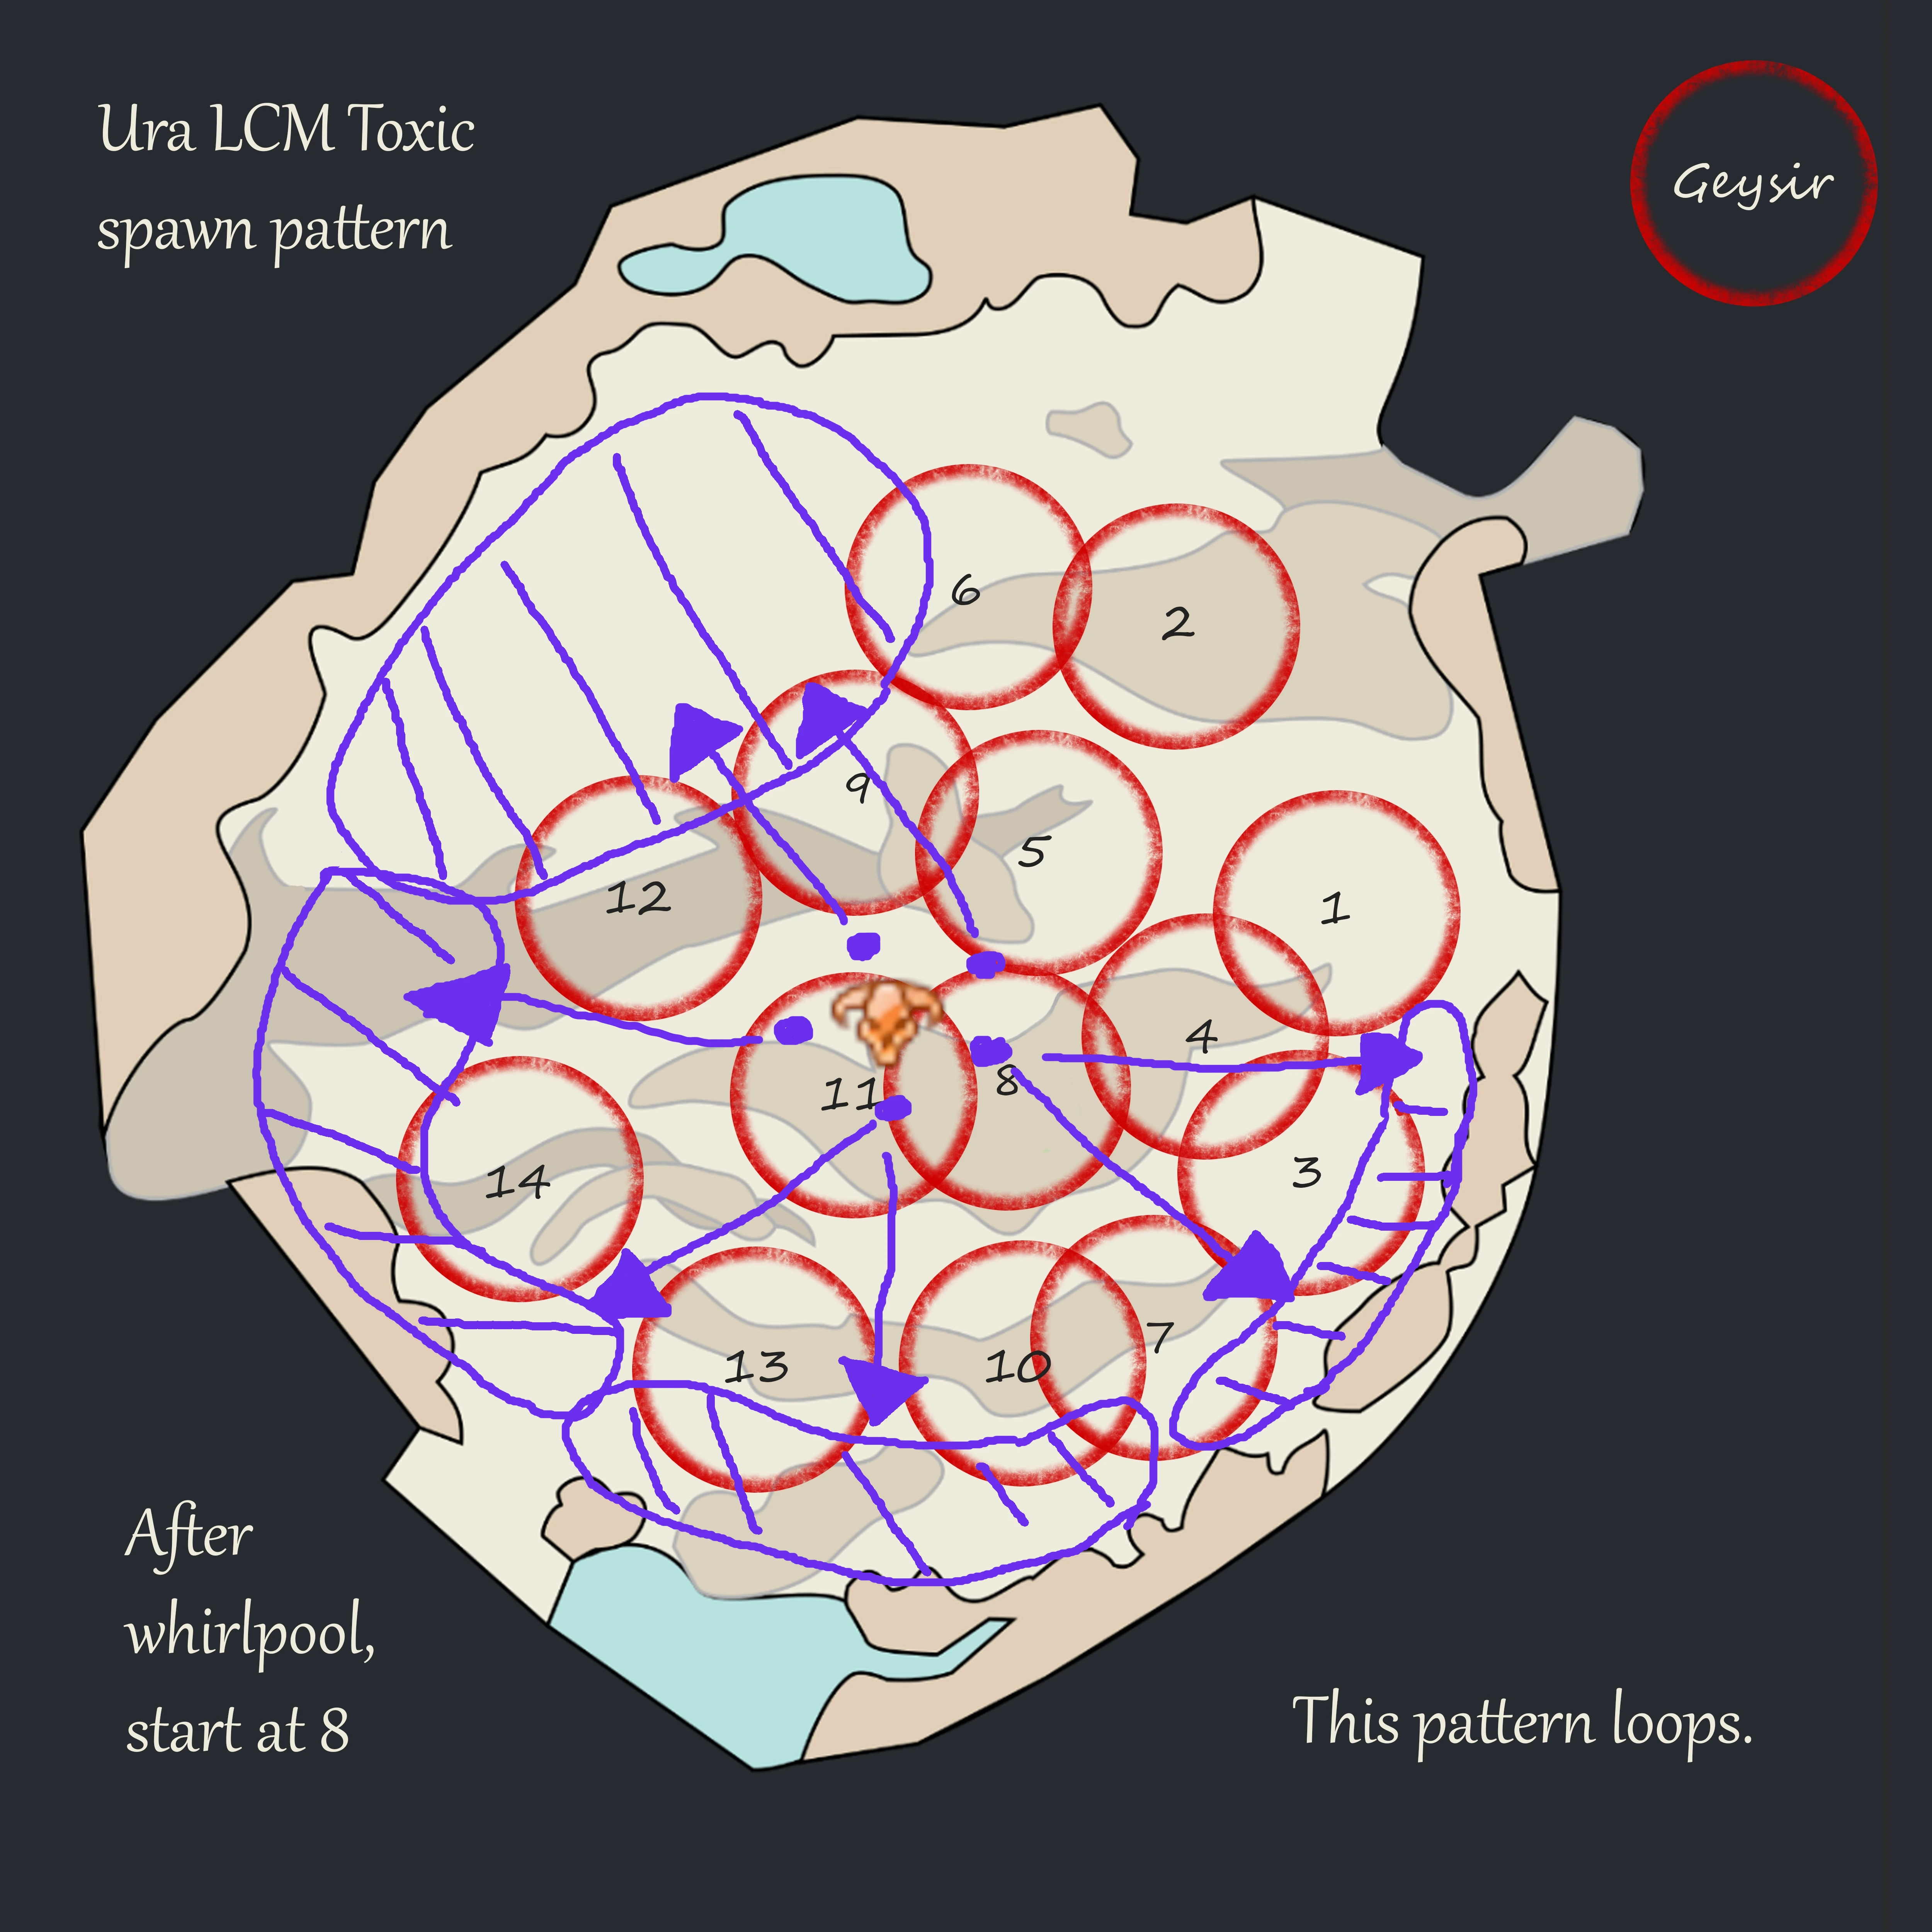
- After every set of Bubbles she will use Propel. If you don’t have bubbles, try to be the furthest player from the boss to bait it, following the pattern in the image below.
- The ranged rotation starts from Toxic Geyser #1 and continues sequentially. If you are double dropping, you can use the image below for reference.
- CC geysers using
Signet of Humility and any other CC skill. If you are double dropping, use
Continuum Split during the cast of the signet to have it also for your second geyser.
- Try not to
Dispel just before 70%, or you may not be able to pick up your shard before the boss casts Return.
Phase 2
From this phase onwards it is not necessary to double drop, as the spawn rate of Toxic Geysers is halved.
70% - 40%
- The ranged rotation restarts from Toxic Geyser #8. The timer will not reset however. Toxics from the previous phase will persist into this one.
- Be on stack whenever you are not CCing a geyser or using your Bloodstone Shard. Try to provide
Stability for the jump attack.
- Follow your group to Titanspawn Geysers. Try to provide
Stability for the Champion Fumaroller’s attacks.
- Once a Titanspawn Geyser is dead, return to the stack and try to recall/remove any pets or clones so that the Champion Fumaroller comes to the stack and is cleaved down.
- If you are targeted by the Arena, run out immediately and place it far from the group.
- Provide
Stability to players caught inside arenas.
- If you are targeted by Sulfuric Geyser, run out immediately and drop it along the edge of the arena. A marker pack can show you the safe areas. Prioritize the large area behind
and
.
Phase 3
40% - 1%
- The ranged rotation restarts from Toxic Geyser #7. The timer will reset, so this geyser will spawn instantly.
- Continue to handle Titanspawn Geysers as in the previous phase.
- If your tank calls for backup and you are not doing any mechanics, it is generally your job to provide that backup. To do this, just stand in front of the boss and follow around if it faces a new direction.
- If you get targeted by Bubbles at the same time as Titanspawn Geyser, always try to stack the bubbles on top of the geyser.
Phase 4
15% (Healed) - 0%
- This phase has all the same mechanics as the previous one.
- You will usually ignore any Titanspawn Geysers that are not close to the boss.
- Since there will be many Champion Fumarollers, try to upkeep constant
Stability.
- You can ignore most Toxic Geysers in this phase, with the exception of #8 and # 11.
Dispel these and CC them as fast as possible.
- You can reset any other geyser with CC if it starts to become annoying.
Melee Group Guide
Your responsibilities (excluding basic damage or support as required by your role) consist in:
- Picking up the melee Bloodstone Shard whenever possible.
- Using
Dispel to free people from Bubbles.
- Using
Dispel on Titanspawn Geysers to remove
Hardened Shell.
- Killing Titanspawn Geysers and Champion Fumarollers.
General Information for all Phases
- Picking up the Bloodstone Shard right after using
Dispel (and thus under the effect of
Bloodstone Saturation) will deal massive damage over time. Be aware.
- Standing in Toxic Geysers and Sulfuric Geysers for too long will afflict you with
Sulfuric Acid. This is a dangerous condition that must be cleansed soon or you will gain
Exposed.
If you're playing with a melee rotation
- Check who is before you and after you in the rotation, asking your commander if necessary.
- Set a personal target on the person before you and be aware of where they go so you can pick up the Bloodstone Shard after they use it.
- Whenever you
Dispel, call out the person after you in the rotation and tell them where to pick up the shard.
If you're playing without a melee rotation
- Whenever you’re not affected by
Bloodstone Saturation, you should be trying to pick up the Bloodstone Shard compulsively after every mechanic.
- Call out when you’re using the shard for a mechanic.
Phase 1
100% - 70%
- One melee player will have to pick up the Bloodstone Shard before the fight begins.
- Start in front of the boss. She will always begin with Bubbles. If you get a bubble, stack with the other targeted person next to the main group.
- After every set of Bubbles she will use Propel. Try to dodge the landing as it deals high damage.
- Always be in melee range to avoid baiting Propel.
- Try not to
Dispel just before 70%, or you may not be able to pick up your shard before the boss casts Return.
Phase 2
70% - 40%
- After the transition, if you are holding the Bloodstone Shard, free everyone with
Dispel.
- You will not have to deal with Bubbles in this phase.
- Whenever Ura uses her jump attack, she will create a Titanspawn Geyser. Move to it,
Dispel if you are holding the shard and kill it as fast as possible.
- Once a Titanspawn Geyser is dead, return to the stack and try to recall/remove any pets or clones so that the Champion Fumaroller comes to the stack and is cleaved down.
- If you are targeted by the Arena, run out immediately and place it far from the group.
- If you are targeted by Sulfuric Geyser, run out immediately and drop it along the edge of the arena. A marker pack can show you the safe areas. Prioritize the large area behind
and
.
Phase 3
40% - 1%
- Ura will start using Bubbles again. She will cast them immediately upon reaching 40% HP.
- Continue to handle Titanspawn Geysers as in the previous phase.
- If you get targeted by Bubbles at the same time as Titanspawn Geyser, always try to stack the bubbles on top of the geyser.
Phase 4
15% (Healed) - 0%
- This phase has all the same mechanics as the previous one.
- You will usually ignore any Titanspawn Geysers that are not close to the boss.
- Since there will be many Champion Fumarollers, try to cleave them if possible.
Tank Guide
Your responsibilities (excluding basic damage or support as required by your role) consist in:
- Picking up the melee Bloodstone Shard whenever possible in phase 1-2.
- Using
Dispel to free people from Bubbles in phase 1-2.
- Using
Dispel on Titanspawn Geysers to remove
Hardened Shell in phase 1-2.
- Killing Titanspawn Geysers in phase 1-2.
- From phase 3 onwards, standing in front of the boss at all times to prevent her from casting Propel.
- From phase 3 onwards, calling out when to break Ura’s
Defiance Bar to prevent her from casting Propel.
- Calling out CC timings.
For more information on the mechanics behind the tank’s role, check out preventing Propel.
General Information for all Phases
- Picking up the Bloodstone Shard right after using
Dispel (and thus under the effect of
Bloodstone Saturation) will deal massive damage over time. Be aware.
- Standing in Toxic Geysers and Sulfuric Geysers for too long will afflict you with
Sulfuric Acid. This is a dangerous condition that must be cleansed soon or you will gain
Exposed.
- You should generally not pick up the Bloodstone Shard. Only do it as a back up if required.
- Ura should be CC’s whenever she reaches five stacks of
Rising Pressure. Keep an eye on the buff and call out when you are approaching the moment to CC.
Phase 1
100% - 70%
- One melee player will have to pick up the Bloodstone Shard before the fight begins.
- Start in front of the boss. She will always begin with Bubbles. If you get a bubble, stack with the other targeted person next to the main group.
- After every set of Bubbles she will use Propel. Try to dodge the landing as it deals high damage.
- Always be in melee range to avoid baiting Propel.
Phase 2
70% - 40%
- You will not have to deal with Bubbles in this phase.
- Whenever Ura uses her jump attack, she will create a Titanspawn Geyser. Move to it and kill it as fast as possible.
- Once a Titanspawn Geyser is dead, return to the stack and try to recall/remove any pets or clones so that the Champion Fumaroller comes to the stack and is cleaved down.
- If you are targeted by the Arena, run out immediately and place it far from the group.
- If you are targeted by Sulfuric Geyser, run out immediately and drop it along the edge of the arena. A marker pack can show you the safe areas. Prioritize the large area behind
and
.
- Do not move away from the boss once it goes below 45% HP.
Phase 3
40% - 1%
- Ura will start using Bubbles again. She will cast it immediately upon reaching 40% HP.
- Starting from this phase, you will be tanking the boss. You must be within a 140°, 400 range cone in front of her at all times.
- Do not move to Titanspawn Geysers.
- If you are targeted by a mechanic that requires you to move, such as Bubbles, Arena or Sulfuric Geysers, prioritize your mechanic and call for a backup tank.
- Ura should be CC’d only at appropriate moments, which can be found here: when to CC Ura. If in doubt, only CC when she is using her Jump.
- Try to rotate the boss towards
and
.
Phase 4
15% (Healed) - 0%
- This phase has all the same mechanics as the previous one.
- Your squad will usually ignore any Titanspawn Geysers that are not close to the boss.
- Since there will be many Champion Fumarollers, try to cleave them if possible.
- Since everyone will be stacking in front of the boss, it’s less important for you to tank in this phase.