Return to Home Return to Overview Strategy Guide
Legendary Ura - FAQ
Based on the original document made with contributions from Minas, Spencer, Sleider, Elise and many more.
This page contains a set of frequently asked questions regarding the Legendary Ura encounter. These are grouped into the following sections:
- Ura’s Attacks and How to Deal with Them
- Ranged Group and Toxic Geysers
- Phasing and Related Issues
- Titanspawners, Fumarollers, Ventshots
- Builds, Composition and More
- Glossary
1. Ura’s Attacks and how to deal with them
1.1 - How does kiting Ura work in phase 1?
Ura targets the furthest player within 1500 range, so in order to kite, you just need to be the furthest away. It’s best if all healers ( Chronomancer,
Scourge,
Deadeye) are aware of how and where to kite, so they can provide some redundancy and know how to react if they are out of place.
Ura’s jumps should roughly follow the Toxic Geysers, as shown below (The numbers with the white background next to the black arrows are the order of the jumps; 1, 2, 3, …; you can see that you essentially kite Ura back and forth). Importantly though, you want to kite so that Ura does not jump into Toxic Geysers, as that will give her boons. You want her to be close to the geysers, but outside of the boon range.
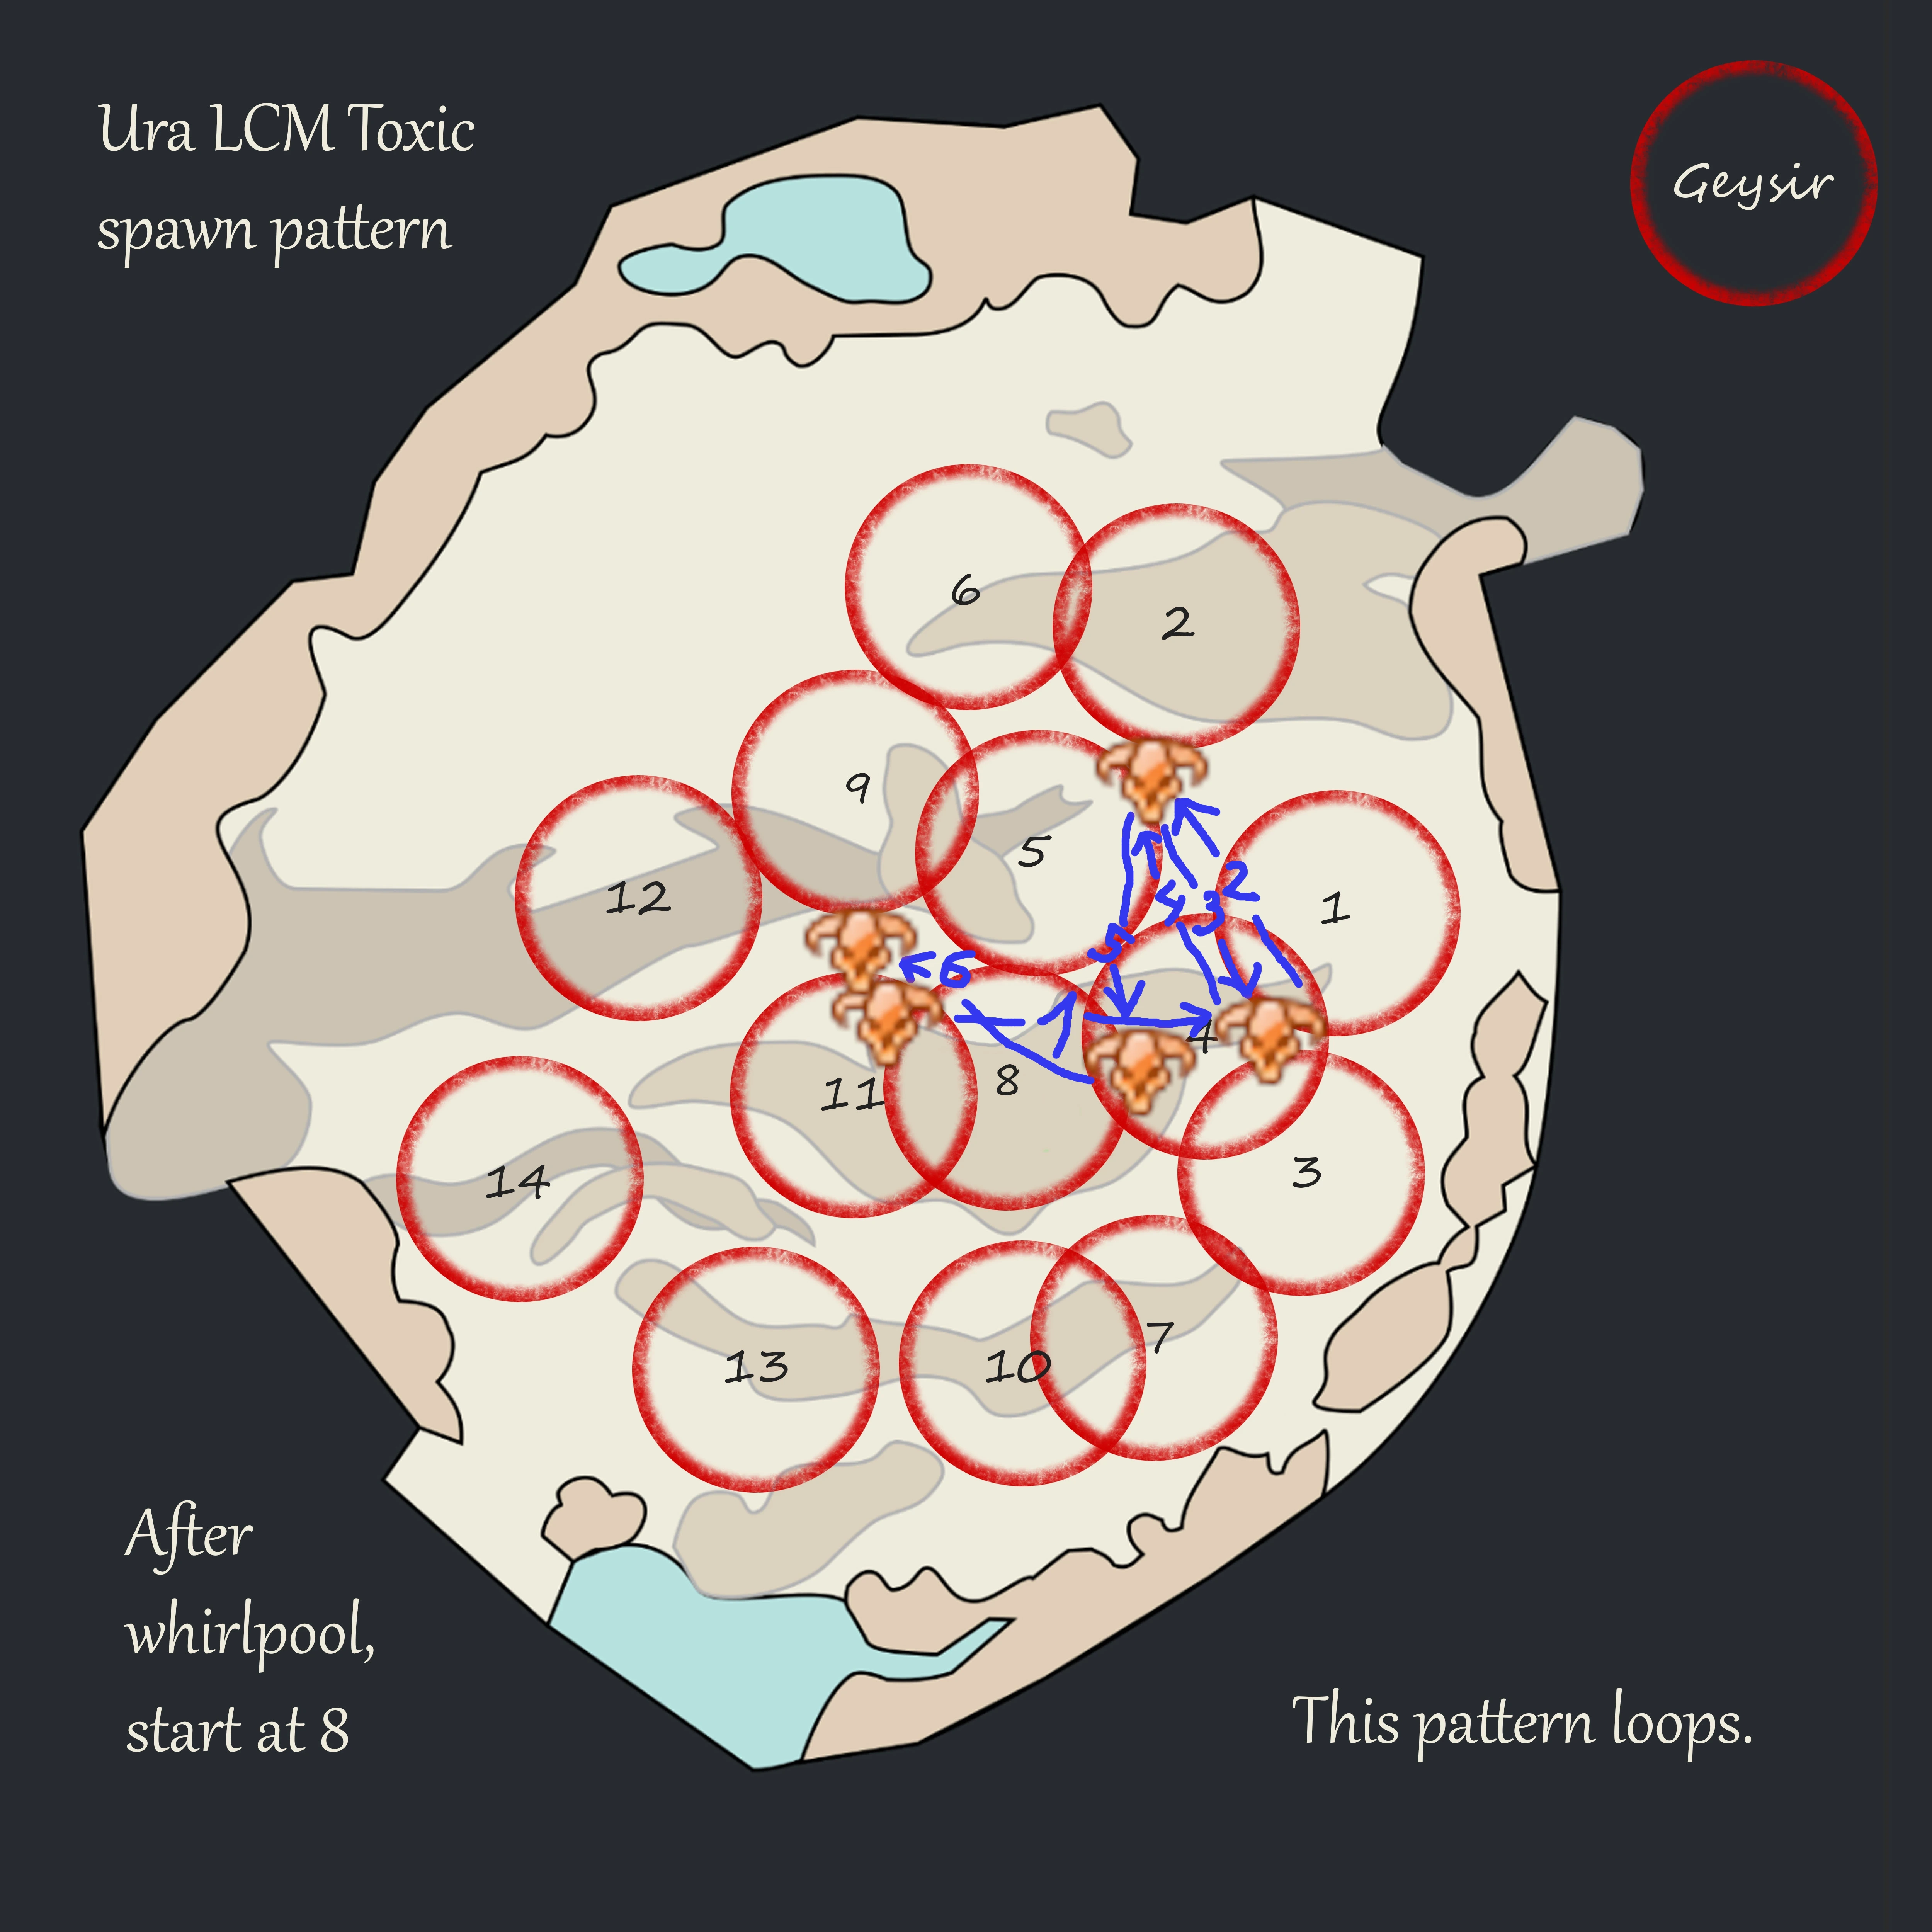
Boons from Toxic Geysers are only given in the initial radius and not in the extended radius when they grow.
If you are in a situation where you are doing a Toxic Geyser in a bad position and you know Ura will jump soon, you can try to quickly move closer to Ura so the other healers can bait her properly, or move out of her 1500 range so you aren’t targeted.
Depending on your damage and whether Ura gets CC’d, you might want to bait slightly differently and not exactly like shown. You can just follow the general principles of: 1) Follow Toxics. 2) Make sure to not make her jump into Toxics. 3) After the last jump, stand southwest of Ura to make her face that way (more info on that below).
1.2 - How, when and why to CC Ura correctly?
Ura builds up Rising Pressure, which gets removed when you CC her. This also gives her a stack of
Titanic Resistance, which reduces incoming CC damage. This means that you want to CC Ura whenever she gets to roughly 5-6 stacks, in order to keep the average damage reduction low while also not getting overwhelmed by high
Titanic Resistance stacks.
Whenever Ura is CCd, her attack will be interrupted and she will immediately start casting the next attack. Ura’s attacks are on a priority list, with cast times, aftercasts and cooldowns. She will go down her priority list and cast the next skill that is available (if a target is in range). If you CC at the wrong time, you can remove cast and aftercast from a skill, which will cause Ura to run out of attacks and then use Propel. That’s why we want to CC at the end of aftercasts, in order to minimize the chances of Ura jumping away. For more information see preventing Propel.
The best CC timings are:
Steam Prison - After her hands are down. Roughly 3 seconds time window after hands are down.

Create Titanspawn Geyser - after she is in the air. Roughly 4-5 seconds time window after she is in the air.

Sulfuric Geyser - Once the indicators start, which is roughly when she has stretched her arm out front fully. About 2-3 seconds of a window.
1.3 - How, when and who tanks Ura?
Ura needs a tank from Phase 3 (40%) onward. The reason for this is to provide a target for her mechanics: if no one is in front of her, she will cast Propel, because all other attacks require line of sight (i.e. she goes down her priority list and if no target is available, goes to the next attack etc.. which brings her to the only attack that doesn’t require a target in front of her, which is Propel). For more information see preventing Propel.
The tank can be any DPS, or any player in general. There is no real “tanking mechanic” per se, nothing to do with Toughness.
The line of sight from Ura is roughly a 140° cone: see the shaded area below. The cone is decently wide and the tank just needs to stay within that cone. See tanking Ura for more information.
1.4 - How do I turn Ura to the correct side?
Turning Ura is a bit finnicky. She only turns when she casts Steam Prison or Sulfuric Geyser. For both casts she will turn toward a random target and follow them for the duration of the cast. This means that she actually can spin 180° to one of the Toxic Geyser group: in these situations it’s crucial for the tank to notice this and quickly run back into her cone of vision.
You can use this to turn Ura by having everyone except the tank go to the side where you want Ura to turn, which gives you a high probability that she will turn once Arena/Sulfuric is used.
Other than that, the tank can try to slowly rotate Ura by standing on one side at the end of Ura’s cone of vision and rotate her in small steps.
1.5 - How come I'm getting ![]() Exposed?
Exposed?
When Sulfuric Acid ticks for 5 seconds, it will turn into
Exposed. You can get
Sulfuric Acid from many different attacks: standing in Toxic Geysers and Sulfuric Geysers if you have too many
Poison stacks, from Ura’s Acid Spray (used when she has no melee target), and from the waves that get released from Sulfuric Geysers when they spawn.
In order to prevent getting exposed, you need to cleanse Sulfuric Acid, which can only be done one stack at a time. That’s why bringing extra cleanse on DPS is so important, so that you have many different skills that cleanse the group in order to minimize
Exposed.
1.6 - Where do I drop Sulfurics?
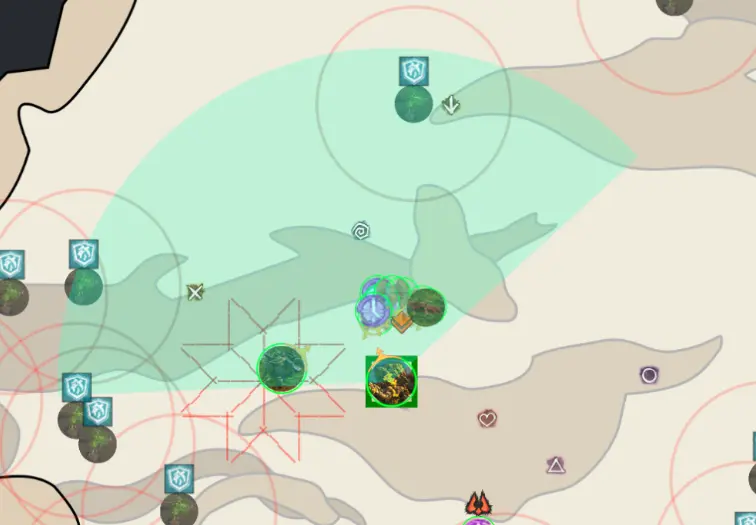
Good places are the green areas highlighted by the image below, which correspond with the part of the area where Toxic Geysers do not spawn. Additionally, avoid attempting to place geysers behind 1 and 2, as this area is difficult to reach from the boss in time, unless you are in the ranged group and doing either of those geyers.
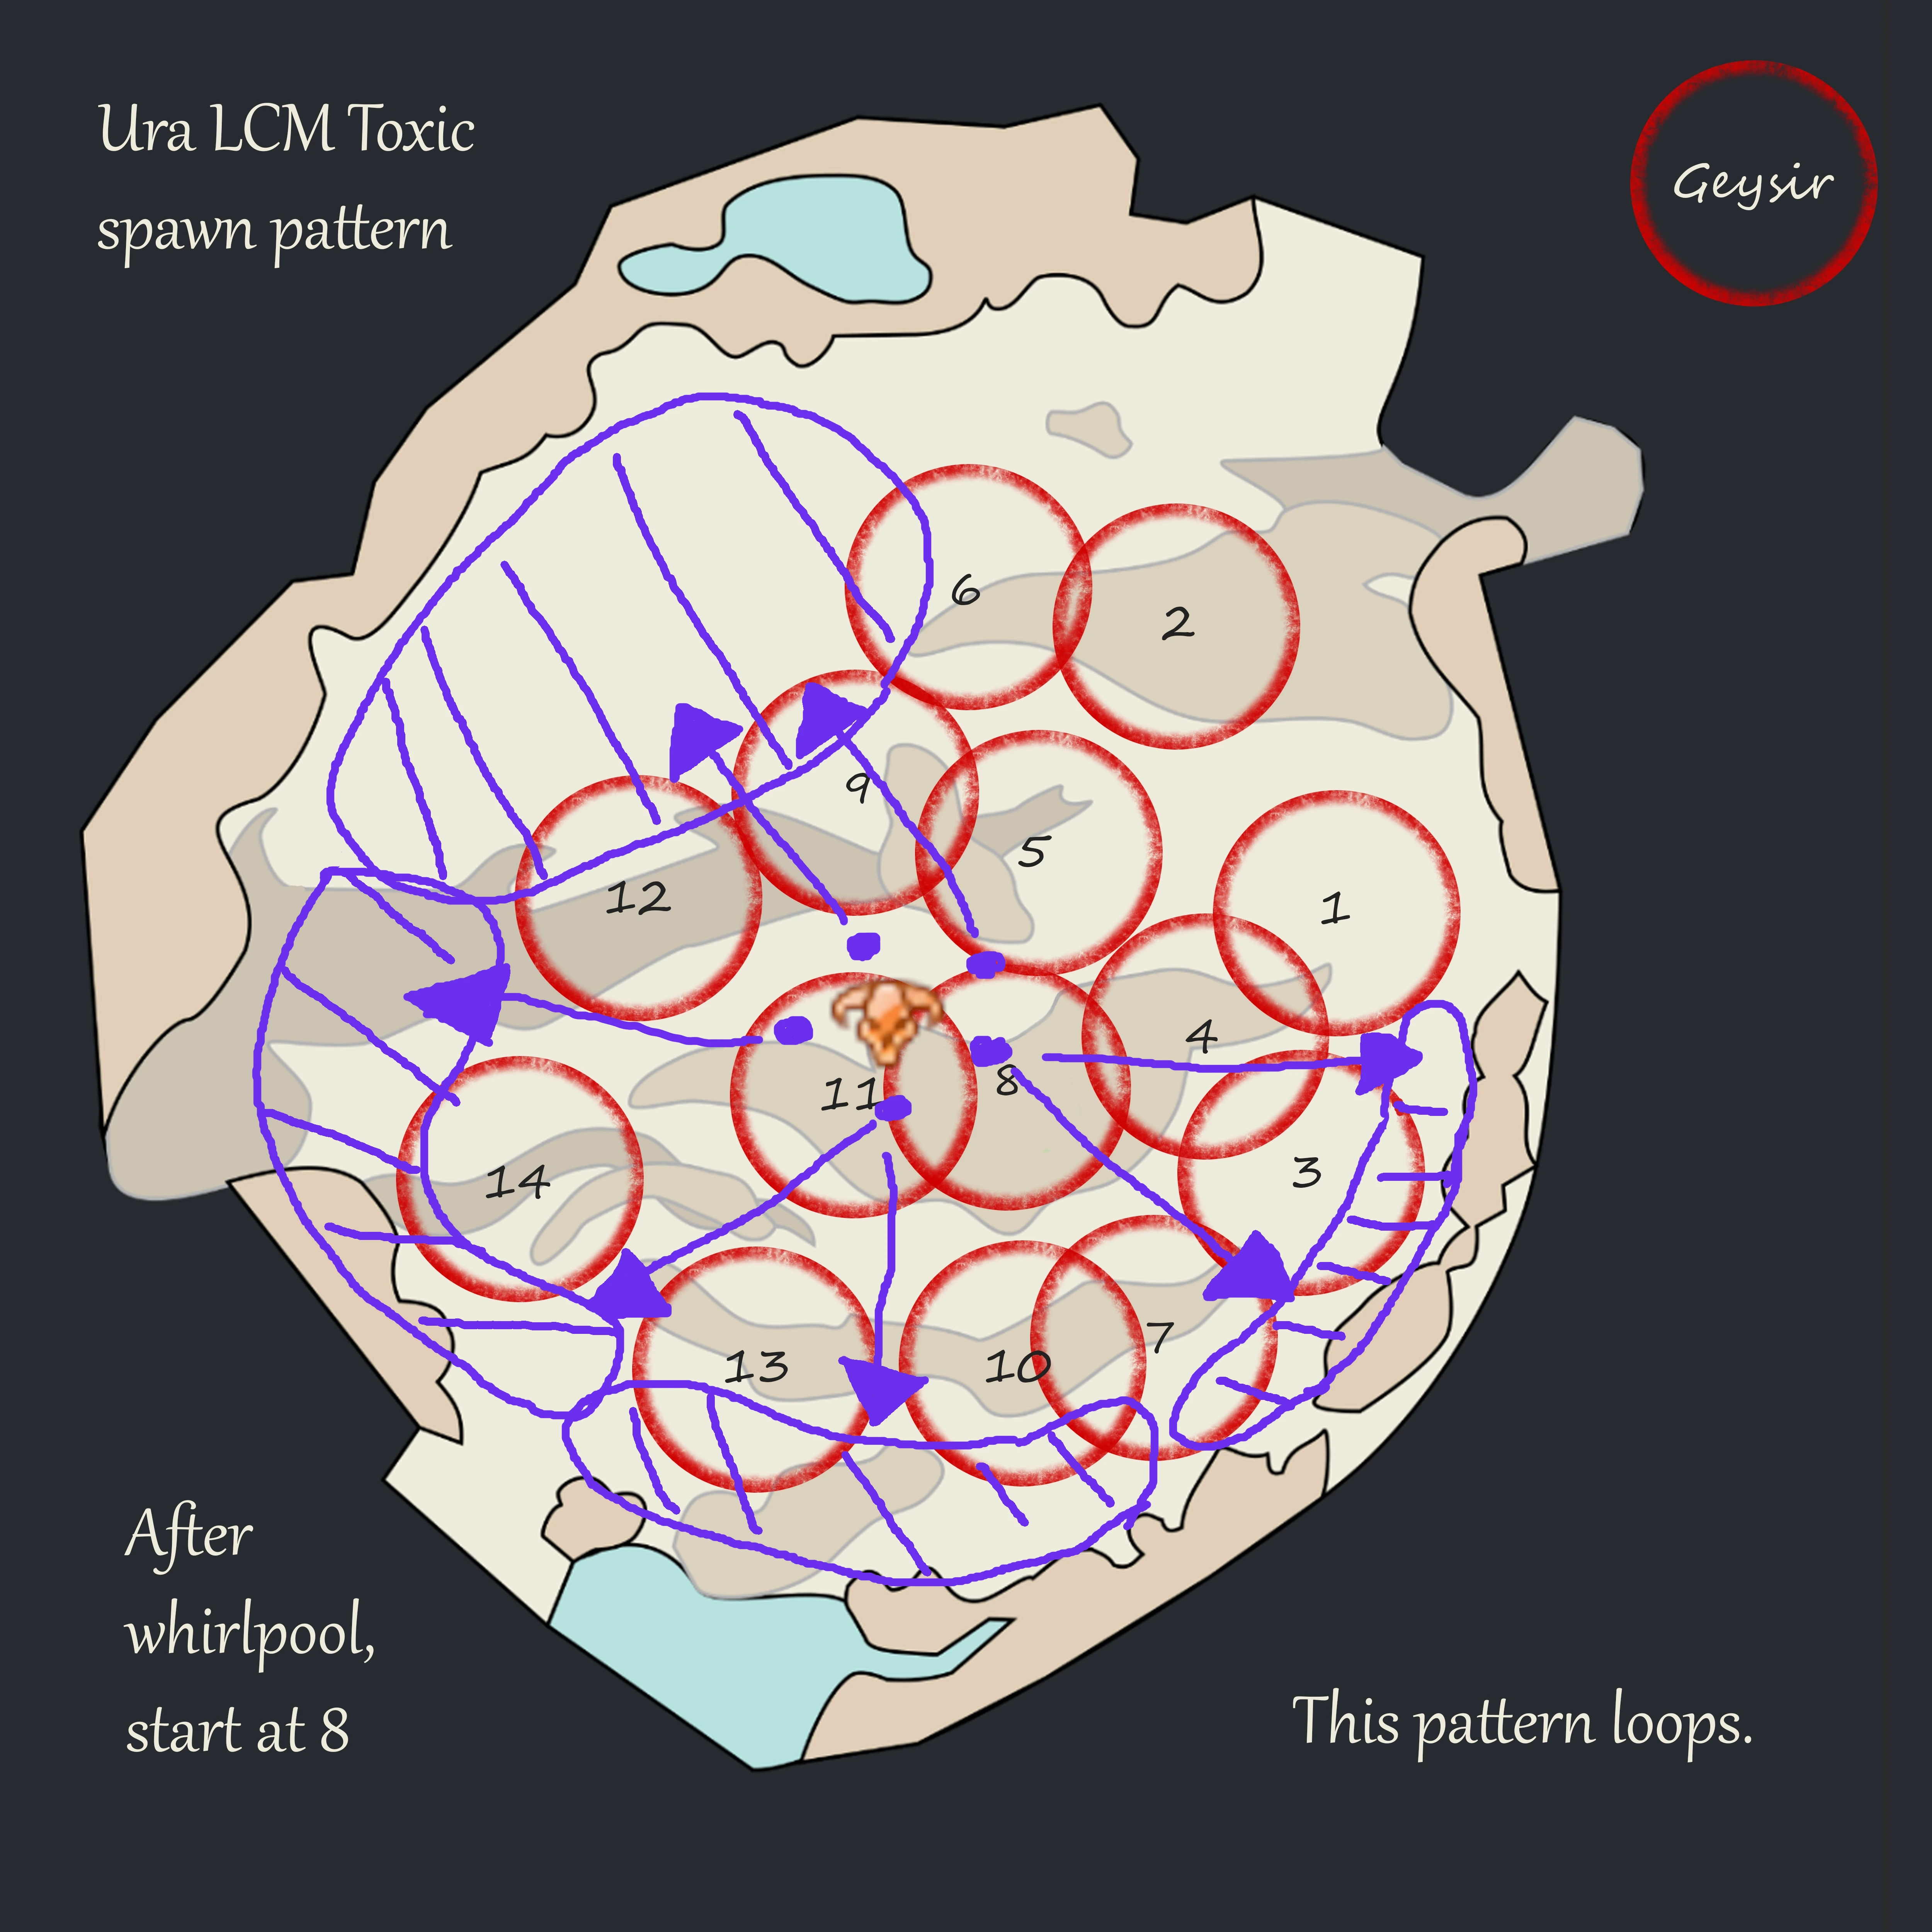
Within these regions, it’s better to drop Sulfurics between Geysers where NO double drops are happening. Example: #13 and #14 are always double dropped, so ideally don’t go between them, but #12 and #14, or #10 and #13 are not, so it’s better to drop between those. The absolute best area to drop them is behind #9, which, as can be seen from the image, is the shortest path from Ura.
1.7 - Is it worth stacking Sulfuric Geysers?
Yes, but they can very quickly kill you if you are not careful. Rule of thumb is that on a non-healer you can stack a maximum of two Sulfuric Geysers (i.e. you run into only one existing and drop yours on top) and on a healer it depends if you have many cleanses or defensive skills available. Chronomancer has it the easiest, because you can press
Distort and ignore all incoming damage and conditions.
1.8 - What attacks should I dodge?
Generally, dodge Create Titanspawn Geyser (the stomp/jump in the air from Ura) and Propel (jump) when she lands. Try to sidestep or dodge the final cone of her Autoattack Chain. Other than these, you can jump, block or dodge the waves from Sulfuric Geysers. You can also double dodge out of the Steam Prison with the right timing (or with Superspeed), if you don’t have a mobility skill and no
Stability. You can dodge Sulfuric Geyser/Toxic Geyser AoEs to prevent the damage ticks, but this is not as important.
1.9 - Can you give ![]() Stability to people in bubbles?
Stability to people in bubbles?
No, the people targeted by the mechanic are stripped of Stability if they have it beforehand, and cannot receive it again during bubbles, until they’re
Dispelled. This means that players in bubbles can get knocked by Champion Fumarollers, which can lead to displaced bubbles.
The white indicator on the floor is misleading in these situations, because it only shows the initial bubble position, and does not get updated when knocked, while Dispel only works if casted underneath the bubble. In such cases immediately call out in voice that the shard needs to be dropped again.
1.10 - How do I deal with bubbles in this situation?
I have bubble at the same time as the Titanspawner!
The Bloodstone Shard always MUST to go to the Titanspawner, this means that the bubbles also MUST go to the Titanspawner. General rule of thumb is to always do bubbles next to the Titanspawn when both are up.
I have bubble at the same time as the Titanspawner and the second bubble is tank!
In this case they should call for a backup tank immediately and run to the Titanspawn. Usually there is always someone who can backup tank for a bit, like a DPS from the ranged team, or one of the healers.
I have bubble but I am running back from Sulfuric Geyser!
Just like the case above with the ranged being far away, call it out immediately with the direction and meet in the middle.
There is one specific possible scenario where you get Sulfuric > phase 40% to p3 > Sulfuric person gets the bubble. This is very unlucky timing and it’s a difficult situation to solve. The second bubble has to run out to the Sulfuric person together with the melee who has the bloodstone shard (and the one who is supposed to pick up) in order to save them. Otherwise they will likely die and it’s a wipe.
2. Ranged group and Toxic Geysers
2.1 - Who should be double dropping?
All healers: Chronomancer,
Deadeye and
Scourge generally. There is an edge case where the DPS that helps the ranged team also has to double drop, which can happen in the p2 to p3 transition if Toxic Geyser #5 or #6 spawns. In that case the dps has to double drop #8 and #9, but otherwise only the healers double drop.
2.2 - Which Toxic Geysers are double dropped?
Essentially almost all of them. Please check a ranged rotation for more information.
2.3 - What Toxic Geysers should be done in the final phase?
All should be done up to #14. After that, everything else can be safely ignored, except for #8 and #11 if you get them. Please check a ranged rotation for more information.
2.4 - Are there differences in doing Toxics in p3 and p4?
Not mechanically speaking, but exceptions apply for the last few Toxic Geysers of Phase 4. Toward the end when you only have geysers #12, #13 and #14 left, you don’t need to do them immediately since at that point you aren’t doing the rest. So you can take your time and do those whenever it is convenient, which is generally when your squad is healthy and there are no important mechanics happening (such as CCing the boss).
After #14, the next Toxic Geysers that become relevant are #8 and then #11. If you have high enough damage, those won’t matter, but if they do, have your Chronomancer (and someone else if needed) prepared to immediately CC #8 when it spawns (you can estimate the timing by looking at when 6 and then 7 spawn). Depending on Ura’s HP, either she will die very soon and you can ignore #8 after CCing, or you want to drop a shard there. If damage is low enough to where you get #11, just immediately drop the shard (and pick it up again) and kill it with DPS, since the squad is usually stacking on that spot. Otherwise, the
Chronomancer should immediately CC it.
2.5 - What is the advantage/disadvantage of having a DPS help the ranged group in a standard strategy?
Having a DPS help makes the ranged rotation easier to deal with. The limiting factor is the duration of the Bloodstone Saturation debuff from using
Dispel. The disadvantage is that it is better to have a DPS with blink skill, which limits the playable classes. More information on this strategy can be found here: NA Pug Rotation.
Playing with 3-heal ranged is harder to execute, as the duration of Bloodstone Saturation makes it tighter. The advantage is slightly higher DPS on the boss and that you can have 2 tanks instead of 1. More information on this strategy can be found here: 3-Heal Rotation.
2.6 - How do I deal with bubbles, sulfuric and cage when double dropping?
- Pressure Blast - Quick reactions, depending on the situation you might want to call out for the next person in the rotation to free you on the next Geyser, or that you’ll run back to the group.
- Sulfuric Geyser - Always has higher priority and needs to be placed correctly. If you are supposed to do a double drop, and you just used
Dispel and then got targeted by the sulfuric, just leave the shard on the ground, place the geyser, and tell the group that the shard will tick two or three times so they can play safe and heal accordingly.
- Steam Prison - Place it so that it does not overlap any [Toxics Geysers] that you want to do, while also moving away from melee range such that the squad can still move around the boss. The arena reflects projectiles, which means that
Distracting Throw cannot hit. There are situations where one Toxic has already been CCd and you are supposed to double drop when you get the arena. In those cases you can just go to the Toxic,
Dispel, place the arena there, pick up and move to the second Toxic. This is fine if and only if the first Toxic has been CCd already, cause then the projectile reflects don’t matter (and you can simply outheal a few ticks on yourself from being inside the arena).
2.7 - I have a shard that I am supposed to drop, but I just got bubble!
First of all, while holding the Bloodstone Shard, you are immune to Pressure Blast and you also can’t get targeted by it. If you just Dispelled, then get a bubble, and you are supposed to double drop, then you can just wait 2 seconds and then pick up the shard again to ignore the bubble and just outheal the tick from it.
Dispel again once the bubble is over and you are on the next Toxic.
If you are Supposed to pick it up, but your buddy has not dropped it yet, you can call that they should free you on top of the geyser they need to Dispel.
2.8 - I have a shard that I just dropped but I just got bubble and group is far!
Immediately call out that bubble is far away (and the direction if possible) and then use your movement skills if you have any available. In principle, the 2 bubbles should meet in the middle if both are far from each other.
2.1 - I have to ![]() Dispel but another ranged player near me has a bubble!
Dispel but another ranged player near me has a bubble!
If you are holding the Bloodstone Shard and a ranged buddy next to you has the bubble, then just free them when you Dispel. Depending on the situation, you may have to just wait a couple of seconds until they are bubbled, and only then should you drop. Remember to spam your healing skills on top of yourself to negate the incoming damage from
Bloodstone Saturation in case you already have a stack.
3. Phasing and related issues
3.1 - What is the issue with CCing around 40%?
At 40% of her HP, Ura transitions from Phase 2 to Phase 3. This interrupts her current skill cast, which similarly to bad CC timing, can lead to her using Propel. There isn’t much you can do to prevent this, as controlling DPS to phase at a good time is very difficult. However, try not to CC her shortly before or after the transition, as two interrupts in a short interval can increase the chance of her running out of attacks to use and then consequently using Propel. See preventing Propel for more information.
3.2 - What are the biggest issues while phasing?
- Phase 2 - nothing specifically, but if you have low dps, then Toxic Geysers #12, #13, #14 can be an issue.
- Phase 3 - Ura will self-interrupt and the Toxic Geyser timer instantly resets, spawning #7 instantly and making things a bit more difficult for the ranged team. Additionally, Ura will immediately cast Pressure Blast. This is usually the most difficult transition, because it starts from being very chill in p2 to suddenly being very hectic with lots of mechanics.
- Phase 4 - self-interrupt, but otherwise nothing in particular. The self-interrupt is less of an issue, because Ura will also spend a few seconds in a phasing animation.
3.3 - How do I deal with #10, #11 (#12) and #8 geysers at 70%?
Depends on strategy; please refer to a ranged rotation or ask your commander.
But generally if you have low dps and you get #13 and #14, you might even want to /gg and practice phase 1, since your whole rotation will be thrown off. If just #12 and #13 spawn extra, reset them with CC until they are done normally at some point in phase 2.
Realistically this should only happen very early into prog: even after a couple of pulls you should phase fast enough to not get #13. If not, you have a DPS issue which will prevent you from killing Ura within the enrage timer; as rule of thumb, this is also a nice check to see if the overall squad dps is enough.
3.4 - How do I deal with #7 and #8 geysers at 40%?
Depends on strategy; please refer to a ranged rotation or ask your commander.
3.5 - Is there any issue while phasing into phase 4?
The Phase 4 transition also interrupts Ura’s current cast, so it can also cause a jump if it happens with very bad timing. However, due to the transition also including an animation for Ura, it’s less likely than for the phase 3 transition. Check preventing Propel for more information.
4. Titanspawners, Fumarollers, Ventshots
4.1 - How do Titanspawners and Ventshots work?
Titanspawn Geysers are created every time Ura uses her Create Titanspawn Geyser ability . The Titanspawners in phase 2 and 3 are the same as in phase 4, but while they will spawn Champion Fumarollers in p2, in p4 they will instead spawn Legendary Ventshots. Additionally, when Ura hits 1% and heals, she will always spawn an additional Titanspawn Geyser independent of her Create Titanspawn Geyser skill.
4.2 - When is a good time to stop killing Titanspawners?
It depends on the squad. Not killing Titanspawn Geysers during phase 3 can be very dicey, because multiple Champion Fumarollers can quickly CC, down then wipe you. If you play with two Chronomancers, this can be managed with relative ease by outhealing the damage and providing
Stability, so you can stop killing Titanspawners roughly after 15% pre-heal. This will reduce the number of Legendary Ventshots you get down to ~2 during the final phase, which means you will likely not wipe if projectile block fails.
However, if you play with only one Chronomancer and one
Scourge, then it’s recommended to continue killing all Titanspawners throughout phase 3. Then, if the first Titanspawn Geyser in p4 is directly next to the squad, you can quickly kill it. Ignore all other Titanspawners after the first.
4.3 - Why are Fumarollers dangerous and how do I deal with them?
Champion Fumarollers hit hard: their attacks often inflict Knockback, which when combined with the heavy damage from Stars/Snowflakes, can quickly down and kill you. The longer they live, the higher the chance that they spawn another star under the boss, so you generally want to kill them as quickly as possible. This usually involves:
- Baiting the Fumaroller to the boss (standing 90°/tangential at the boss)
- After the Fumaroller charges, moving on top of it and cleaving it down.
The only exception to killing them immediately is for some specific strategies in which you want to keep them alive for as long as possible at the start of phase 4, in order to get less Legendary Ventshots. This works because Ventshots, Titanspawn Geysers and Fumarollers have an entity cap (6 in phase 4), so when too many are on the field, no new entities will spawn. However, this is quite dangerous, and requires specialized compositions.
Players in the ranged group should watch the Fumarollers and bait them into the stack before running out for Toxic Geysers if possible, since their charge targets the highest toughness player in their cone of vision. Baiting them in this manner also makes it so that they cannot bother you at range while dealing with other mechanics.
Generally, you want to kill the Fumarollers before they cast a star/snowflake on the boss. If they do cast one, move out of it as quickly as possible. If someone downs, everyone needs to immediately ress, as the high incoming damage makes it difficult to do with few players.
Fumarollers don’t need to be CCd. They can be CCd just from passive AoE CC, but there is no specific need to pay special attention to it.
The melee team who kills the Titanspawner should always have some Stability (e.g. from the
Firebrand), so that they don’t immediately get knocked. Once the Fumaroller is on the group, also make sure to also provide
Stability. The star attack inflicts
Knockback three times, while the charge, roll and headbutt only once each.
4.4 - How do I deal with Ventshots?
Legendary Ventshots have over 20 million HP, so they are not meant to be killed. After 2 or more spawn, keep projectile block up on the group permanently and try to keep up permanent Stability as well. Ventshots can kill you either with ranged attacks when projectile block is down, or with melee attacks (that also inflict
Knockback) when they are close to the squad.
As a Chronomancer, if you are running
Well of Precognition you can use this rotation from Schwifty for permanent
Stability.
4.5 - What are the advantages and disadvantages of only ![]() Power DPS killing Titanspawners?
Power DPS killing Titanspawners?
Titanspawn Geysers have low armor and therefore take extra Power damage. This, combined with the absence of ramp-up and the strong burst typical to most power DPS, can kill them pretty quickly, which mitigates the possibility of having a second Champion Fumaroller spawn.
Burning-based condition builds are also viable due to their relatively short ramp-up. Note that conditions can be stacked on the Titanspawner Geyser while it’s still invulnerable.
Instead, sending all the DPS and boonDPS to the Titanspawner has the advantage that the group stays together (except for the tank), but the disadvantage that if the tank is targeted by Pressure Blast, there may not be a backup tank available. One way to circumvent this is by having only the players doing the melee Bloodstone Shard rotation on the Titanspawner, which means you will always have multiple people tanking. The downside in this case is that once more the squad will be split into two.
Generally either way works good enough: pick based on personal preference and whether you have Power DPS available.
4.6 - How many ![]() Power DPS and what classes should be sent to Titanspawners?
Power DPS and what classes should be sent to Titanspawners?
For simplicity it’s best to send the full melee shard rotation group, as this way you will always include the players who must Dispel and successively pick up the Bloodstone Shard. This should be a
Firebrand and three DPS at least. Including a single
Power DPS, or having at least two
Burning-based
Condition DPS (such as
Weaver,
Willbender and
Firebrand) is usually enough to make sure that they can kill the Titanspawner comfortably in time.
5. Builds, Squad Compositions and More
5.1 - What supports should I play?
You can find a list of builds in the builds & PoV section of the strategy guide, but here follows a short description of the most popular builds:
![]() CC Deadeye
CC Deadeye
This is the only build that can keep up with the encounter’s extreme Crowd Control requirements with little assistance.
For the most part there is only one specific build, but some small variations are possible. Depending if you are tunneling or not, you can play with/without weapon swap.
If you are learning to play this build, check out Chupathingy’s excellent CC Deadeye Guide for more information.
If you need to provide Might and
Fury, you should take
Relic of the Midnight King. Otherwise, take
Relic of Speed for permanent
Superspeed.
![]() Heal Chronomancer
Heal Chronomancer
A standard, yet extremely strong build that does everything well.
By default takes Well of Precognition but if you are paired with a Quick
Firebrand who is comfortable with providing
Stability, then you could also drop the well, replacing it with:
Blink for early prog, to cover up mistakes and manage mechanics. It is also useful to bait Ura into casting Propel in a specific direction.
Feedback allows you to backup projectile blocks in p4, and if taken along with the
Medic Feedback trait also gives you extra ress ability.
- An additional CC skill (such as
Technobabble,
Signet of Domination,
Well of Senility) can be useful to quickly solo CC Toxic Geysers from range (otherwise you can solo CC with
Signet of Humility and
Mental Collapse with
Clarity; or with
Signet of Humility and
Phantasmal Sharpshooter , but the latter requires very good timing). This can be useful when the
Deadeye is inexperienced, and when they cannot otherwise CC.
There have been plenty of kills with all different kind of utility variations, and all the utility skills can fill different needs. Hence, there is not a clear go-to that is the best for all situations.
![]() Celestial Hybrid Scourge
Celestial Hybrid Scourge
A flexible support that provides a bit of extra damage and utility, depending on your group’s needs in terms of offensive vs defensive support.
- Offensive: runs the
Curses and
Soul Reaping traitlines for some additional damage. Has a lower cooldown on
Corrosive Poison Cloud, which means that they can cover reflect with only a single
Firebrand. Also runs sword offhand for extra movement. The downsides are less healing and no
Stability, so the
Firebrand in the same subgroup should bring extra.
- Defensive: runs
Blood Magic instead of
Curses for more healing,
Stability and boons. The downside is less damage and a longer cooldown on
Corrosive Poison Cloud, which means you need to account for either a more difficult projectile block rotation that involves additional people, or (better) you need at least two
Firebrands with the
Scourge just backing up.
- Middle ground: play the offensive build with
Trail of Anguish instead of
Blood is Power, so you have a
Stability skill available.
![]() Condition Quickness Firebrand
Condition Quickness Firebrand
A high damage boonDPS with exceptional utility.
There are a few variations in your loadout depending on your squad’s needs:
Wall of Reflection is needed once per squad. This player should call the projectile block rotation, which is
Wall of Reflection ->
Chapter 3: Valiant Bulwark -> fill – where the fill is either
Corrosive Poison Cloud, or another
Firebrand’s
Chapter 3: Valiant Bulwark. Loses ~3.7k DPS from the bench.
- Running
Mantra of Liberation and
Purging Flames (recommended) gains additional cleanses and
Stability with a group
Stunbreak on the elite, losing ~2.7k DPS from the bench and the
Superspeed from
Feel My Wrath!.
- Running
Feel My Wrath! and
Stand Your Ground! has the advantage of still providing
Superspeed to quickly run to the Titanspawn Geysers. Use
Stand Your Ground! for the Titanspawn and
Epilogue: Unbroken Lines for Steam Prison. This loses ~3.7k DPS from the bench.
- Running
Mantra of Liberation and
Stand Your Ground! trades even more DPS (~6.3k) for more
Stability, which can be done if people in your sub get knocked around a lot, such as when running an offensive
Scourge.
5.2 - What DPS should I play?
DPS builds always depend on the current meta, so it’s best to just look at the builds & PoV section to see what is up-to-date. Alternatively, resources such as Void Lounge and Snowcrows keep a dedicated builds section that you can check.
5.3 - What utility should I bring on DPS?
Condition cleanse, Stability and movement skills are nice if they don’t cost you much and if your group doesn’t require more damage. Examples are:
Willbender - in the
Virtues traitline, taking
Absolute Resolve brings lots of cleanse at a very minor DPS loss.
Mechanist -
Healing Turret is good AoE cleanse.
Weaver - can bring
Lightning Flash for mobility instead of
Glyph of Lesser Elementals. Generally it’s always worth to have good Sulfuric Geyser placements over some additional damage.
Scrapper - can take
Mass Momentum for additional
Stability at the cost of
Superspeed.
5.4 - What are the best ways to CC on a support class?
Deadeye - check out the detailed guide from Chupathingy.
Chronomancer -
Signet of Humility combined with any other skill from weapons or utilities you might have. Depending on the situation, don’t be afraid to use these within
Continuum Split if you anticipate needing CC again soon after.
Scourge -
Summon Flesh Golem into
Charge.
Firebrand -
Jurisdiction (but generally don’t hold it) and
Chapter 3: Heated Rebuke.
Specter - generally runs spear to gain access to
Distracting Throw.
5.5 - Who should provide ![]() Stability?
Stability?
Highly dependant on the squad composition, how much Stability you are running and on the situation. Generally there is not one main
Stability provider. The
Chronomancer is running
Mantra of Concentration and should always pay attention to mechanics and use a charge whenever there is a mechanic that requires it. If running
Well of Precognition, they can also drop it onto the group at Titanspawn Geysers, or on the squad if a Champion Fumaroller is on stack.
Scourge and
Firebrand have varying amounts depending on the build, but should similarly use them whenever needed and they are in range (e.g.
Stand Your Ground! for Titanspawners and
Epilogue: Unbroken Lines for Steam Prison).
So summarizing, whoever has Stability should always use it for mechanics if they are on stack, or wherever the mechanic is happening. For example while the Chrono has obviously the greatest amount of
Stability if they are running
Well of Precognition, this doesn’t help when they are on ranged shard duty away from the squad: at this point the
Firebrand needs to provide
Stability.
5.6 - What are compositions are commonly run?
In standard strategies, the two main compositions are relatively similar and only come down to Scourge or
Chronomancer as second healer and what specific build the
Firebrand runs.
The DPS builds can in principle be any dps of the builds in the builds & PoV section. One notable distinction is that if you run a full Condition comp, everyone in the second subgroup (
Firebrand + 3 DPS) should go kill the Titanspawn Geyser, while with
Power DPS, only two are required to go there to kill it in time. In this case, these two should be placed with their
Firebrand in the
Deadeye’s subgroup.
Willbender strategy instead runs a fixed composition with little build diversity.
Scourge Composition
Composition for the standard strategy. Trades higher DPS for less healing and Stability. Example comp:
| DPS (tank) | DPS (Ranged Backup) | |||
| DPS | DPS | DPS |
* If defensive, then the two Firebrands should do the basic projectile block rotation, while keeping the
Corrosive Poison Cloud from the
Scourge as backup whenever needed.
** If confident, can also drop Stand Your Ground! and still run
Purging Flames, especially if the
Scourge plays the defensive version with
Trail of Anguish and Staff for
Stability.
Double Chrono Composition
Composition for the standard strategy. Trades lower DPS for more healing and Stability. Example comp:
| DPS (tank) | DPS (Ranged Backup) | |||
| DPS | DPS | DPS |
* The Firebrand can either run
Mantra of Liberation and
Purging Flames to have some extra
Stability, or fully offensive with the default SnowCrows build, bringing only
Epilogue: Unbroken Lines for
Stability.
Willbender Composition
Standard composition for the willbender strategy.
5.7 - Can I play a different QuickDPS in a standard strategy?
Other support builds can technically be run if there is no need for specific skills (e.g. projectile block, Stability, etc), but
Firebrand is generally the best choice due to high DPS combined with the massive amount of utility it brings. If in doubt, just check your squad composition and make sure everything is covered.
5.8 - How much damage should my squad be dealing?
This page shows average and approximate DPS required by squads to clear LCM.
Glossary
Arena: Donut/Cage/Prison refers to Ura’s Steam Prison attack that shows up as a donut-shaped orange indicator around a player.
Bubbles: aka “Friends”, refers to Ura’s Pressure Blast attack that applies 2 small circle indicators to random players which will trap those players and anyone else caught in the explosion radius in floating bubbles.
Titanspawner: Refers to the Titanspawn Geyser that appears when Ura casts Create Titanspawn Geyser.
Fumas/Fumarollers: Refer to the Champion Fumaroller adds that spawn from Titanspawn Geysers.
LCM: Legendary Challenge Mode.
Ventshots: Refer to the Legendary Ventshot adds that spawn from Titanspawn Geysers during phase 4.