Return to Home Return to Overview Strategy Guide
Decima Mechanical Reference
Table of Contents
This page contains a detailed reference of the various attacks and mechanics present in the encounter.
The rest of this page is structured into the following sections:
- Overview - basic description of the fight and its main points.
- Phases - a description of the structure of the fight, with transitions and differences between phases.
- Mechanics - a reference of every attack in the encounter.
- Effects - a reference of all effects unique to the encounter.
Overview
Decima’s basic behaviour is centered around an attack loop: a series of skills that constantly repeat until the boss progresses to the next phase by being lowered to determined health thresholds. This means that the encounter is relatively scripted; since the sequence is known, the squad can always predict and prepare for oncoming mechanics. The sequence varies phase by phase, but has the following structure:
flowchart LR
    %%{init: {'themeVariables': { 'edgeLabelBackground': 'transparent'}}}%%
    classDef link stroke:#e0be00,stroke-width:3px,color:#e0be00,font-size:13px,background-color:#212325
    classDef invis fill:#212325,stroke:#212325,color:#212325
    classDef green fill:#00540d,stroke-width:0,color:#fff
    classDef blue fill:#0072c9,stroke-width:0,color:#fff
    classDef default fill:#212325,stroke:#e0be00,color:#e0be00

    shocks(["`Foreshock &
    Mainshock`"])
    arrows1("`Combination attack
    involving <a href='#fluxlances' style='color:white'>Fluxlances</a>
    and <a href='#chorus-of-thunder' style='color:white'>Chorus of Thunder</a>`")
    filler(["`Sequence of
    filler skills`"])
    arrows2("`Combination attack
    involving <a href='#fluxlances' style='color:white'>Fluxlances</a>
    and <a href='#chorus-of-thunder' style='color:white'>Chorus of Thunder</a>,
    with a <a href='#red-fluxlance' style='color:white'>Red Fluxlance</a>.`")

    click shocks "#foreshock--mainshock"

    shocks l1@--> arrows1
    arrows1 l2@--> filler
    filler  l3@--> arrows2

    class l1,l2,l3 link
Proximity to the boss determines the targets for the primary mechanics, Chorus of Thunder and Fluxlances. With proper positioning, these mechanics can be assigned to the same players for each occurrence, making the fight easier for the group as a whole.
Several of Decima’s attacks hit hard, requiring proper healing and damage mitigation management. Stability is also required for both groups at differing times throughout the fight.
Misplaying mechanics usually results in the boss acquiring Charge stacks. This can be dangerous since the boss’s damage scales with the number of stacks, additionally upon gaining 10 stacks the boss enrages,killing the entire group . However, Decima resets her
Charge level twice, at 70%, 40% of her HP, and as a result the encounter is relatively forgiving.
Table of Mechanics
A brief description of the primary mechanics in the fight. Click on a mechanic to view additional information.
| Attack | Common Name | Brief Description |
| Thrumming Presence | - | Constant damaging AoE around the boss. |
| Fluxlances | Arrows | Laser attacks originating from the boss that follow players. |
| Conduits | Pylons | Small, moving structures that interact with other mechanics. |
| Dancing Sparks | Greens | Small greens that need to be intercepted by players. |
| Chorus of Thunder | Spreads | Multiple AoEs that target players and conduits. |
| Foreshock and Mainshock | Autos, Pizza | Melee AoE attacks performed in sequence by the boss. |
| Seismic Crash | Smash, Jump | Knockback AoE centered on the boss. |
| Earthrend | - | Knock-in ring AoE on the outside of the arena. |
| Flux Nova | Nova, CC | Large channeled attack that unlocks a |
Interaction Graph
Decima can be a difficult boss to understand fully, as each of her unique mechanics has its own particular interactions with the rest of the encounter. For convenience’s sake, below you will find a simplified graph with the most important interactions.
flowchart TD
    %%{init: {'themeVariables': { 'edgeLabelBackground': 'transparent'}}}%%
    linkStyle default stroke:#857532,stroke-width:3px,color:#e0be00,font-size:13px,background-color:#212325
    classDef purple fill:#654d86,stroke:#e0be00,color:#e6e1e8,font-size:9pt
    classDef green fill:#00540d,stroke:#e0be00,color:#e6e1e8
    classDef blue fill:#0072c9,stroke:#e0be00,color:#e6e1e8
    classDef default fill:#212325,stroke:#e0be00,color:#e6e1e8

    fulm(Fulminate)
    subgraph peals [Increased by DPS]
        peal_h(["`Peal of
        Harmony`"]):::blue
        peal_d(["`Peal of
        Discord`"]):::blue
    end
    subgraph thunder [Chorus of Thunder]
        disc_thunder(["`Player
        Spreads`"])
        harm_thunder(["`Conduit
        Spreads`"])
    end
    charge([Charges]):::blue
    harm(["`Harmonic
    (Arrow)
    Sensitivity`"]):::purple
    galv(["`Galvanic
    (Green)
    Sensitivity`"]):::purple
    thrum(Thrumming Presence)
    flux(Arrows)
    conduit(Conduits)
    spark([Greens]):::green
    nova(Flux Nova)

    click charge "#charge"
    click spark "#dancing-sparks"
    click nova "#flux-nova"
    click peal_d "#-peal-of-discord"
    click peal_h "#-peal-of-harmony"
    click disc_thunder "#discordant-thunder"
    click harm_thunder "#harmonious-thunder"
    click conduit "#conduits"
    click thrum "#thrumming-presence"
    click flux "#fluxlances"
    click fulm "#fulminate"
    click galv "#-galvanic-sensitivity"
    click harm "#-harmonic-sensitivity"

    harm -->|Increases Damage Of|flux
    flux -->|Apply|galv
    thrum -->|Applies|harm
    galv -->|Increases Damage Of|spark
    flux -. Can Charge .->conduit
    harm_thunder -->|Charges|conduit
    disc_thunder -. Can Charge .-> conduit
    conduit -->|Spawn|spark
    spark -. Can Generate .->charge
    peal_h-->|Consumed By|harm_thunder
    peal_d -->|Consumed By|disc_thunder
    fulm -. Can Increase .-> peals
    charge -->|Consumed By|nova

    class peals,thunder default
Phases
Decima’s encounter has an articulate structure, with over nine unique sub-phases. We can roughly divide these into four distinct parts, based on health percentage.
First Phase
100% - 80%
Decima starts the fight in the center of the arena. As soon as the encounter begins, she summons her Conduits, then begins doing the following attack loop:
flowchart LR
    %%{init: {'themeVariables': { 'edgeLabelBackground': 'transparent'}}}%%
    classDef link stroke:#e0be00,stroke-width:3px,color:#e0be00,font-size:13px,background-color:#212325
    classDef invis fill:#212325,stroke:#212325,color:#212325
    classDef purple fill:#654d86,stroke-width:0,color:#e0be00
    classDef green fill:#00540d,stroke-width:0,color:#fff
    classDef blue fill:#0072c9,stroke-width:0,color:#fff
    classDef default fill:#212325,stroke:#e0be00,color:#e0be00

    shocks(["`Foreshock &
    Mainshock`"])
    subgraph arrows1 [ ]
        direction TB
        flux1("`Fluxlance
        Fusillade`")
        chorus1("`Chorus of
        Thunder`")
    end
    smash("`Seismic
    Crash`")
    greens(["`Dancing
    Sparks`"]):::green
    rend(Earthrend)
    subgraph arrows2 [ ]
        direction TB
        flux2("`Fluxlance
        Fusillade (Red)`")
        chorus2("`Chorus of
        Thunder`")
    end

    click shocks "#foreshock--mainshock"
    click flux1 "#fluxlance-salvo"
    click chorus1 "#chorus-of-thunder"
    click flux2 "#fluxlance-fusillade"
    click chorus2 "#chorus-of-thunder"
    click smash "#seismic-crash"
    click rend "#earthrend"
    click greens "#dancing-sparks"

    shocks l1@--> arrows1
    flux1 ~~~ chorus1
    arrows1 l2@--> smash
    smash l3@--> greens
    greens l4@--> rend
    rend l5@-->arrows2
    flux2 ~~~ chorus2

    class arrows1,arrows2 default
    class l0,l1,l2,l3,l4,l5,l6 link
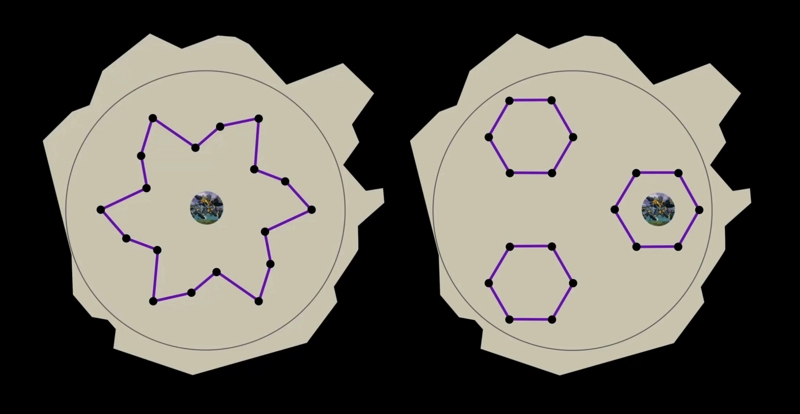
Decima’s Conduits in this phase form a star shape, and maintain this shape, only slightly shifting inwards and outwards as the phase progresses. Fulgent Fences will be active during both Fluxlance Salvo attacks, and during Seismic Crash and Earthrend. The second Fluxlance Salvo, and every other salvo afterwards, will have a Red Fluxlance targeting the furthest player.
80% - 70%
As soon as Decima reaches 80% of her HP, she will finish whatever animation she is doing, then transition into the following phase. The transition consists of these steps:
- All Fulgent Fences and Dancing Sparks currently on the arena will despawn.
- All Conduits rearrange into a new pattern, made of three hexagonal formations (see the video below). Meanwhile, Decima uses Seismic Reposition to move inside of one of these hexagons.
- Fulgent Fences reactivate, sealing off the formation, and a Transcendent Boulder spawns inside each of the two remaining unoccupied hexagons.
Decima will always move to the formation consisting of the Conduits that were formerly on the outermost ring (colored in blue in the video above).
As soon as Decima is done repositioning, she continues with the same attack loop as in the previous phase, except all attacks will originate from her new position.
Both Decima and Transcendent Boulders will gain Linked. This means that the boulders must be killed within 10 seconds of each other. Decima herself, while still vulnerable, will not transition into the following phase until they are dead.
At the beginning of the phase, an updraft will spawn in the center of the arena, allowing players to jump up and glide into the hexagonal formations after they are locked down with Fulgent Fences. Similar updrafts will spawn on each Transcendent Boulder’s death, allowing players to exit and return to the boss at the end of the split phase.
Both Transcendent Boulders will start casting Sparkling Reverberation, unlocking their Defiance Bar. After this attack ends, either by completing the channel or the squad breaking the defiance bar, they will start chain casting Seismoelectricity until they reach 1% health (see
Linked) or die.
70% Transition
Once Decima reaches 70% of her health and both Transcendent Boulders are dead, she performs a sequence that transitions her into the second phase:
- Decima gains
Nova Shield.
- Decima will Seismic Reposition to the center of the arena.
- Decima starts channeling her Flux Nova, unlocking her
Defiance Bar, and simultaneously casts Chorus of Thunder.
- Upon finishing her channel, or shortly after her defiance is broken, Decima will Fulminate all charged Conduits, then consume all her
Charge to conclude her Flux Nova.
Second Phase
If Decima’s Defiance Bar was broken during Flux Nova, she will start the phase with 10 seconds of
Stunned and
Exposed. This phase is structured similarly to the previous one, with two burn phases divided by a split phase at 50% HP. The major difference here is two fold: conduit movements are markedly different from the first phase and the 50% split phase is significantly more dangerous. Combined, these often prove to be a major hurdle for progression.
70% - 50%
In this burn phase, Decima performs the following attack loop:
flowchart LR
    %%{init: {'themeVariables': { 'edgeLabelBackground': 'transparent'}}}%%
    classDef link stroke:#e0be00,stroke-width:3px,color:#e0be00,font-size:13px,background-color:#212325
    classDef invis fill:#212325,stroke:#212325,color:#212325
    classDef purple fill:#654d86,stroke-width:0,color:#e0be00
    classDef green fill:#00540d,stroke-width:0,color:#fff
    classDef blue fill:#0072c9,stroke-width:0,color:#fff
    classDef default fill:#212325,stroke:#e0be00,color:#e0be00

    shocks(["`Foreshock &
    Mainshock`"])
    subgraph arrows1 [ ]
        direction TB
        flux1("`Fluxlance
        Salvo`")
        chorus1("`Chorus of
        Thunder`")
    end
    smash("`Seismic
    Crash`")
    greens(["`Dancing
    Sparks`"]):::green
    rend(Earthrend)
    subgraph arrows2 [ ]
        direction TB
        flux2("`Fluxlance
        Salvo (Red)`")
        chorus2("`Chorus of
        Thunder`")
    end

    click shocks "#foreshock--mainshock"
    click flux1 "#fluxlance-salvo"
    click chorus1 "#chorus-of-thunder"
    click flux2 "#fluxlance-salvo"
    click chorus2 "#chorus-of-thunder"
    click smash "#seismic-crash"
    click rend "#earthrend"
    click greens "#dancing-sparks"

    shocks l1@--> arrows1
    flux1 ~~~ chorus1
    arrows1 l2@--> smash
    smash l3@--> greens
    greens l4@--> rend
    rend l5@-->arrows2
    flux2 ~~~ chorus2

    class arrows1,arrows2 default
    class l0,l1,l2,l3,l4,l5,l6 link
This loop is, in essence, identical to its behaviour in the previous phase, but substitutes Fluxlance Fusillade for the more dangerous Fluxlance Salvo. On the second and every other Fluxlance Salvo thereafter, one of the fluxlances will be a Red Fluxlance.
Conduit movements in this phase are shown in the following short video, where each corner of the colored shapes is a conduit.
50% - 40% and Transition
This phase is essentially identical to the 80% -70% Phase, with one major difference: once their Defiance Bar is broken, Transcendent Boulders will start periodically casting Sparkwave. This is an extremely dangerous skill, both it and the Charged Ground it generates must be avoided or managed with extreme care.
Once Decima reaches 40% of her health and both Transcendent Boulders are dead, she will perform the same sequence she used at 70% to transition into the third phase.
Third Phase
This phase consists of one large burn from 40% to 10% of Decima’s HP. It differs significatively from the previous phases, as Decima will often make use of her Seismic Reposition to move around the arena. This also introduces two new attacks: Focused Fluxlance and Converging Fluxlances.
At the beginning of the phase, Decima will summon two Transcendent Boulders. These are untargetable and cannot be interacted with. They do not Link with the boss, and do not cast any skills except for participating in Converging Fluxlances. Decima will then Seismic Reposition and begin the following attack loop:
flowchart LR
    %%{init: {'themeVariables': { 'edgeLabelBackground': 'transparent'}}}%%
    classDef link stroke:#e0be00,stroke-width:3px,color:#e0be00,font-size:13px,background-color:#212325
    classDef invis fill:#212325,stroke:#212325,color:#212325
    classDef purple fill:#654d86,stroke-width:0,color:#e0be00
    classDef green fill:#00540d,stroke-width:0,color:#fff
    classDef blue fill:#0072c9,stroke-width:0,color:#fff
    classDef default fill:#212325,stroke:#e0be00,color:#e0be00

    shocks(["`Foreshock &
    Mainshock`"])
    subgraph arrows1 [ ]
        direction TB
        flux1("`Fluxlance
        Salvo`")
        chorus1("`Chorus of
        Thunder`")
        focused(["`Focused
        Fluxlance`"]):::green
    end
    move("`Seismic
    Reposition
    (Random)`")
    subgraph graph1 [ ]
        shocks2(["`Foreshock &
        Mainshock`"])
        greens(["`Dancing
        Sparks`"]):::green
    end
    subgraph arrows2 [ ]
        direction TB
        flux2("`Converging
        Fluxlances`")
        chorus2("`Chorus of
        Thunder`")
    end

    click move "#seismic-crash"
    click shocks "#foreshock--mainshock"
    click shocks2 "#foreshock--mainshock"
    click flux1 "#fluxlance-salvo"
    click chorus1 "#chorus-of-thunder"
    click flux2 "#converging-fluxlances"
    click chorus2 "#chorus-of-thunder"
    click greens "#dancing-sparks"
    click focused "#focused-fluxlance"

    shocks l1@--> arrows1
    flux1 ~~~ chorus1
    chorus1 ~~~ focused
    arrows1 l2@--> move
    move l3@--> graph1
    shocks2 ~~~ greens
    graph1 l5@--> arrows2
    flux2 ~~~ chorus2

    class arrows1,arrows2,graph1 default
    class l0,l1,l2,l3,l4,l5,l6 link
Every time Decima casts Seismic Reposition in this phase, she will relocate to a random position located on a circle 1500 units from the center of the arena. Furthermore, all her conduits will move to this new position, reconfiguring as shown in the following clip:
Final Phase
On reaching 10% health, Decima will become Invulnerable, then Seismic Reposition to the center of the arena. She will simultaneously cast Discordant Thunder targeting all ten players, then cast Harmonious Thunder. Shortly after jumping, all Conduits will lose their charge.
Once at the center, the squad will have some time to damage her while she does the following sequence of attacks:
- Chorus of Thunder twice, once with a single target per type and once with three targets per type.
- Fulgent Fences.
- Fluxlance Salvo, with one fluxlance being a Red Fluxlance.
Once this sequence is complete, Decima will start rapidly gaining Peal of Harmony and
Peal of Discord while chain-casting Chorus of Thunder. This results in all Conduits quickly being charged. Sometimes conduits will double charge, as they will be targeted by a new Chorus of Thunder during a previous cast.
Throughout this, conduits will sporadically spawn Dancing Sparks. Then, once all conduits are charged, every conduit will start simultaneously spawning Dancing Sparks. This, combined with continuous Discordant Thunder casts, will rapidly lead to defeat unless the boss is killed.
Peals Gained
The sequence in which Decima gains Peal of Harmony and
Peal of Discord throughout the final phase is deterministic, though hard to keep track of. She wll gain:
- +1
Peal of Harmony at 7, 4 and 1% HP.
- +1 of both peals at 3, 5, 7 and 9 seconds after the start of the phase. On the first and last of this set, these will be used instantly to cast Chorus of Thunder. Sometimes the first one will not increase the targeted Conduit’s charge.
- +3 of both peals at 21 seconds after the start of the phase, instantly used by Chorus of Thunder.
- +4 of both peals at 23 seconds.
Peal of Harmony will instantly be used by Harmonious Thunder.
- +4 of both peals at 25 seconds.
- +5 of both peals at 29 seconds and every 2 seconds after. These cannot take Decima above 10 stacks so the third and onwards often will have no effect.
(Credit to @Tsaerid for researching this)
List of Mechanics
This section contains a full, in-depth explanation of all mechanics in the encounter.
Thrumming Presence
A 750-radius area-of-effect centered around Decima, outlined with a faint red circle. Constantly inflicts a small amount of damage to all players inside the area and applies Harmonic Sensitivity.
Decima gains her Thrumming Presence at the beginning of the encounter only losing it: while casting Seismic Reposition, when she has Nova Shield, while
Stunned, and when she is under 10% health.
This attack enables effective use of Relic of Thorns on the encounter.
Fluxlances
Also known as “Arrows” due to their indicator; Laser attacks originating from the boss. Once their indicator appears, after a brief delay, fluxlances will fire, applying an effect in a line according to their type. Fluxlances have infinite range, but can be blocked by Conduits. Any conduit hit by a lance will increase its charge level, but will prevent the lance from extending beyond the conduit itself. Fluxlances cannot be Blocked or
Evaded, and ignore
Invulnerability.
Standard Fluxlance
Also known as Orange Arrow. Targets the furthest player that is not targeted by another Fluxlance, dealing heavy damage to all allies, increased for players affected by Harmonic Sensitivity, and applying 30 seconds of
Galvanic Sensitivity. Additionally applies a stack of
Exposed to all allies hit except its target.
Red Fluxlance
Also known as Red Arrow. Always targets the furthest player, and Defeats all allies it hits. Must be aimed away from the squad and blocked using a Conduit.
Focused Fluxlance
Also known as Green Arrow. Targets the furthest conduit from the furthest player from the boss (i.e. opposite side of the boss from Red Arrow). Requires five people to be inside the arrow’s line of fire to block the attack and prevent it from charging the conduit. Deals heavy damage, reduced based on the number of people in the arrow, and unaffected by Harmonic Sensitivity. Focused Fluxlances are summoned as part of Decima’s attack rotation from 40% to 10% HP.
Standard or red fluxlances are summoned whenever Decima casts one of the following skills as part of her attack loop:
Fluxlance Fusillade
Targets the five furthest players with standard fluxlances. Targeted players will have a number above their head from one to five. After a brief delay the lances will be fired in sequence based on their number. Every other time that Decima uses this skill, one of the fluxlances will be a red fluxlance.
Fluxlance Salvo
Targets the five furthest players with fluxlances. After a brief delay, all lances are fired simultaneously. Every other time that Decima uses this skill, one of the fluxlances will be a red fluxlance.
Converging Fluxlances
This skill does not have an official name, so this name is given for convenience.
A combined attack performed by Decima and two Transcendent Boulders. This attack consists of:
- One Red Fluxlance cast by Decima and targeting the furthest player from her.
- Two Standard Fluxlances cast by Decima and targeting the next two furthest players.
- One Standard Fluxlance cast by each Transcendent Boulder and targeting the furthest player from Decima.
Therefore, while five fluxlances are summoned in total similarly to previous attacks, three of them (one red and two standard) will be targeting the same player.
Chorus of Thunder
This attack has two components:
Harmonious Thunder
Decima consumes all stacks of Peal of Harmony. For each stack, she targets the closest uncharged, untargeted Conduit to the furthest player with Thunder.
Discordant Thunder
Decima consumes all stacks of Peal of Discord. For each stack, she targets the closest untargeted player with Thunder.
Thunders are player-centred tracking AoEs that fill and explode after a brief delay, dealing damage and charging all Conduits they hit. Damage increases with the number of overlapping AoEs, but can be Evaded,
Blocked, or avoided with
Invulnerability . Single blocks will prevent one Thunder from hitting, but channeled blocks are necessary in case of multiple overlaps.
Players hit by any Thunder except their own will gain a stack of Exposed.
Chorus of Thunder is used regularly by Decima as part of her attack loop.
Conduits
Conduits, or pylons, are structures that are manipulated by Decima and play a critical part in the encounter as a whole. Eighteen of them are summoned at the beginning of the fight and they persist throughout all phases. Conduits are arrayed in shifting patterns around Decima, which vary based on the phase and the state of Decima’s attack loop.
Conduit Charge
Whenever a conduit is hit by by Fluxlances or Thunder, it gains a level of Charge. When charged a conduit gains Fulgent Aura: a red damaging AoE centered around the conduit that grows larger with each level of charge. Conduits cannot be charged more than three times: every time a level three conduit would gain a charge, it will instead Fulminate. Conduits lose all charge after the boss casts Flux Nova, and when the boss transitions into the final phase of the fight.
Fulminate
A charged conduit explodes, dealing damage based on its charge level in a large area. Level three conduits additionally apply a stack of Exposed, and grant Decima five stacks each of
Peal of Harmony and
Peal of Discord. Level three conduits will Fulminate whenever they would gain a charge, and all conduits Fulminate as part of Flux Nova, during the transitions at 70% and 40% of Decima’s health.
Fulgent Fences
Lasers periodically link all conduits together in a pattern. Whenever any player passes through them, they are affected by Reverberating Impact, which deals moderate damage and pushes the player out of the laser, preventing them from crossing it. This is also applied for movement skills such as dashes, but excludes player teleportation such as blinks or portals. It is not affected by Stability. Players that are knocked into a fence by Decima’s attacks are ejected at high speeds, possibly into other fences.
Dancing Sparks
Also known as greens. Small AoEs that spawn from charged Conduits and start moving towards Decima. If they are allowed to reach the boss, they are consumed and grant her a stack of Charge.
Sparks deal damage to all players standing in their area, which is greatly increased towards players affected by Galvanic Sensitivity. When enough players stand inside a spark, it will stop moving towards Decima and start draining health, disappearing once fully drained. The number of players required to achieve this effect is displayed above each spark, and is equal to the charge level of its originating conduit.
All charged conduits spawn sparks simultaneously as part of Decima’s attack loop.
Foreshock & Mainshock
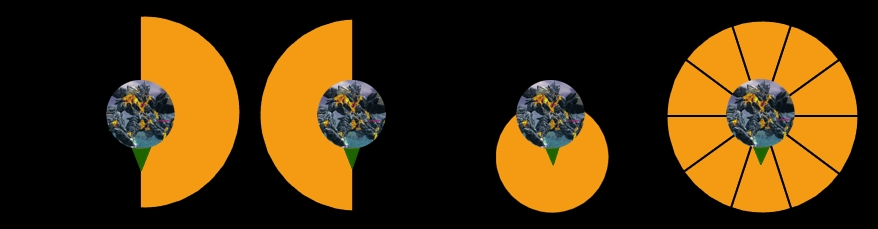
Foreshock
Decima stomps three times, dealing moderate damage in 3 large AoEs.
Mainshock
Always cast after Foreshock: a “pizza” attack centered on Decima. Deals significant damage and additionally inflicts 1.5 seconds of Cripple. Players hit by multiple “slices” will receive multiple instances of this damage.
Foreshock and Mainshock are used regularly by Decima as part of her attack loop, and are always directed towards the closest player.
Seismic Crash
Decima leaps up, then crashes down in a circular AoE centered on herself. This AoE has two components:
- An inner circle, with the same dimensions as Decima’s hitbox, that
Defeats all players inside of it. This effect cannot be
Evaded or
Blocked, and is not affected by
Invulnerability.
- A larger circle centered on the hitbox deals damage (decreasing the further the player) and inflicts
Knockback, launching players away from the boss. This part can be mitigated using all standard methods.
Seismic Crash is a critical ability, not due to its instant kill potential, but mainly because the Knockback is especially dangerous when combined with Chorus of Thunder, Fluxlances and Fulgent Fences.
Decima casts this skill regularly as part of her attack loop. Furthermore, she also casts this skill as part of her Seismic Reposition, which is essentially identical but also has a movement component.
Earthrend
Decima leaps up, then crashes down, generating AoE attacks in two components:
- An inner circle, corresponding with Decima’s hitbox, that
Defeats all players inside of it. This effect cannot be
Evaded or
Blocked, and is not affected by
Invulnerability.
- A wide ring on the outside of the arena deals damage and inflicts
Knockback, launching players towards the boss. This part can be mitigated using all standard methods.
While similar to Seismic Crash, this skill is much less threatening since it usually does not affect the area where the squad is stacking. Decima casts this skill regularly as part of her attack loop.
Flux Nova
A massive arena-wide attack. This attack has two versions: a first one is used as part of the phase transitions at 70% and 40% of Decima’s health total, while the second one is used whenever she reaches 10 stacks of Charge, or when the enrage timer runs out.
Transition Nova
Upon reaching 70% or 40% health, Decima gains Nova Shield, then casts Seismic Reposition to the center of the arena, followed by Chorus of Thunder. She will then start channeling her main attack, gaining a large
Defiance Bar. During the channel, all charged Conduits will start summoning Dancing Sparks: if these are allowed to reach Decima, they will fully regenerate her
Defiance in addition to their other effects. Breaking this bar will shorten the channel (possibly despawning all Dancing Sparks) and apply
Fractured Armor to her.
When the channel ends: Decima will first Fulminate all conduits, and then cast her main attack, consuming all stacks of Charge to deal massive squad-wide damage. If she is affected by
Fractured Armor: she will take backlash from her attack,
Stunning her for 10 seconds and applying
Exposed for the same duration.
Death Nova
If Decima gains 10 stacks of Charge or the enrage timer runs out, Decima will stop whatever attack she was doing, gain
Nova Shield, and then cast a maximum power Nova after a short channel,
Defeating all players.
Transcendent Boulders
Dangerous minions that spawn during the split phases at 70% and 50% of Decima’s HP, and at the beginning of the third phase.
| Health | 1,373,882 |
| Armor | 2597 (standard) |
| Hitbox | 380 |
| Defiance | 1000 |
There will always be two of them alive at the same time; since they gain Linked, they must be killed within 10 seconds of each other.
Players who attack Transcendent Boulders from more than 750 range will be teleported to the boulder and gain a stack of Debilitated.
Boulders can use several different attacks:
Sparking Reverberation
The boulder smashes the ground continuously, for a cast time of 19.75 seconds, dealing damage to all enemies and unlocking its Defiance Bar. If the skill is allowed to complete: it will apply 60 seconds of
Debilitated to the entire squad. Breaking the
Defiance Bar will interrupt this skill,
Stunning the boulder for 5 seconds and applying 10 seconds of
Exposed.
Seismoelectricity
The boulder jumps into the air and then crashes down: releasing six arcs of electricity that spread out in a hexagonal shape, before returning to the add. These arcs will deal damage and remove boons from players they hit and can be jumped or blocked.
Sparkwave
Targets the fifth-furthest player from the boulder with a massive, 120° wide arc of lightning. Players hit by this wave will take damage and generate Charged Ground below them. This skill is extremely dangerous, so whenever the boulder’s Defiance Bar is broken, a player (usually the healer) should try to bait it away from their teammates, including the subgroup fighting the other boulder, as the attack is arena-wide.
Charged Ground
A circular damaging AoE that increases its damage over time, and applies Daze and
Vulnerability on reaching maximum damage. Players who are hit by this skill will also generate an additional AoE below them, if they haven’t already, resulting in a fast spread of the damaging area.
List of Effects
Decima’s encounter has a multitude of unique effects, which are listed below for reference purposes.
![]() Galvanic Sensitivity
Galvanic Sensitivity
An effect that is applied to players hit by a Standard Fluxlance, lasting for 30 seconds. Greatly increases damage taken from Dancing Sparks. Galvanic Sensitivity is incompatible with
Harmonic Sensitivity, which it overwrites.
![]() Harmonic Sensitivity
Harmonic Sensitivity
An effect that is applied to players standing inside Decima’s Thrumming Presence, lasting for 30 seconds. Greatly increases damage taken by Fluxlances.
Harmonic Sensitivity is incompatible with
Galvanic Sensitivity, and cannot be applied to players affected by
Galvanic Sensitivity.
![]() Charge
Charge
A stacking effect that is gained by Decima every time she consumes Dancing Sparks. Increases all outgoing damage from all of Decima’s attacks. If Decima gains 10 stacks of Charge, she becomes
Unstoppable and gains
Nova Shield, after which she then casts a maximum power Flux Nova, defeating all players.
Decima loses all stacks of Charge when she performs her Flux Nova.
![]() Peal of Harmony
Peal of Harmony
A stacking effect that determines the number of Conduits that Decima targets with Harmonious Thunder during Chorus of Thunder. Decima starts the fight with 5 stacks of Peal of Harmony and gains a stack every 5% of her HP.
![]() Peal of Discord
Peal of Discord
A stacking effect that determines the number of players that Decima targets with Discordant Thunder during Chorus of Thunder. Decima gains 5 stacks of Peal of Discord every 10% of her HP.
![]() Nova Shield
Nova Shield
Makes Decima immune to health damage. Decima gains this effect on reaching 70% or 40% health, when she gains 10 stacks of Charge, or when the enrage timer runs out. She loses it after casting Flux Nova
![]() Fractured Armor
Fractured Armor
An effect that is gained by Decima whenever her defiance bar is broken. Makes Decima susceptible to the backlash from her next Flux Nova, which Stuns her for 10 seconds and applies
Exposed for the same duration.
![]() Linked
Linked
This effect has two versions: one that is applied to Decima at the beginning of the 80% and 50% split phases, and one that is applied to Transcendent Boulders.
Decima
Decima links herself to a Transcendent Boulder, and and becomes Invulnerable upon reaching a certain maximum HP threshold as long as the boulder is alive. This threshold is 70% during the first split phase, and 40% during the second. Since there are always two boulders, Decima will gain two of this effect.
Boulders
The two Transcendent Boulders link to each other and gain this effect. Whenever one of the two falls to 1% HP, it becomes Invulnerable, and after 10 seconds, it will heal itself back to 50% of its maximum health. If, during this interval, its linked target also falls to 1% health, the
Invulnerability is removed and both boulders can be killed.