Return to Home Return to Overview Strategy Guide
Greer Mechanical Reference
Table of Contents
This section contains a detailed reference of the various attacks and mechanics present in the Godspoil Greer encounter.
The rest of this page is structured into the following sections:
- Overview - basic description of the fight and its main points.
- Phases - a description of the structure of the fight, with transitions and differences between phases.
- Mechanics - a reference of every attack in the encounter.
- Effects - a reference of all effects unique to the encounter.
Overview
Greer’s basic attack pattern centers around a handful of skills that have individual cooldowns, priorities, and line of sight/range conditions. This means that while there is some randomness in the encounter, repeatable patterns often occur as high priority skills come off cooldown at roughly the same time over multiple pulls. The fight is separated into various burn and split phases, with transitions triggered by hitting specific health thresholds.
Lesser Titans
A defining characteristic of this encounter is the presence of the lesser titans: Reeg, Gree and Ereg. These adds have a profound impact on the overall structure and strategy of the fight.
| Enemy | Health | Hitbox | Boon Granted |
| Reeg, the Blighter | 21’234’960 | 600 | |
| Gree, the Bringer | 21’234’960 | 600 | |
| Ereg, the Enabler | 21’234’960 | 600 |
During burn phases, lesser titans are locked into specific positions, and cannot move, limiting the skills they can use. During split phases, they move to new positions and are then free to ambulate and use all their skills as their AI dictates. Each one has access to a subset of Greer’s skills, as shown here.
Each lesser titan is associated with a boon: Reeg with Resolution, Gree with
Protection and Ereg with
Might. As long as a lesser titan is alive, they will provide their boon to all other titans on the map. These boons cannot be stripped.
Ironically, lesser titans cannot grant themselves their own boon.
Damaging a lesser titan to a certain threshold will make it despawn for the current phase, at which point it will stop providing its boon and casting skill. These thresholds are:
- 75% for the first burn phase.
- 50% for the first split phase.
- 25% for the second burn phase.
Gree and Reeg must be dead at the end of the second split phase, but Ereg does not need to be killed at all. Leaving him alive, and surviving his attacks during the hectic final phases of the fight, will net you the Spare the Ereg achievement.
These mechanics generally force squads onto either a full Power or full
Condition composition. More information on why can be found here.
Table of Mechanics
A brief description of the primary mechanics in the fight. Click on a mechanic to view additional information.
| Attack | Common Name | Brief Description |
| Blob of Blight | Death/Blighting orbs | Three large homing orbs that |
| Cage of Decay | Arrows | 5 projectiles that pulse |
| Empowering Blast | Empowered orbs/Small orbs | Small purple orbs that give |
| Enfeebling Miasma | Cones, Poison cones | A large wave of poisonous gas that applies conditions, corrupts boons and leaves behind Noxious Blight pools. |
| Eruption of Rot | Greens | Large greens that require 2 or 3 players to be solved. |
| Rain of Spores | Artillery barrage | A barrage of projectiles that explode on impact, dealing damage and applying conditions. |
| Ripples of Rot | Jump | A jump attack with a large AoE that deals damage and inflicts |
| Scattering Sporeblast | Barrage | A barrage of damaging projectiles that targets enemies in front of the caster. |
| Stomp the Growth | Slam, Stomp, Wave | A three-part attack chain, with two AoE slams followed by a wave that corrupts boons and inflicts |
| Sweep the Mold | Autoattack, Cone | Two cone attacks that deal damage and inflict |
| Covid, Reds | A dangerous debuff applied by some of Greer’s abilities that can rapidly spread to other players. | |
| Aura of Corruption | Hitbox | An AoE corresponding with Greer’s hitbox that pulses damage and |
Phases
There are essentially 3 different types of phases:
- Burn phases, in which Greer and the lesser Titans are vulnerable.
- Split phases, in which Greer is
Invulnerable and the lesser Titans are vulnerable (at new, separate locations)
- The 10% phase, in which Greer is
Invulnerable, but 3 Champion Proto-Greerlings are active (and Ereg, if kept alive).
The fight overall consists of:
- A first burn phase from 100% to 65% health.
- The first split phase.
- A second burn phase from 65% to 35% health.
- The second split phase.
- A third burn phase from 35% to 10% health.
- The proto-greerling phase.
- A final burn phase from 10% to 0% health.
Burn Phases
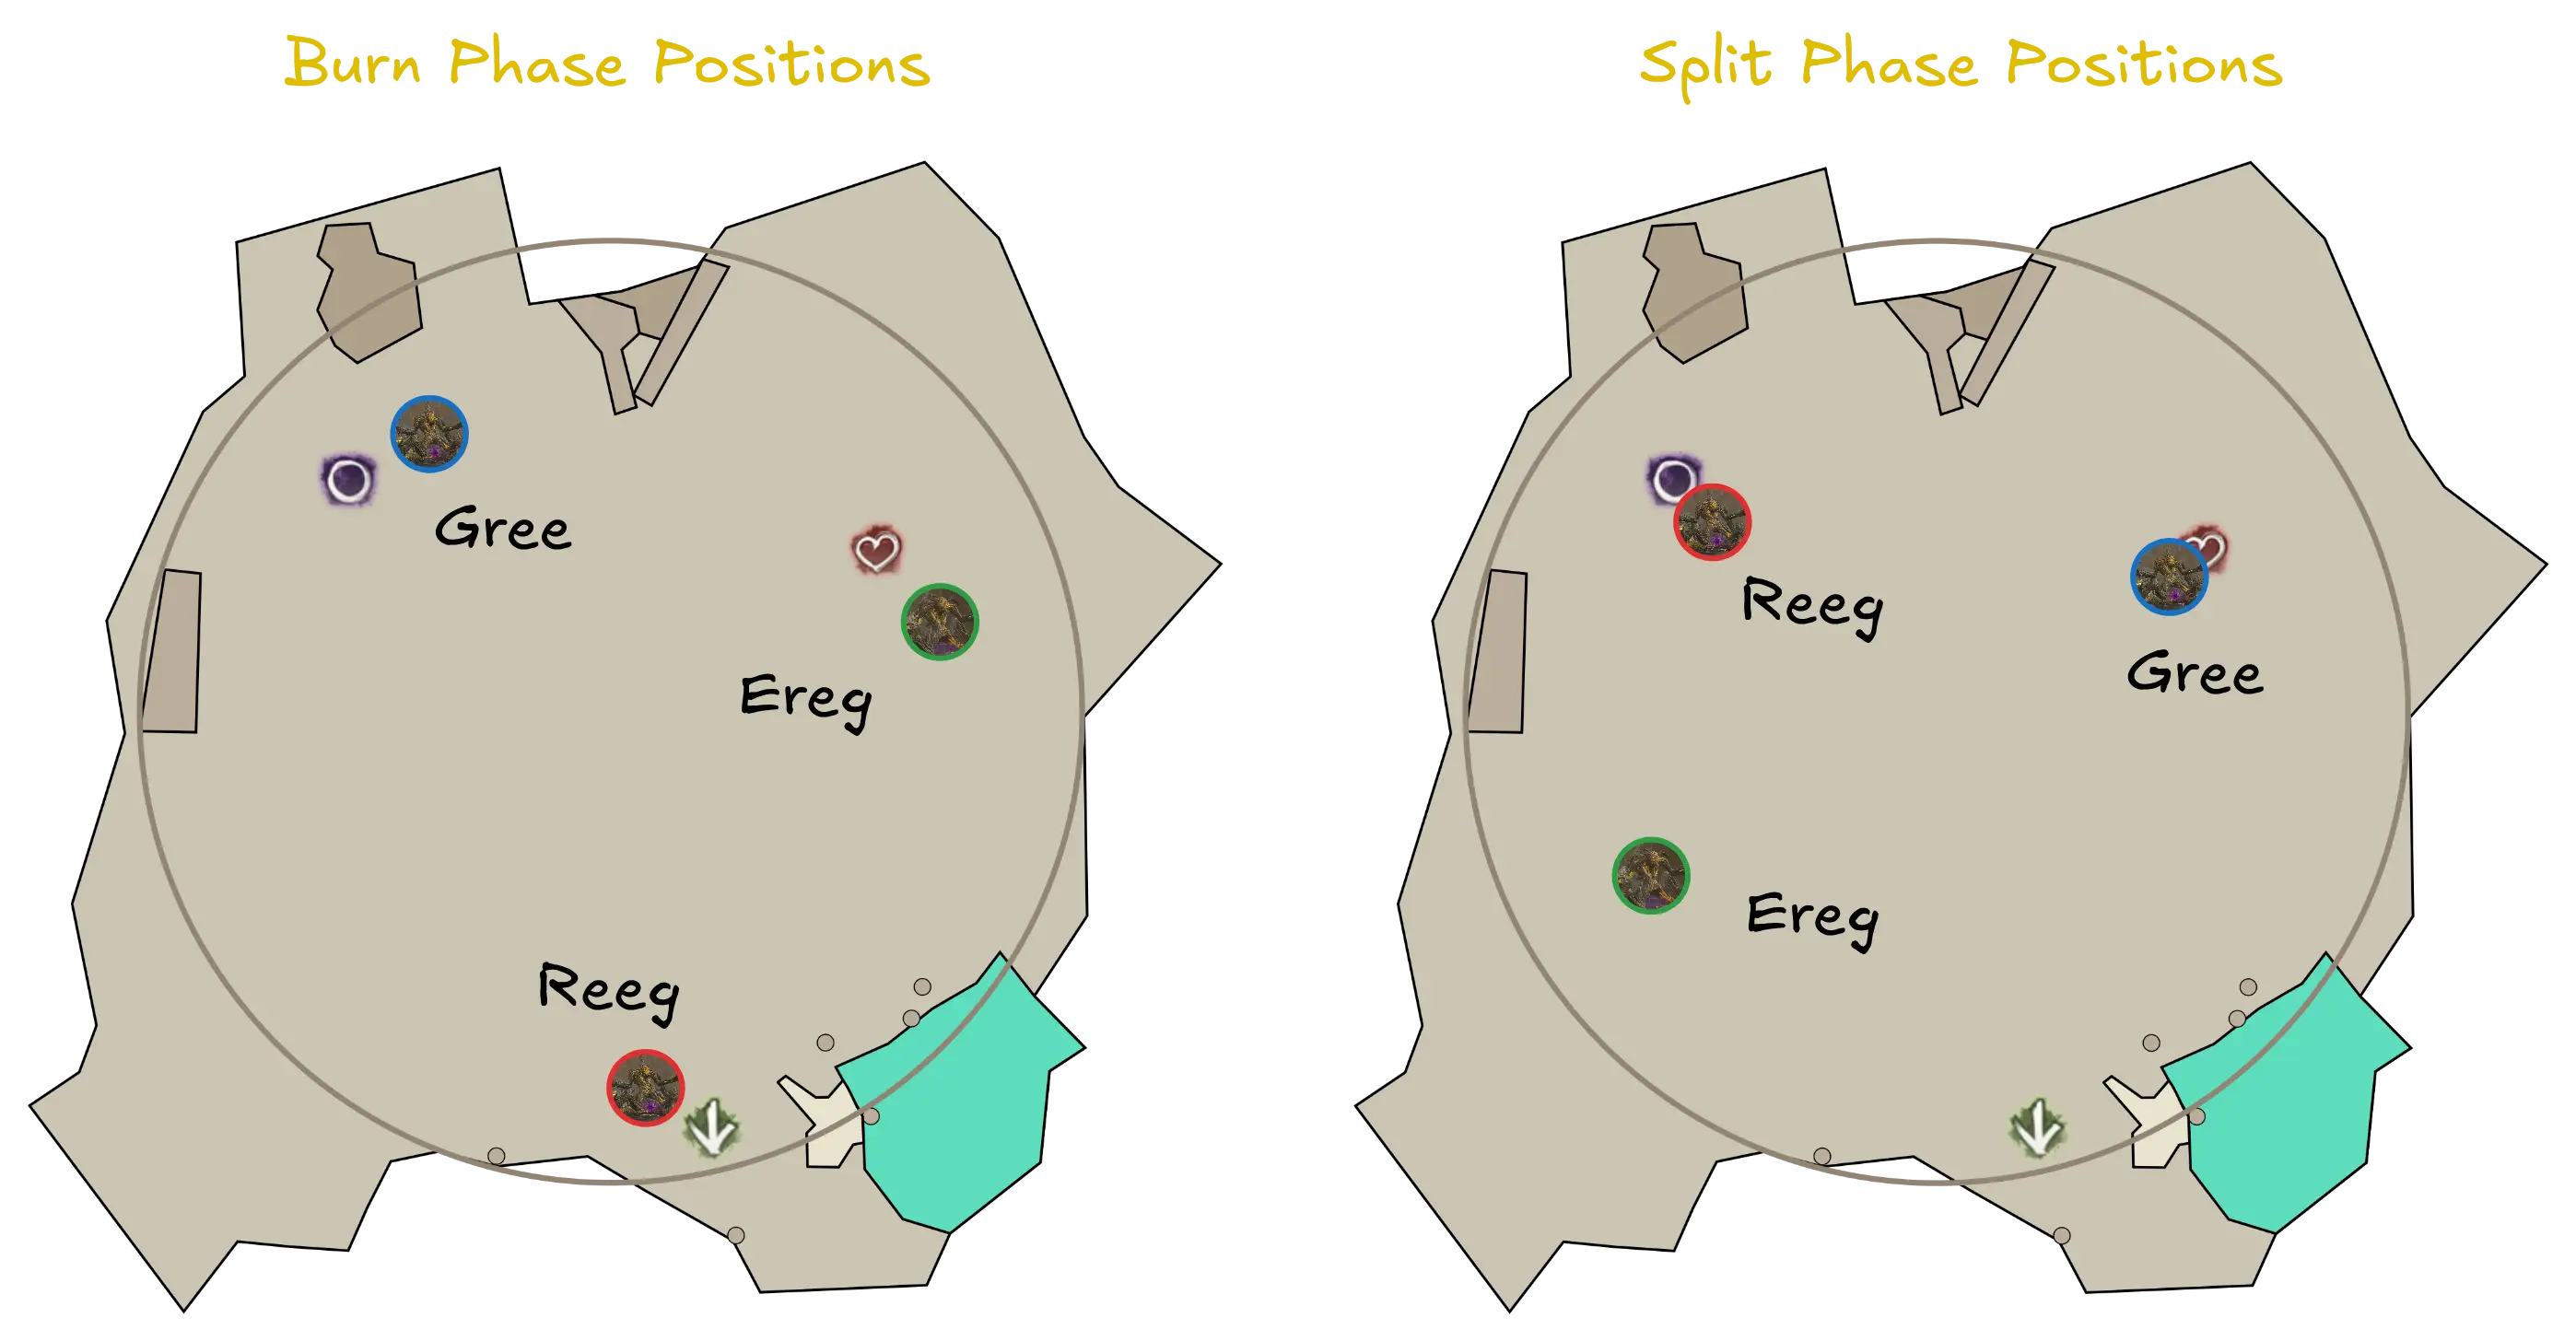
The fight begins with Greer and the lesser Titans at the following spawn points.
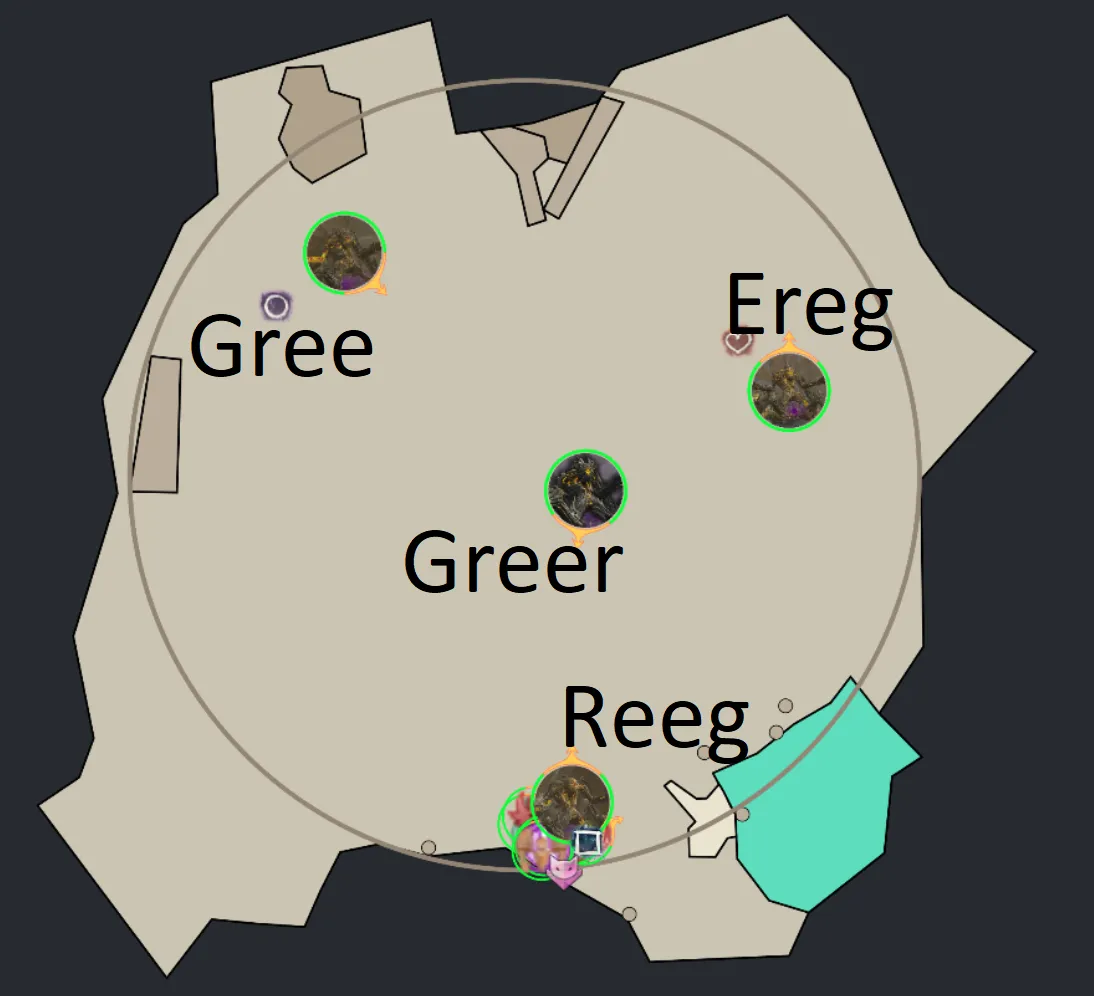
During the first two burn phases, all lesser Titans will not move from these locations. During the third one, Ereg will be free to move if he is still alive.
High priority skills such as Blob of Blight and Eruption of Rot mark the beginning of these phases. These skills have a long enough cooldown that they are generally used only once or twice per phase.
Once per burn phase, at 80%, 50%, and 20% of his health, Greer will become Invulnerable, unlocking a
Defiance Bar. This needs to be broken quickly, as while the defiance bar is active Greer will continuously spawn AoEs on the group, which deal moderate to high damage.
Breaking the bar will spawn several Elite Empowering Beasts (see amount below); these will start targeting Greer with Empowering Blast, requiring additional projectile block.
- Two will be spawned at 80% HP
- Three will be spawned at 50% HP
- Four will be spawned at 20% HP
The first main phase ends at 65%, the second at 35% and the third at 10%. The first two main phases are pretty similar in the amount of mechanics and Empowering Blasts that have to be dealt with. The third main phase is different, since both Gree and Reeg will have been killed, removing the need to block their projectiles.
Split Phases
The split phases start once Greer hits 65% and 35% HP. All lesser Titans will move to a new position, as shown by the following image.
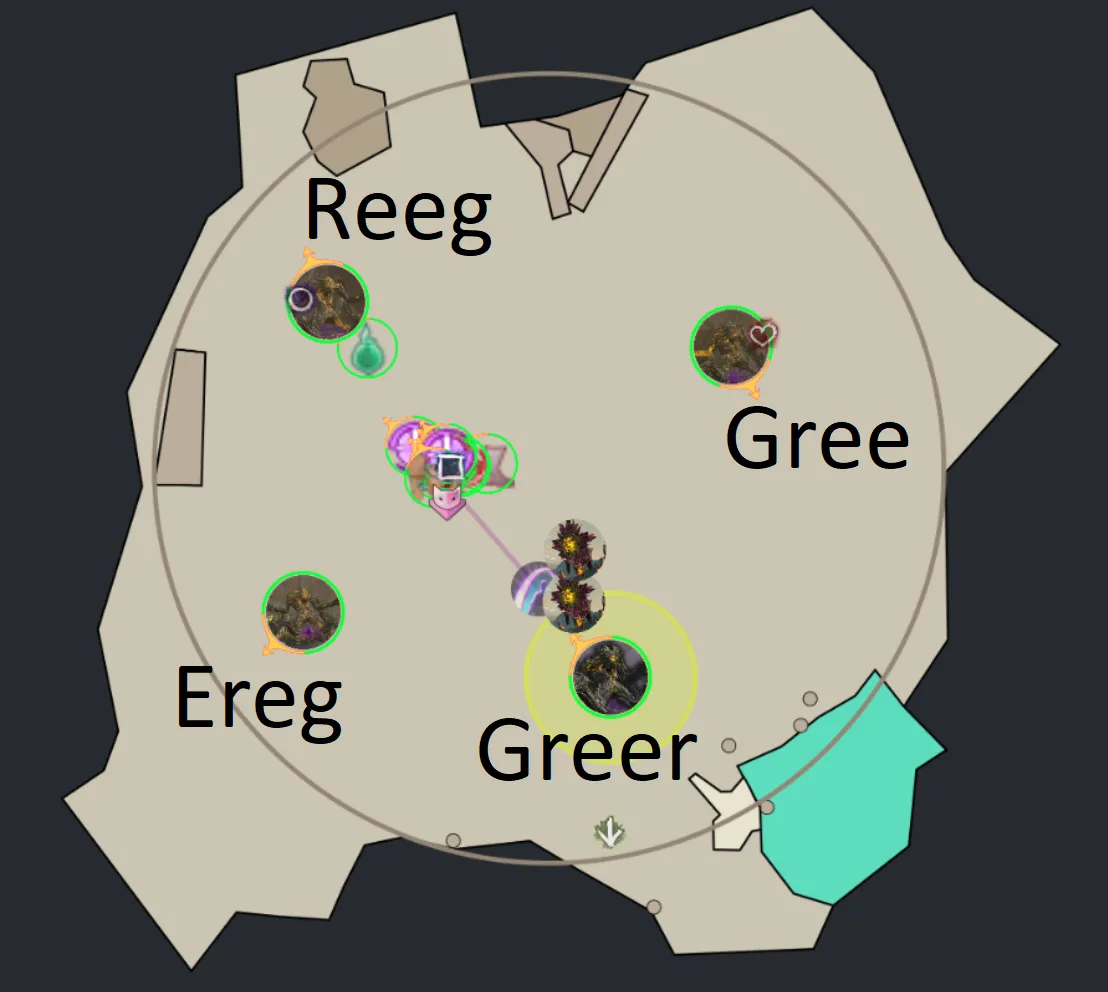
During these phases Greer is Invulnerable and does not perform any attacks or mechanics, instead remaining at the position he occupied at the end of the previous main phase.
Split phases end when both Reeg and Gree have reached a defined health threshold, that being 50% HP for the first split phase, and 0% for the second.
Ereg does not count towards the end of the split phase. He will despawn upon being damaged to 50% HP during the first split, or otherwise when the phase ends. If he is alive at the end of the second split phase, he will remain active and mobile throughout the rest of the fight or until killed.
Proto-Greerling Phase
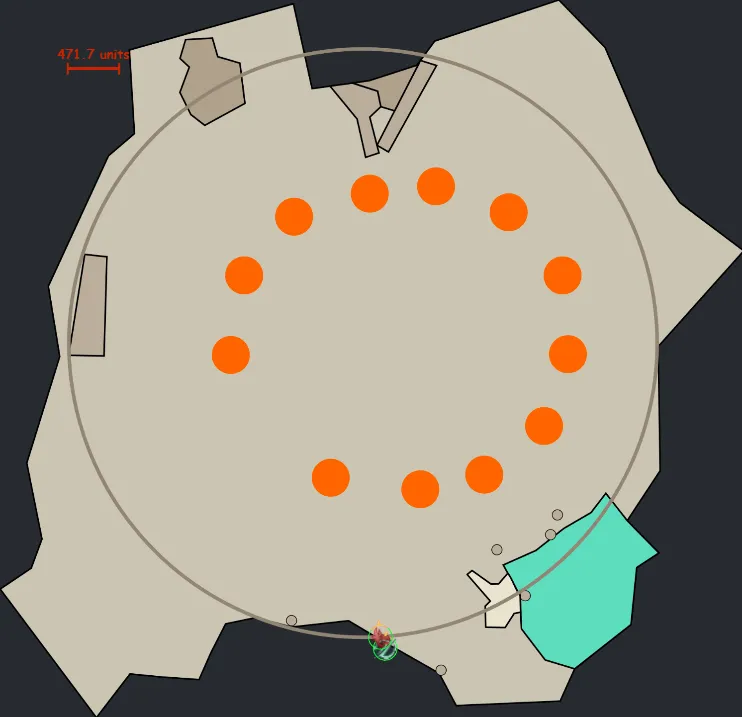
Once Greer hits 10% of his HP, he will become Invulnerable. At the same time, three Champion Proto-Greerlings will appear. They have 12 possible spawn points, from these, three are chosen at random.
The Protolings will continuously perform the basic attack chains: Sweep the Mold, Stomp the Growth and Scattering Sporeblast. This means this phase has a very high level of incoming damage and requires constant projectile block.
Greer will remain fully active throughout this phase. The squad should pay attention to his highly disruptive mechanics, in particular Blob of Blight, Eruption of Rot and Ripples of Rot.
Sub 10% Phase
Once the last Champion Proto-Greerling has been defeated, Greer becomes vulnerable for 30 seconds. After this time passes, he will re-spawn all Protolings and become Invulnerable once more until they are dead.
While this phase is functionally identical to a main phase, the time limit means that it must be approached in a fundamentally different manner. You only have to deal with attacks from Greer (and Ereg if he's alive); because Greer often has a lot of Empowered stacks at this point, every attack is deadly, especially Stomp the Growth.
List of Mechanics
This section contains a full, in-depth explanation of all mechanics in the encounter.
Generally, there is a skill priority that titans follow, however, this skill priority is often interrupted with the auto-attack chain Sweep the Mold. The full logic behind how Greer selects what attacks to use is not yet fully understood. The general priority of skills is roughly as follows:
| Priority | Skill | Greer | Gree | Reeg | Ereg |
| 1 | Blob of Blight | ||||
| 2 | Eruption of Rot | ||||
| 3 | Ripples of Rot | ||||
| 4 | Rain of Spores | ||||
| 5 | Scattering Sporeblast | ||||
| 6 | Enfeebling Miasma | ||||
| 7 | Cage of Decay | ||||
| 8 | Rain of Spores | ||||
| 9 | Stomp the Growth | ||||
| Auto | Sweep the Mold |
Blob of Blight
Used by Greer (cooldown 120s), Reeg (cooldown 75s) and Ereg (cooldown 75s).
Targets the three furthest players. These players get notified by a Target effect in their boon bar and a pulsing audio cue. The attack spawns three homing orbs in sequence in front of the caster. These orbs start tracking the targeted players while constantly spawning projectiles.
If they hit a player, they will inflict Knockback, then become stationary for 12 seconds before despawning. The projectiles they summon during this period can quickly become deadly if not avoided.
Moving orbs can also be despawned by evading through then them, or by moving into them with active Invulnerability effects, such as
Distortion. This does not work for stationary orbs.
Cage of Decay
Used by Greer (cooldown 120s) and Gree (cooldown 30s).
This attack produces five projectiles, marked with arrow indicators. It starts with 2 arrows directed towards opposite sides of the caster, with the following directed inwards by 45° steps. These projectiles inflict Knockback multiple times while traveling along their path.
Once they reach their maximum travel or hit the edge of the arena, they spawn a pool of Noxious Blight which persists for a brief period, stripping boons and applying Plague Rot. The pool is additionally ringed by a set of walls that deal damage and inflict
Knockback on contact with a player, leaving only a few narrow passages to escape through.
Since Plague Rot is removed on downing, affected players will often run constantly against these walls to take damage and go downstate, thus removing the effect before it can spread.
Empowering Blast
Used by the three lesser Titans and by Elite Empowering Beasts (cooldown 10s).
The caster shoots out small orbs towards other lesser Titans and towards Greer. If they hit their target, the target receives two stacks of Empowered. These small orbs can be destroyed by using projectile destruction/reflection skills. During the first and second main phase, lesser Titans will constantly use this ability as long as they are active, requiring frequent projectile block. It’s crucial to block those as much as possible, otherwise Greer will gain too many
Empowered stacks and overwhelming damage.
Enfeebling Miasma
Used by Greer (cooldown 120s), Reeg (cooldown 75s) and Ereg (cooldown 75s).
Spawns three cone indicators that release an outgoing wave of miasma, leaving behind clouds of poisonous gas. The waves corrupt boons and apply Poison; they should be avoided by either immediately dodging through the casting add, or by standing between the cones.
The actual area of effect is larger than the indicator.
The poisonous gas clouds are pools of Noxious Blight, which corrupt boons and apply Plague Rot. Avoid them at all costs.
Eruption of Rot
Used by Greer (cooldown 120s) and all three lesser Titans (cooldown 75s).
Targets the furthest untargeted player from the caster with a green AoE, requiring a certain amount of players inside: three if the caster is Greer,
two if the caster is a lesser Titan. Failing to solve any Green summons a Noxious Blight pool under the targeted player that knocks up, corrupts boons, inflicts
Plague Rot, and converts conditions on Greer into
Resolution.
Failing a Green furthermore gives two stacks of Empowered to the caster: for this reason it’s always important to have the minimum number of players for each Green.
Players that stand in multiple Greens within a short time interval will be Downed. This effect can be evaded with the right timing, or can be avoided with
Invulnerability skills. Similarly, the pool summoned by failed Greens can be avoided in the same manner.
The number of Greens spawned by Greer increases in later phases up to a maximum number of three simultaneous three-person Greens. Lesser titans will instead always spawn a single green.
Rain of Spores
Used by Greer (cooldown 120s), Reeg (cooldown 120s) and Ereg (cooldown 120s).
Targets the furthest player from the caster; consists of a barrage of projectiles, indicated by small AoEs. These deal damage and apply Poison and
Confusion. It’s best to have projectile block up for these to mitigate as much damage as possible.
Greer uses this attack only when his target is not in melee range.
Ripples of Rot
Used by Greer (cooldown 120s) and Gree (cooldown 30s).
This attack can occur whenever the caster doesn’t have a melee target available. When this attack is used, the caster jumps up toward their target, falling down in a deadly AoE that spreads outwards from their point of contact with the ground. The attack deals damage and inflicts Knockback,
Bleeding and
Plague Rot.
The exact trigger for this attack is not precisely understood, but it’s tied to being in a specific range window from the caster, somewhere between 600 and 1000. If you are closer than this, this attack will not be used.
Additionally, the attack leaves behind a pool of Noxious Blight, which is ringed by walls that deal damage and inflict Knockback on contact with a player, leaving only a few narrow passages to escape through.
Since Plague Rot is removed on downing, affected players will often run constantly against these walls to take damage and go downstate, thus removing the effect before it can spread.
Scattering Sporeblast
Used by Greer (cooldown 12s), Reeg (cooldown 8s), Ereg (cooldown 8s), and Champion Proto-Greerlings.
Shoots damaging spores that can be projectile blocked, targeting enemies in front of the caster and dealing moderate to high damage. Since Reeg and Ereg don’t have Sweep the Mold and Stomp the Growth in their skillsets, they will use this attack very frequently.
Greer uses this attack only when his target is not in melee range.
Stomp the Growth
A three-part attack-chain used by Greer, Gree and Champion Proto-Greerlings regularly.
The first two attacks are high damage melee AoE slams. The third and final attack has different effects based on the caster: when cast by Greer it releases a wave that deals damage, corrupts boons, and inflicts Vulnerability and
Knockback; when cast by Gree or the Champion Proto-Greerlings, it does not unleash a wave, instead dealing heavy damage and a inflicting
Knockdown.
This attack can be mitigated with Aegis, blocks, or evasion. The wave it generates when cast by Greer can be jumped, but cannot be blocked and corrupts
Stability.
This attack becomes especially deadly in the later phases of the fight, when Greer often has several stacks of Empowered, due to its high damage and large area of effect.
Sweep the Mold
This attack is used by Greer, Gree and Champion Proto-Greerlings regularly.
It consists of two subsequent 60° cones that Knockback and deal damage; it also inflicts
Bleeding and
Poison on the first swipe, and
Cripple and
Poison on the second swipe. The damage component of this attack is not high, so it can be ignored using
Stability, or otherwise mitigated with
Aegis, or by sidestepping.
Aura of Corruption
Passively, Greer and all three lesser titans deal damage and inflict Poison to all players inside their hitbox.
This attack enables effective use of Relic of Thorns on the encounter.
Elite Empowering Beast
| Health | Hitbox | Defiance |
| 210 k | 240 | 500 |
These adds are spawned in shortly after Greer’s Defiance Bar is broken.
- Two will be spawned at 80% HP
- Three will be spawned at 50% HP
- Four will be spawned at 20% HP
They themselves are not especially dangerous, as they deal little damage and can be easily cleaved. However, they will cast Empowering Blast every 10 seconds, which can easily grant Greer several stacks of Empowered if mismanaged.
Champion Proto-Greerling
| Health | Hitbox |
| 4’620’570 | 600 |
Also called Protolings, these are dangerous adds that spawn when Greer reaches 10% health, at the beginning of the Protoling phase. As long as one is alive, Greer is Invulnerable. After the last one dies, Greer will wait 30 seconds before re-summoning them.
Proto-Greerlings have access to three skills that they spam relentlessly: Sweep the Mold, Stomp the Growth and Scattering Sporeblast.
Proto-Greerlings grant themselves three Might every second, up to 25 stacks. If Ereg is alive, he will also grant them an additional 25 stacks, up to 50 total (as Ereg’s
Might is considered separately and does not count towards the regular boon’s cap).
This combination of high damage and heavy crowd control makes them tough enemies to deal with.
List of Effects
The Greer encounter has some additional unique effects, which are listed below for reference purposes.
![]() Empowered
Empowered
An effect that is gained by Greer and all three lesser Titans when players fail mechanics. Increases outgoing damage by 5% per stack, up to 99 stacks, at which point all attacks become unblockable. Titans can gain Empowered through the following:
- Empowering Blast will grant one stack every time it hits a titan.
- Eruption of Rot will grant two stacks to the casting titan on failure.
![]() Plague Rot
Plague Rot
A debuff that is applied to players hit by Cage of Decay, Enfeebling Miasma, or Ripples of Rot. Affected players are surrounded by a red AoE that regularly corrupts boons and applies Poison. This effect spreads to other players on contact with the AoE, and if uncontrolled, can quickly spread to the entire squad.
The effect is removed if the affected player is Downed, or after a brief time interval.
Reaching 10 stacks of Plague Rot will instantly kill the player.
![]() Target
Target
An effect that gets applied from being targeted by Blob of Blight, which targets the furthest players away from the caster. Affected players and others near them will hear a persistent sound effect for as long as the corresponding orbs are in movement.
The effect disappears when the orb despawns or becomes stationary.
Noxious Blight
Describes various stationary AoE pools left behind by some abilities that corrupt boons and apply Plague Rot to any player touching them.