Return to Home Return to Overview Mechanical Reference
Decima Recommended Strategy
Table of Contents
This strategy is a written version of this PoV, and is designed for achievement runs, minimizing movement and difficulty while satisfying all mechanics in a deterministic manner.
All markers referenced in this guide can be set up with the Commander Markers module for Blish HUD, using the marker pack provided below.
Click to view markers
Paste the following code into Commander Markers to use this marker pack:
eyJlbmFibGVkIjp0cnVlLCJuYW1lIjoiRGVjaW1hIENNIFN0cmF0ZWd5IiwiZGVzY3JpcHRpb24iOiJEZWNpbWEgQ00gc3RyYXRlZ3kgbWFya2VycyBwYWNrIGJ5IE1pa2UgW0NSU10iLCJtYXBJZCI6MTU2NCwidHJpZ2dlciI6eyJ4IjotMjc2LjU1NjEyMiwieSI6MjY1Ljc3OTU3MiwieiI6MTM4LjUxNjc2OX0sIm1hcmtlcnMiOlt7ImkiOjEsImQiOiJTb3V0aCBtYXJrZXIiLCJ4IjotMjU2Ljk5MDEsInkiOjMxNi40OTY0NiwieiI6MTM4LjUyMjM1NH0seyJpIjoyLCJkIjoiV2VzdCBtYXJrZXIiLCJ4IjotMjc3LjA4MzI4MiwieSI6MzM5LjE4OTk0MSwieiI6MTM4LjUyMjM1NH0seyJpIjozLCJkIjoiTm9ydGggbWFya2VyIiwieCI6LTI0OC41NDI3NCwieSI6MzQ3LjI0NDE0MSwieiI6MTM4LjUyMjM1NH0seyJpIjo3LCJkIjoiUm9sbCBvdXQgc3BvdCEgKHN0YXJ0aW5nIGxvY2F0aW9uKSIsIngiOi0yODIuNDU2MiwieSI6MjczLjQ2MDksInoiOjEzOC41MTY1fV19
This is an in-depth guide: if you are looking for something fast to read and less comprehensive, check out the Decima Fast Guides.
Main Points
- The squad divides into a ranged group and a melee group.
- The ranged group stays far from the boss to bait Fluxlances.
- The melee group stays close to the boss to bait Thunder and collect Greens.
- One player covers a special role, the kiter, and controls spawn positions for several important mechanics.
- The position of the two different groups and the kiter are carefully controlled to minimize overlap between mechanics.
General Information
Decima’s encounter is inherently deterministic, giving the squad a large amount of control through careful positioning.
Melee and Ranged Group
Many of the more dangerous mechanics in the encounter choose their targets based on proximity to the boss. Noticeably, Fluxlances always target the furthest players, while Thunders target the closest, making management of these two mechanics mutually exclusive. Furthermore, the effects applied by some mechanics impede players from participating in others:
- Players hit by Fluxlances will be affected by
Galvanic Sensitivity, and thus cannot collect Greens.
- Players staying within Thrumming Presence will be affected by
Harmonic Sensitivity, making them more vulnerable to Fluxlances.
The natural conclusion to this issue is separating the squad into a ranged and a melee subgroup.
- The ranged group is responsible for baiting Fluxlances by being the furthest players from the boss, and pointing them away from Conduits.
- The melee group is responsible for baiting Thunder by being the closest players to the boss, and collecting Greens.
In this way, most strategies eliminate harmful overlaps and reduce the overall stress on each player while retaining deterministic control of all mechanics.
Kiting
Several of Decima’s mechanics focus around the furthest player from the boss.
- Harmonious Thunder charges Conduits closest to them.
- The Red Fluxlance will target them.
- The Focused Fluxlance will target the conduit furthest from them.
We can take advantage of this by having a specific role, called the kiter, position accordingly, thus exercising a great amount of control over the flow of the encounter.
- By positioning during Chorus of Thunder, they can choose which Conduits are charged.
- While satisfying the previous point, they will also bait out the Red Fluxlance and can be prepared to survive.
- While satisfying the first point, they can also ensure that the Focused Fluxlance spawns in an advantageous position.
Kiters often have to move off-stack to do mechanics: this makes for lower DPS uptime and higher survivability requirements. For this reason, kiters are often the healers for the ranged subgroup, though this is not set in stone.
Composition
Support players should be providing good defensive boon coverage and healing. Decima has many strong bursts of damage incoming from various mechanics (Fluxlances, Seismic Crash, Flux Nova), so drops in Protection and insufficient healing can quickly lead to players downing.
Stability is required at regular intervals, portals are very useful to simplify the split phases (especially for the melee group) and good burst CC is necessary to break Decima’s massive
Defiance Bar. Due to these requirements,
Chronomancer is by far the most played healer on this encounter, though not the only viable one. Kiters will also greatly benefit from mobility and boon radius, as their subgroup will often have to spread out to do mechanics.
While there are less strict requirements on the boonDPS and DPS than on the healers, the ranged group will spend a decent amount of time out of melee range and thus it is recommended to use appropriate builds. DPS in general should also try to bring sufficient amounts of CC, and boonDPS should bring backup Stability if possible.
Builds and PoVs
This is a non-exhaustive list of playable builds on the encounter. If anything is outdated, you can find up-to-date information on Void Lounge.
| Build | Role | PoV | Last updated |
|---|---|---|---|
| Heal, Kiter | PoV (Kiter) PoV (Melee) | September 2025 | |
| Heal, Kiter | PoV (Kiter) | April 2025 | |
| Heal, Kiter | PoV (Kiter) | September 2025 | |
| Heal, Kiter | PoV (Kiter) | July 2025 | |
| Ranged BoonDPS | September 2025 | ||
| Ranged BoonDPS | PoV | May 2025 | |
| Ranged DPS | June 2025 | ||
| Ranged DPS | PoV | June 2025 | |
| Melee DPS | PoV | August 2025 |
First Phase
100% - 80%
The fight begins by making use of Mount abilities to quickly enter the arena and reach Decima, usually either  Roll Out or
  Leap.
Leap.
Decima starts with the attack pattern shown here. The Foreshock & Mainshock abilities are simply outhealed.
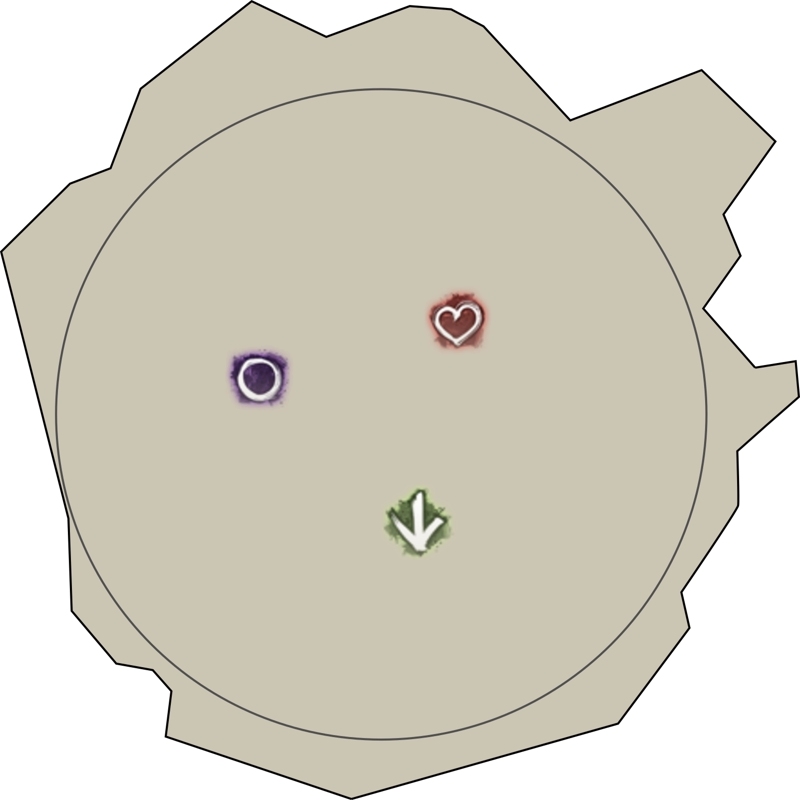
Once you see the start of the Mainshock ("pizza" attack) cast, the ranged group needs to step away from the boss to bait Fluxlances close to the marker.
The kiter should instead go to roughly the marker (see image below) in order to bait Thunder into charging up the correct conduits.
The kiter should try not to charge up any of the conduits that make up the outer ring furthest from Decima, because those will encircle Decima in the split phase, making collecting their Greens much more difficult; (see this animation).
Shortly after the Fluxlances will fire. Make sure to not hit any conduits and then quickly group up on the marker and heal up and give
Stability to prevent the knockback from Seismic Crash.
Immediately after, the ranged group has to bait the next set of Fluxlances, while the melee group has to collect Greens. This set of Fluxlances contains the Red Fluxlance, so make sure that the kiter is the furthest player from boss. The kiter should use a mobility skill to get behind a conduit, making sure to not charge up one of the furthest conduits, to make the split phase easier.
After the collection and Fluxlances, the attack pattern starts from the beginning again, with Foreshock & Mainshock. Again, once the pizza attack starts, the ranged group needs to bait arrows. The kiter needs to pay attention here and make sure they are at the marker to bait Thunder.
Depending on the group’s DPS, you may already phase now into the first split phase; if not, you will get another Knockback that needs Stability. Ideally it would be better to phase before or during the next set of greens, so as to avoid an additional collection.
Phasing after the second collection usually indicates a serious DPS issue: this needs to be resolved or the group will struggle greatly with the damage check in the final phase.
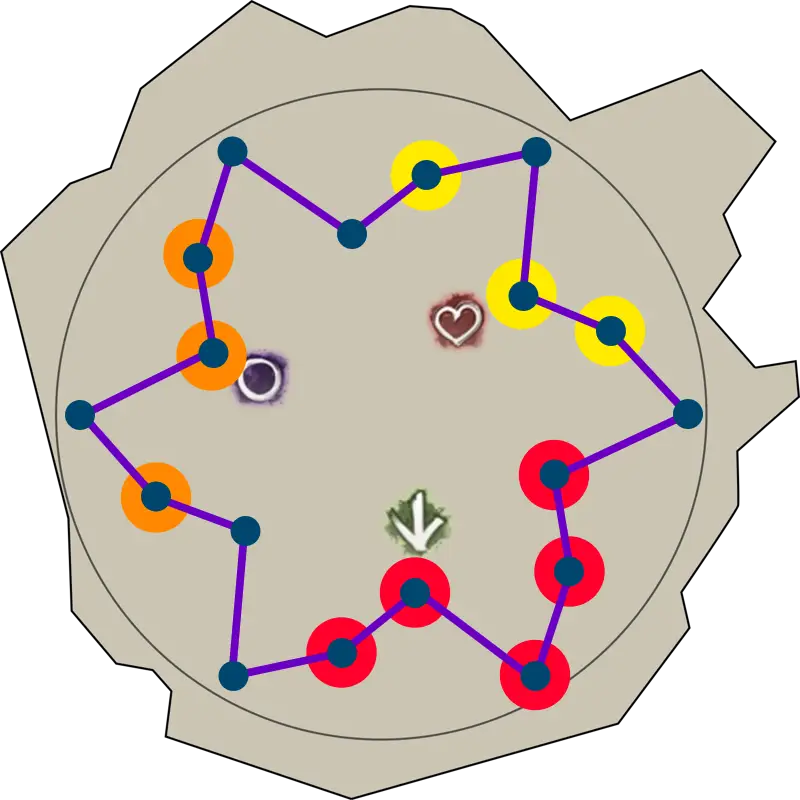
The kiter’s positioning in this phase is meant to spread out the charged Conduits between the inner rings of the formation. In this way there will be less Greens in the next phase. When played correctly, only one of the outer conduits should be charged. In the image below for example, the red conduits will have been charged during the first set of arrows, the orange during the second, and the yellow during the third.
First Split Phase
The ranged and melee group will split to their respective closest Transcendent Boulder, which is usually close to the marker for the ranged group and to the
marker for the melee group.
The two healers can either pre-place their portal before going to the adds (required for Specter since their portal is one-way), or place it after playing the main mechanic during this split.
For the melee portal, the healer needs to pay attention to prepare the portal to the side of Decima, not in front. This is to prevent the melee group getting hit by by Fluxlances after taking the portal.
While damaging the Transcendent Boulder adds down as fast as possible, it’s important to not use any skills with Breakbar damage in order to skip their dangerous follow-up attacks.
Decima will continue her attack loop from where she left off after jumping, resulting in a set of Fluxlances and Thunders that must be played, while within the smaller arenas. The ranged group should position themselves on the far side of theTranscendent Boulder from Decima; the melee group on the closest side, in order to bait the mechanics properly. The melee group can simply dodge their Thunders, while the ranged group needs to pay attention to not charge any extra conduits.
After the Fluxlances and Thunders, the two healers can open their portals to get everyone back to Decima. The ranged group should be ported outside the cage, while the melee group should be ported into the cage.
Some experienced squads will portal both subgroups into Decima’s cage. This is usually a small DPS increase for the ranged group, but requires more careful positioning.
80% - 70%
After taking the portal, timing-wise, Decima usually uses Seismic Crash again, so healers should make sure to immediately provide Stability. The attack pattern is the same; next in turn will be a set of Fluxlances and [Green] collection. Play the mechanics as before, heal everyone up and prepare your CC skills for when Decima hits 70%.
At 70% HP, Decima will become immune to damage and jump into the middle of the arena. This is a knockback attack, so make sure to provide Stability again. Depending on DPS, Thunders might also spawn, be prepared to dodge them, while also paying attention to not charge any conduits.
Afterward Decima will gain a Defiance Bar of 7500, this needs to be broken as soon as possible. If broken quickly enough, there is no need to deal with any of the other mechanics (mainly Greens) and the only thing that’ll happen next is a big incoming damage burst from Fulminate.
Make sure that both groups are stacked up and have Protection, use Barrier skills and time your strong healing skills to prevent any downs. If someone downs, everyone should make sure to quickly bring them back up.
Second Phase
70% - 50%
In this phase Decima repeats her attack pattern; starting from Foreshock & Mainshock like in Phase 1. The melee group can stand near the marker. The ranged group can stand near the
marker.
The ranged group baits the conduit charges and Fluxlances at . Spread apart without hitting any conduits and stack up quickly to heal and provide
Stability for the Seismic Crash coming immediately after.
Next, the melee group rotates toward to collect Greens, Thunders may happen at the same time, so be ready to dodge.
The ranged group will be baiting the next set of Fluxlances right of . The kiter needs to make sure they bait the Red Fluxlance again and move behind a conduit in order to survive.
Decima will then restart her attack pattern. The ranged group should position themselves between and
and the melee group can stand near
. Either the boss will phase after the following set of Fluxlances, or you may need to play another collection.
Second Split Phase
Similar to before the two groups go to their closest Transcendent Boulder, while the healers prepare their portals. Usually, the melee group should go towards the marker and the ranged group towards the
marker. The split phase plays similar to before, only it is much more important to not break the add’s
Defiance Bar, so as to avoid Sparkwave, which will usually wipe the group.
Do not CC the Transcendent Boulder! A huge number of wipes happen in this phase due to early CC leading to Sparkwave casts. If you do CC early, the healer in your cage should try to be the furthest from the add, and bait the attack away from the other subgroup’s cage. Everyone else should move opposite to them, so that they are not hit.
As before, the ranged group positions themselves outward to bait Fluxlances and melee group inward to bait Thunders. The ranged group needs to pay attention again to not hit any conduits with Fluxlances and the melee group needs to time their dodge again. As soon as both adds are dead and the two mechanics are done, use portals once more to quickly get back to Decima.
50% - 40%
This section plays identically to the 80% - 70% section. After taking the portal, be ready to give Stability to prevent knockbacks. The melee group will be inside the cage collecting Greens; the ranged group will be outside the cage baiting Fluxlances. Once Decima hits 40%, be ready to dodge in case Thunders appear, while again not dodging into any conduits. Cast
Stability when Decima jumps into the middle of the arena and be ready to CC again. Stack up into groups, use barrier skills and time your heal skills to heal through the big incoming damage of Fulminate again.
Third Phase
40% - 10%
Next, Decima will jump toward the edge of the arena. The jump is a Seismic Crash attack with a knockback, make sure to provide Stability.
The melee group can position themselves left or right of Decima when looking at her from the center; the ranged group just stays between the two hexagonal formations of conduits. Decima will start her attack pattern again, like at the start of Phase 1 and Phase 2. Once you see the “pizza” attack begin, bait the Fluxlances.
The kiter in this phase has the additional responsibility of managing the spawn position of the Focused Fluxlance (aka Green Arrow). To do this: they should initially move toward the conduits on the opposite side from the melee group, this will also bait Thunder onto those conduits.
The first set of Fluxlances in this phase includes the Focused Fluxlance. If the kiter baits correctly on the right-hand side, the Green Arrow will spawn to the left of Decima, directly on top of the melee group. The melee group needs to stack inside of the Focused Fluxlance to solve the mechanic. This can overlap with Thunders: in this case they will need to dodge backward/forward while still staying inside the Green Arrow so as to not fail the mechanic.
Next, Decima will Seismic Reposition to a different position. Be ready to provide Stability and follow Decima to her new location. The melee group can position themselves to stand between Decima and the conduits that have been charged up already; the ranged group should remain in the center and the kiter should bait on the opposite side to the melee group.
After the jump Decima will start with Foreshock & Mainshock again. Toward the end, once the “pizza” attack appears, the kiter wants to make their way to bait conduits and the next [Red Fluxlances]. This should be close to the conduits that are already charged, in order to make the Greens come only from one side. The kiter will then need to deal with Converging Fluxlances, which requires accurate positioning to block the Red Fluxlance while avoiding charging any conduits with standard Fluxlances.
Afterwards, the kiter should move back to the stack, and Decima’s attack pattern starts again. Once you see the “pizza” attack, in addition to baiting the five Fluxlance, the kiter will again need to bait the Green Arrow and the next set of charging up conduits.
Next, Decima will jump again, and will cast Foreshock & Mainshock followed by a collection. The melee group this time must split between the left and right in order to collect all greens: their healer should take care to keep all the players healthy even while they are off-stack.
After the “pizza” attack, the ranged group will bait Fluxlances with the kiter playing Converging Fluxlances again. Following this is another set of Foreshock & Mainshock and Fluxlances, with the Green Arrow and possibly Thunders. Play them similarly to before.
After this Green Arrow, ideally before, Decima should hit 10% and the final phase will start.
Final Phase
10% - 0%
The final 10% is a burst phase, so you want to immediately deal as much damage as possible. Cleanly transitioning into this phase is extremely important due to the relatively tight DPS-check: any downs or knockbacks at this stage will seriously hurt your chances of a kill. Depending on the DPS spec, it might also be beneficial to save some cooldowns for the initial burst (e.g. Weave Self).
At the start of the phase, Decima will become invulnerable and jump into the center of the arena, resetting all conduits. The jump is a knockback, so have Stability up. At the same time Decima will cast any remaining Thunders, be ready to dodge. Depending on DPS, it can happen that two subsequent Thunder casts happen, be prepared to dodge twice subsequently.
This combination of Seismic Crash and Thunder is extremely lethal: players should always attempt to dodge both components (called “double dodging”).
Soon after this, a set of Fluxlances and Thunders must be played. Make sure to not hit any conduits, and the kiter should bait the Red Fluxlance and use a mobility skill behind a conduit to survive.
Afterwards, stack up at the boss and DPS. Throughout this phase, Thunders will spawn continuously, these should be dodged into the boss. This is because around the boss conduits will gradually come closer and closer and dodging backward or sideways will hit and charge them.
Additionally, Greens collection will spawn as well, gradually escalating from only a few greens to massive simultaneous 18-conduit discharges. Try to block them as well as you can, while focusing on DPS and dodging Thunders.
If 10 Greens move into Decima’s hitbox, Decima will become invulnerable and you will wipe. Hence, it is important to block as many as possible. Doing this successfully, keeping up damage, and avoiding downs will lead you to a successful clear.