< Wing 7 Return to Home Wing 1 >
Mount Balrior
| Timer | 27 minutes 45 seconds |
| Timer Start | On beginning Decima’s pre-event. |
Table of Contents
Mount Balrior’s three formidable bosses have much higher HP than the average Guild Wars 2 raid. Fast clears require good damage and clean execution of all three, including Legendary Ura for Infallible runs. The Infallible timer itself is not too harrying: most of the wing’s difficulty comes from the high risk of Downstates, which in turn is exacerbated by its long duration.
Main Points
- Standard strategies for Balrior CMs are fairly optimized: speedruns re-hash many of the same concepts and compositions.
- Decima is played with a standard strategy and celestial healers.
- Greer can be played in a safer manner, or can be optimized by removing specialized roles.
- Ura can be played with either a Solo CC or a 4-man composition.
- Portals are used to optimize transitions from pre-events into the various bosses.
Composition
Most groups will run two Mesmers, as they provide irreplaceable utility. These are usually
Troubadours, as they have unique healing and defensive skills that make them desirable on all three encounters. At least one
Thief is almost always present due to its unparalleled CC capabilities.
The rest of the composition is mostly determined by your strategy on Ura:
- Solo CC compositions are much more flexible but require an experienced Solo CC player.
- 4-man compositions are rigid but make ranged gameplay easier overall.
Stacking sigils such as  Superior Sigil of Corruption can be prepared by killing the enemies between the entrance to the wing and Camp.
For Infallible runs, prioritize consistency and safety over raw damage: redundant defensive utility, Trailblazer builds, and comfort picks wherever possible will all improve your experience progressing this wing.
Decima
- Bring reliable sources of
Stability or
Aegis for Seismic Crash, with
Aegis being better than
Stability.
Portals are extremely useful, verging on mandatory, for the split phases.
Troubadour is the most commonly played healer, as it can run a celestial build to deal decent damage while still providing more than enough healing and defensive utility.
Greer
Condition compositions are preferred, since most DPS can run full Trailblazer gear with little downside. The starting position is also more convenient when transitioning from the pre-event.
- Classes with high cleave are extremely useful for speeding up the split phases and protoling phase.
Troubadour is the best healer here, as it can completely negate Eruption of Rot (greens) with
Tale of the August Queen.
- Bring large amounts of projectile negation.
- Some special roles can be ignored or compressed into others. Check the Greer Composition section for more information.
Ura
- Read the Legendary Ura Composition Guide.
Decima, the Stormsinger
While being relatively scripted and thus predictable, this encounter has a large amount of potential downstates and failstates that need to be managed correctly in order to guarantee a smooth, reliable pull. The strategy is overall similar to the standard turnaround strategy with a few optimizations.
Pre-Event - Legendary Conduit
The Infallible timer starts upon triggering the pre-event. This means that you’re essentially forced to begin on Decima, as completing Greer first will not count towards achievement completion.
One Mesmer or
Thief should pre-position next to the challenge mote at Decima’s arena beforehand.
Begin the event with mount skills such as Leap and
Roll Out. Strip
Resolution from the Conduit and burst it down. The
Mesmer or
Thief will prepare a
portal as soon as the encounter begins, then join the rest of the squad. Open the portal when the miniboss is close to dying and hit the Challenge Mote as soon as possible once the event is complete.
You will have some time before Decima finishes spawning in: use it to swap templates and food and mount up in preparation for the fight.
Strategy
Decima is played using the standard turnaround strategy, dividing the squad into a ranged and a melee subgroup, with the melee group handling Spreads and Greens and the ranged group baiting Arrows.
This strategy is extremely scripted and should ideally play out the same way every pull. Players should be familiar with their role and practice in order to perform consistently and reliably.
High Damage Skips
High damage is especially important in this fight as it will let you skip certain mechanics. In particular, in order of importance, you should try to phase before:
- Green collection at 80% and 50% - removes the need for the melee group to move to collect. This skip is one of the premises of the turnaround strategy, and not managing it is an indicator of a serious DPS issue.
- Third arrows in split phases - this deals a lot of damage and can potentially apply
Exposed right before the Flux Nova.
- Final arrows before 10% - again this can potentially deal a lot of damage and position your kiter far from the group just before the transition.
Additionally, at 70%, 40% and 10%, the boss will become Invulnerable and complete any ongoing mechanics before transitioning into the next phase of the encounter. This can artificially lengthen phase duration, especially in the case of Arrows as they have a long animation. Phasing before these mechanics will thus save a lot of time.
Split Phase Management
Split phases are one of the places where squads can optimize outside of pure DPS. Groups should have
portals for both subgroups, which should be pre-placed at Decima’s location at the beginning of each split phase. They can then be opened once the Boulders are close to dying, around 30-40%.
There are two approaches to managing CC in this phase:
- Do not CC the adds so as to not trigger their special attacks, especially Sparkwave at 50%. This is safe, but potentially slower.
- CC the adds immediately and bait out Sparkwave. This is riskier, but also much faster since the adds will be
Exposed.
The ranged group will have to manage Arrows while killing the add. The standard strategy involves spreading out with arrows, then waiting for the mechanic to finish before taking the portal.
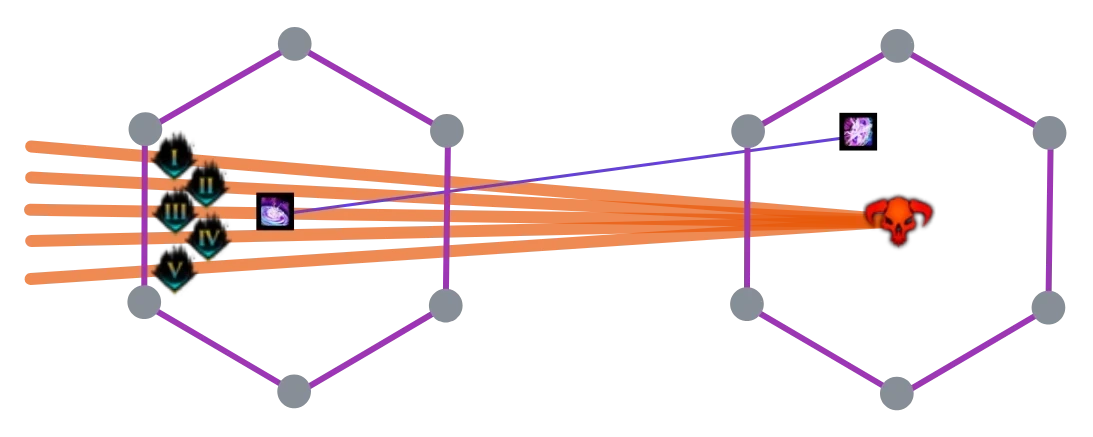
With good DPS however, the add will often die before the mechanic is complete: this offers an opportunity to get some DPS back onto the boss faster. For this reason, 4 and 5 will often take the portal early and move off the exit, while 1, 2 and 3 wait for their arrows to fire before doing so.
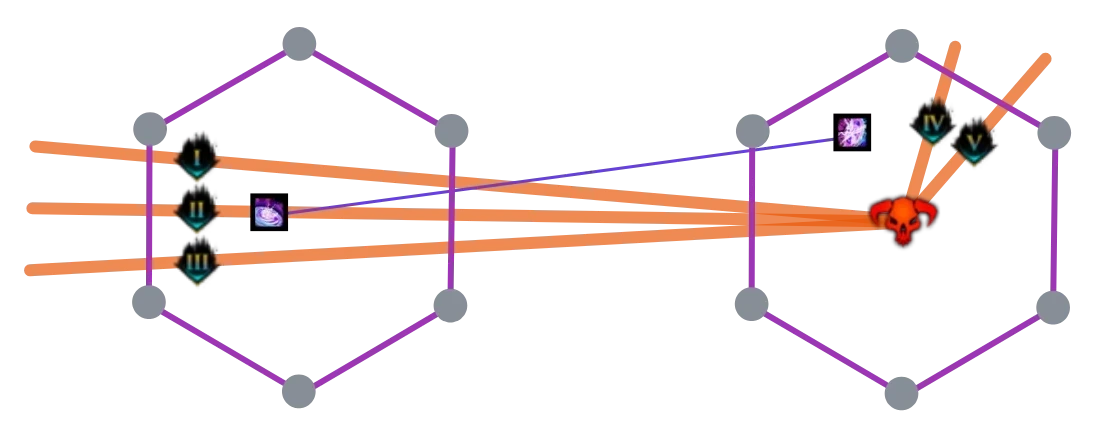
This has the double advantage of increasing DPS on the boss (potentially skipping mechanics) and reducing arrow overlap on the ranged add.
If the melee group gets spreads just before the adds die, they should dodge the spreads into the portal.
Speedrun Split Phases
This is a risky strategy that is usually only used in dedicated speedruns. The idea is to phase Decima by bringing her to the next health threshold and killing both adds simultaneously. This can be done by having the group begin on Decima, then
portaling players out to each add.
This works because the Boulders only begin casting Sparkling Reverberation when enemies are nearby, allowing the group to start them later than usual without getting Debilitated. However, executing this cleanly requires much more coordination and precise timing compared to the normal strategy. A PoV can be seen here.
Phase 3 Portal
In phase 3, Decima’s jump positions depend on your group’s DPS. With good damage, the first jump will often be extremely short, thus not affecting uptime by much.
The second jump however will almost always cross the entire arena, requiring everyone to follow. Optimized groups improve DPS uptime by providing a Portal to her new position. This portal can be pre-placed before the Arrows preceding her jump, and then opened after
Blinking to her new position.
Make sure you are correctly providing Aegis before blinking away, and that you have
Aegis before taking the portal.
Additional Tips
Tale of the August Queen is very strong on the melee group as it completely negates the Spreads. Save it for when they overlap with the Green Arrow.
- The safest way to play Spreads is to not overlap any: this greatly reduces the chances of wiping to a failed dodge.
- If you have to stack the Spreads, it’s convenient to have one person slightly off-group so that everyone can see the AoE filling.
- It’s ok to double charge some pylons or let a few greens through. Triple charging is not ok, as it results in additional greens and spreads.
- Healers should train to out-heal the Flux Nova consistently, as it is one of the most common sources of
Downstates. On Celestial
Troubadour, this can be done with the sequence:
Singularity Shot and
Crescendo just before the attack,
 Tale of the Second Scion during and
 Harmonious Harp immediately after.
- A
Mesmer can provide a
Portal from the center of the boss arena to the ley rift to speed up the transition to Greer. This portal can be pre-placed at the beginning of the 10% phase.
Greer, the Blightbringer
Greer as an encounter has a large amount of incoming damage and crowd control. Most common strategies therefore focus on mitigation and maintaining damage uptime. Speedrun compositions keep the framework of the standard “Cozy Strat” while focusing on role compression and positioning to improve DPS overall.
This encounter poses a significant Downstate risk and can be a significant hurdle for Infallible clears. Squads attempting the achievement must focus on proper movement and stacking so that everyone benefits from defensive utilities and projectile negation.
Pre-Event - Legendary Blighted Beast
The Infallible timer starts upon triggering Decima’s pre-event. This means that you’re essentially forced to begin on Decima, as completing Greer first will not count towards achievement completion.
Once Decima dies, take the ley rift in her arena to the camp. From there, you can use mounts to quickly reach Greer’s pre-event, the Legendary Blighted Beast.
This miniboss hits hard and has a lot of HP. His Corrupting Eruption is a line attack that will often Downstate any players it hits. The wind-up for this attack is identical to Boneskinner’s famous AoE smash, and must be treated in the same way by dodging it.
The Legendary Blighted Beast spawns with Resolution that is re-applied every 10 seconds. Try to strip it away as much as possible to kill him faster. The attack where it’s sinking into the ground will corrupt boons: step out of its AoE or re-boon quickly.
When the miniboss is close to dying (~25% HP), one player can run to the South-East, prepare a Portal, then mount up and run to Greer’s challenge mote. The portal can be opened as soon as the pre-event is over: activate the CM and run in to start the fight.
Compositions
Based on the presence of the bubble and 10% tank roles, we can build a table with the four most common Greer compositions.
Greer Composition Table
| - | With a bubble | Without a bubble |
| With a 10% tank | “Cozy” Composition | “Lean” Composition |
| Without a tank | “Heal Bubble” Composition | “Lean and Mean” Composition |
“Cozy” Composition
This is the standard composition for Greer CM, and is often seen in PUGs. The use of both special roles simplifies the fight noticeably, at the cost of some damage. The bubble is often played by a boonDPS, either a Herald or
Firebrand, while the 10% tank is usually on a tanky class running either Celestial or Trailblazer gear. This composition is very safe: run it if you have no concerns about DPS.
“Heal Bubble” Composition
This is another favourite in PUG runs. By not running a tank, you ensure an additional DPS on the group in the protoling phase. There is also no risk of the tank going Downstate due to unlucky protoling spawns. However, you will likely have Greer jump on the group during the protoling phase, and will then have to manage the overlap between his attacks and the protos’.
Greer jumping on the group can be seen as an advantage overall, as it makes it much easier to pre-stack conditions on him before the end of the protoling phase.
To combat this issue, the bubble is almost always played by a third healer, often a Luminary or
Vindicator. This is less of a DPS loss than one may expect, as boonDPS bubbles often have to make quite a few compromises in build and gameplay to fulfill their role.
“Lean” Composition
These compositions get rid of the bubble role and distribute its responsibility over the rest of the squad. The advantage is that you can then run offensive supports on standard raid builds, increasing DPS overall.
Both Mesmers will take
 Warden’s Feedback and focus, letting them negate Empowering Blast by alternating
 Feedback and
Temporal Curtain. They should communicate beforehand who manages which side of the boss in order to guarantee full coverage of this mechanic.
It’s highly recommended to have additional sources of projectile nullification distributed through the squad. A common pick is Necromancers with
Corrosive Poison Cloud.
With these compositions it’s common to run a Trailblazer DPS as 10% tank, often a Willbender. This increases the overall safety of the protoling phase, as your two defensive supports may get overwhelmed if they have to contend with Greer’s attacks on top of the protolings’. The tank will often rejoin the group before the first protoling dies, baiting out Greer’s jump in the process.
“Lean and Mean” Composition
Identical to the “Lean” composition but played without a 10% tank, granting an ideal role compression and the best DPS potential overall. This is conditional, however, on your squad being able to maintain defensive capabilities throughout the fight, and especially in the proto phase. If you have experienced healers and feel confident, this composition may work for you.
Additional Tips
- If running two
Troubadours, you can solve all triple greens on the group using
Tale of the August Queen. When doing so, it’s beneficial for one of the greens to be slightly off-stack so that the healers can see its progress and time the skill correctly.
- If you’re not running a
Chronomancer, the first reflect can be done by two players running out together, with each taking a side.
Harmonious Harp differs from
Distortion in that it always grants two seconds of
Invulnerability independent of the number of notes it consumes. This is often not enough to block all three Blobs of Blight: get used to dodging the third.
- During the split phases, try to pull Gree to the center of the arena instead of directly to Reeg. This will make it easier to bait Ereg and position the squad closer to Greer at the end of the split phase.
- Any greens or seekers that persist after the boss has died are real: players will need to solve them or they will
Downstate.
Legendary Ura, the Steamshrieker
Legendary Ura is an extreme challenge that will test the group’s ability to focus and play at the top of their game. While clearing this encounter with no Downstates may seem difficult, it can become very consistent with practice. There are no overt one-shots: the fight constantly ramps up, remaining manageable as long as you can keep up with its mechanics, with the risk of getting overwhelmed if you start falling behind.
Transition from Greer
Once Greer dies and you have solved any lingering mechanics, you should take the ley rift to Camp. From there, the quickest way to Ura is by either using the Skyscale or
Skimmer to fly up directly to the arena, or by using the
Roller Beetle through the cave. The beetle is faster overall, but also more difficult to maneuver.
Send one person to activate the Legendary mode before beginning the fight. Consider using a ready check if you have enough time.
Composition and Strategy Choice
Strategy wise, speedrunning LCM Ura looks very similar to standard runs. Public strategies are fairly optimized already, as the difficulty of the encounter mandates competency from all involved players. For Infallible runs, groups will have to choose which composition to run.
- Solo CC compositions give the squad more leeway overall in class choice, as the only hard requirements are the presence of a CC player and a certain amount of
Stability and condition cleanse. Speedrunners often use this composition as it lets experienced groups play around with riskier playstyles, such as solo-healing.
- 4-man compositions are often preferred by progression groups, especially on the EU server, and are therefore familiar to many players. For Infallible, these force you to run two
Mesmers and two
Thieves. This is often not an issue, as
Troubadour is extremely strong on all three bosses and
Thief has some good boonDPS options, but its viability depends on your group’s preferences and the current state of the meta.
Almost all Infallible runs ignore Titanspawners. The benefits of keeping the group stacked and simplifying the melee rotation are undeniable if your objective is to get a reliable kill.
For more in-depth information on this encounter, read the Legendary Ura Strategy Guide.
Additional Resources
PoVs
This is a non-comprehensive list meant to display a diverse selection of perspectives and roles. You can find additional PoVs and logs in the Infallible Archive.
| Classes | Link | Date | Notes |
| July 2026 | Melee heal on Decima, lean Greer, 3-heal rotation on Ura | ||
| July 2026 | Kite on Decima, lean & mean Greer, Solo CC Ura | ||
| July 2026 | Kite on Decima, lean Greer, 4-man Ura | ||
| July 2026 | lean & mean Greer, Solo CC Ura | ||
| July 2026 | Cozy Greer, 4-man Ura | ||
| August 2026 | Heal Bubble Greer, Solo CC Ura | ||
| May 2026 | lean Greer, 4-man Ura | ||
| August 2026 | lean Greer, Solo CC Ura |
Other Useful Links
Wing 8 Infallible Strategy by [WRDL] is one of the main references for this guide.
- Complete Mount Balrior CM Guide - contains detailed mechanical breakdowns and strategy guides for all CM and LCM bosses in this wing.
Celestial Troubadour Guide and Benchmarks - currently the primary resource on this build.