< Wing 8 Return to Home Wing 2 >
Spirit Vale
| Timer | 12 minutes 30 seconds |
| Timer Start | On entering combat with Vale Guardian. |
Table of Contents
Spirit Vale is a transition-heavy wing, with relatively little time spent in combat with bosses. Efficient movement and skips are thus extremely important, as the Infallible timer for this wing is notoriously difficult.
Main Points
- Vale Guardian and Gorseval have similar strategies, aiming to keep the boss in the center of the arena and kill all adds in the split phases simultaneously.
- Spirit Woods can be heavily optimized using portals and skips.
- Several transitions in and out of bosses are similarly optimized.
- On Sabetha, it can be worthwhile to ignore cannons based on your healing output, confidence and overall leeway on the timer.
Composition
Spirit Vale compositions bring several classes focused on group mobility and portals. Two Mesmers are almost always present to provide
Portals at various points in the wing. Groups will sometimes run an additional
Thief or
Mesmer for out-of-bounds skips, with
Thief being the easier of the two to execute.
Solo-healing is common on all three bosses, and can be made much easier by supporting the off-heal sub with classes such as Luminary and
Ritualist. Common choices for healers include:
Troubadour for role compression with the
Mesmer slot.
Tempest for its excellent Seeker control, often swapping to boonDPS
Catalyst after Vale Guardian.
Druid for its excellent healing output, utility and seeker control. Requires
 Eclipse and
  Glyph of Burgeoning to generate Astral Force when incoming damage is low, or can swap to DPS after Vale Guardian.
Luminary also has incredible healing and good seeker control, and can swap to boonDPS after Vale Guardian.
Stacking sigils such as  Sigil of Bloodlust and
  Sigil of Cruelty are highly recommended. You can stack them during Spirit Woods, or even before Vale Guardian by killing the respawning Pocket Raptors on the cliff to the east before the boss arena.
Vale Guardian
Power builds are favoured since the boss has 36% reduced armor.
- Bring at least three
Condition builds to kill the Red Guardian. Classes with fast ramp-up, such as
Willbender, are especially strong.
- Make sure you have enough Seeker control:
Mesmer:
Temporal Curtain and/or
Illusionary Wave
Ranger:
 Entangle
Tempest:
 Aftershock!
Guardian:
 Shield of Absorption and
  Line of Warding
- Any class with Shouts can bring
 Relic of the Reaper
- This is the most difficult boss to solo-heal due to Distributed Magic. Group invulnerability and mitigation skills such as
“Rebound!”,
“We Will Never Yield!”,
Tale of the August Queen and
Xinrae’s Weapon can help the off-heal subgroup survive. Personal invulnerability, mitigation and healing should also be used if available.
- DPS players can food swap on the Guardians in the split phases for some additional DPS.
Spirit Run
- You will almost always see two
Mesmers running
Mimic,
Portal and
Blink to optimize movement between rifts.
- If doing out-of-bounds skips, a third player will be on either a
Mesmer or
Thief.
- If doing out-of-bounds skips, try to assign strong, self-sufficient power builds with boon access to kill the walls ahead of the main group.
- Run stacking sigils during these encounters to increase your DPS on the following bosses. Put the sigils on ascended weapons and share these weapons between templates to maintain stacks when swapping builds.
Gorseval
- Ensure you have at least one source of reliable
Aegis or
Stability per subgroup.
- This boss can be done without a healer if you have sufficient CC to survive Ghastly Rampage or enough DPS to phase it before the Retaliation effect kills anyone.
- DPS players can food swap on the Charged Souls in the split phases for some additional DPS.
Sabetha
- Ensure you have abundant
pull skills to speed up the pre-event.
Temporal Curtain,
Binding Blade and
Spectral Grasp are best for this.
- Your kiter should be a boon provider with either ranged application, a large radius or a bursty boon profile. This maximizes overall DPS while guaranteeing uptime.
Vale Guardian
The strategy for this boss differs from the standard PUG strat on two fundamental points:
- Center tanking to minimize boss movement.
- Optimized split phases to kill all three guardians at the same time.
Center Tanking
Center Tanking is when you aim to keep the boss in the center of the arena. Compared to the standard side tanking strategy, this has the advantage of:
- Reducing time spent waiting for the boss to run to the edge at the beginning of the first and second phases.
- Keeping the boss immobile for most of the fight, increasing damage uptime overall.
- Place the group in a position where all three add spawn positions are equally accessible for the split phases.
It is highly recommended to being the fight by using Mass Invisibility or another
Stealth source to approach the boss. This can save up to 3-4 seconds on the timer, as it starts counting from when you enter combat.
Being in the center, players should be careful to not stand in the dangerous portions of the arena, and good Seeker control is extremely important.
The tank should try to stay as close to the center as possible to avoid any boss movement. The exception is the final 33%, where they can pull it slightly to the side in order to give the squad a bit more maneuvering room.
Three-Way Split
Optimized strategies aim to kill all three lesser guardians at the same time. This involves sending three DPS players to each guardian. The healer is usually the odd one out, and can decide to initially support one of the three groups (usually the Condition players on the Red Guardian) before moving to another guardian, usually either Blue Guardian for Distributed Magic or whichever one needs the most CC.
Each group should run sufficient CC to break the Defiance Bar of their assigned guardian (roughly 900 HP).
Vulnerability should also be balanced out, ensuring that each group brings sufficient sources.
The condition group often struggles the most with Vulnerability application: this is another reason why healers often support them in the beginning of the split phases.
Spirit Woods
This is the longest encounter in the wing, and the one where it’s easiest to save time. Several tricks and optimizations have been found by the community, including an especially effective out-of-bounds skip that can save around a minute on the timer overall.
It is recommended to run a marker pack when doing these skips for the first time, as it shows the positions of most portals and the path of the out-of-bounds skip.
Spectral Rifts
This event can be greatly sped up using portals to transport the group from rift to rift. It is also used to set up players in key positions in preparation for the following event, the Spirit Race.
Once Vale Guardian is dead, both Mesmers should swap to a build that provides sufficient mobility between rifts (
Example Build). Transition from Vale Guardian’s arena by providing a
Portal to the first area.
From here, use Temporal Curtain to pull together the first group of adds in the rift area, cleave them down and trigger the beginning of the encounter.
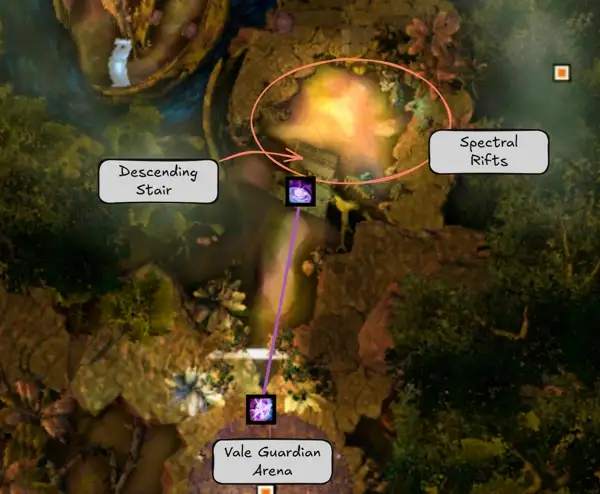
The Spectral Rifts event follows a structure similar to normal runs, with the Mesmer players providing portals from rift to rift and resetting their cooldowns with Adrenal Mushrooms. Alternate portals between the two players to comfortably cover all required movement. As DPS is not really necessary for this event, players should consider running additional healing, support and utility if necessary. Movement skills can also be very useful for moving between rifts without having to wait for each portal.
The event will finish once the 20th rift has been closed.
Out of Bounds Skip
This skip, when executed at its full potential, allows the group to:
- Completely bypass the Champion room event that occurs after Spectral Rifts.
- Kill the final three Ethereal Barriers almost simultaneously, greatly speeding up Spirit Race.
- Prepare a convenient portal to the Cemetery.
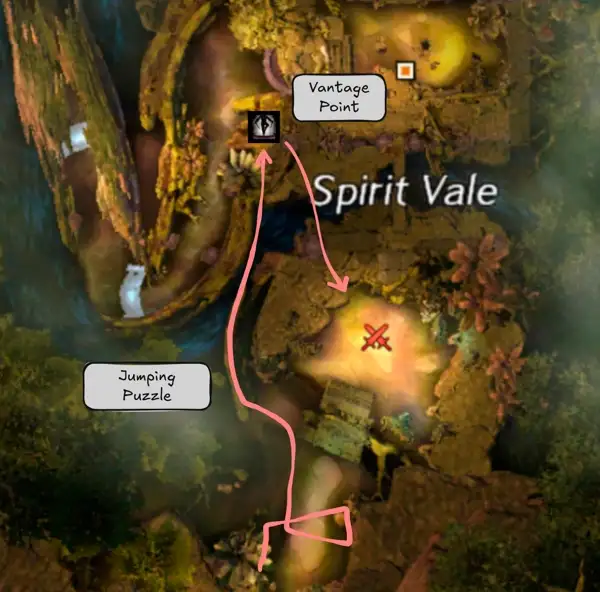
Preparation begins right after Vale Guardian dies, with a Thief or
Mirage doing a jumping puzzle around the spectral rifts area to get into a position overlooking the beginning of the Spirit Race.
While this puzzle can be done by both Thief or
Mirage, it is easier on
Thief.
They then prepare a
portal and glide down to join the rest of the group in stacking and capturing rifts. When this portal is close to running out, they can open it (the
Mirage using
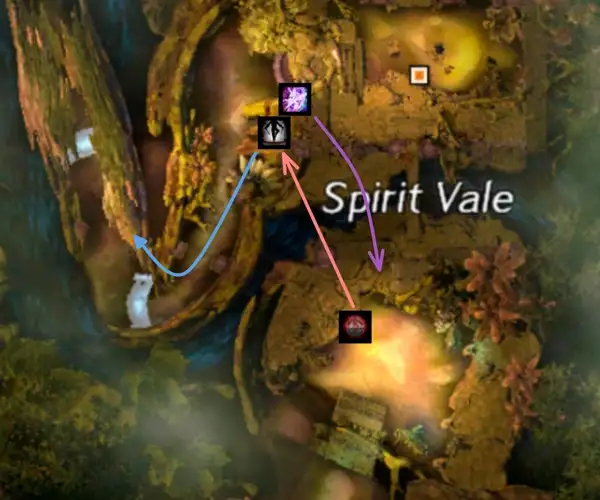
Mimic and resetting it on an Adrenal Mushroom) to get to the vantage position and replace it.
Around a minute before the end of the Spectral Rifts event, this player should open their
portal and take it along with one of the
Mesmer players and two to three DPS. The
Mesmer can prepare their own portal on the vantage position and rejoin the group for the final few rifts. Meanwhile, the DPS players plus the skip player glide down to the top of the log and run northwards, following the path that the group would normally take.
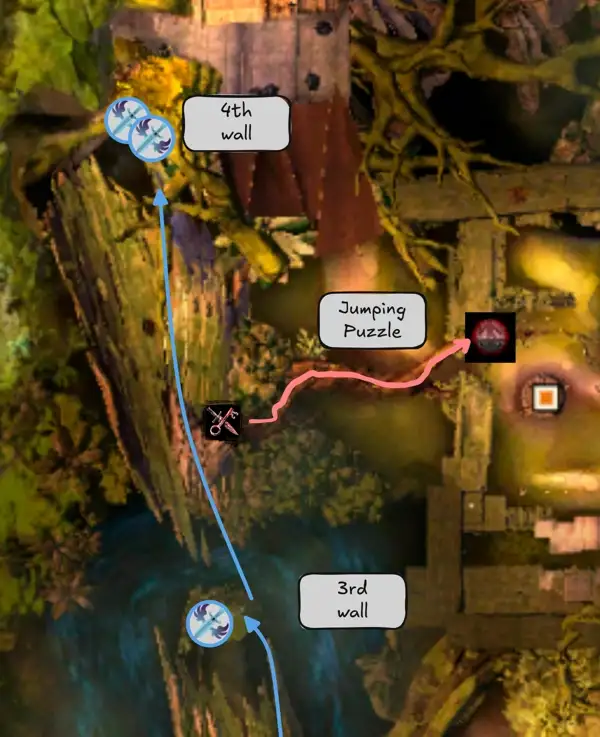
Out of these four players:
- One DPS should stop at the spawn location of the third wall (optional but recommended).
- Two DPS will go ahead to the spawn location of the fourth and final wall.
- The skip player will do another small jumping puzzle to place a
portal in preparation for the cemetery transition. They can then glide back to the location of the third wall.
Ideally, the skip group should reach their positions at the same time as when the main group captures the last rift. Time the portal so that it’s as close as possible: this usually means opening it once the rifts event is 65-75% complete.
Spirit Race
Once the last rift is closed, the Mesmer opens their
Portal to the vantage point, which the rest of the group takes. They can then glide down to begin the encounter.
The main group will only need to fully kill the first two Ethereal Barriers.
The third barrier can be killed by the solo DPS, with the group joining them towards the end of the encounter, or by the group on its own. Once the wall is dead, take the
portal to the Cemetery.
The fourth wall will be cleared by the remaining two DPS, who can then walk to the Cemetery once it’s dead.
These players need to be especially careful with their positioning: they must stand in a specific location in order to hit the barrier but not trigger any spectral rifts.
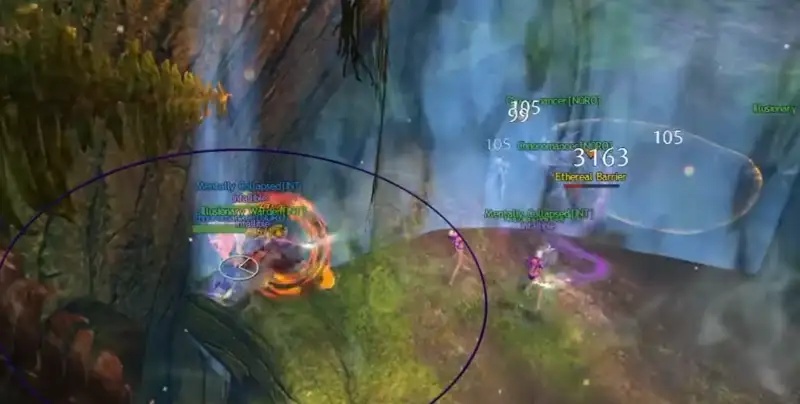
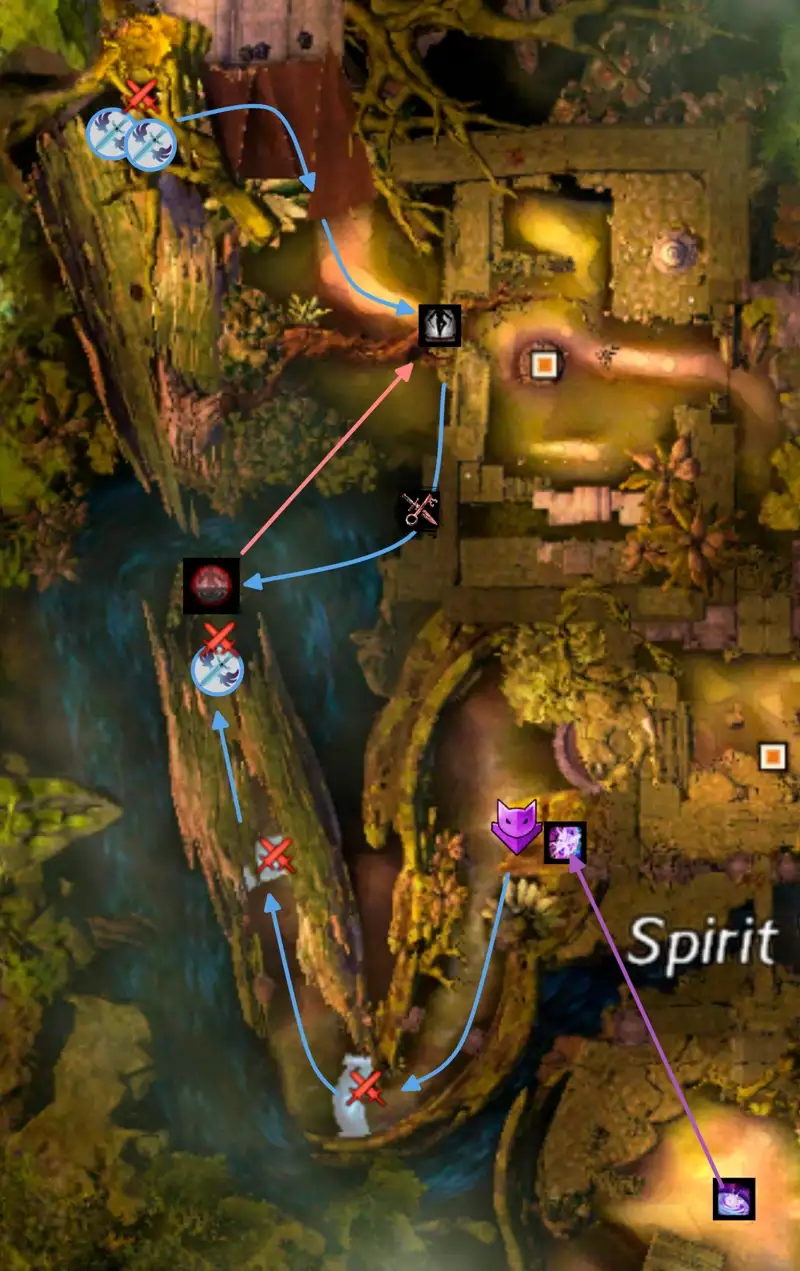
The main group will contain both Mesmers, enabling them to use
Portals in combination with
Blink to quickly move from barrier to barrier. This is especially important for moving between the first and second walls, as
Blinking correctly will skip over one of the rift trigger zones, so the group will not have to capture it.
Cemetery
Designate one person each for buttons #1, #2, #3 and #5 (all of them except for the jumping puzzle one). Everyone else should go for #4 to maximize the chances of at least one person making it through the jumping puzzle. Anyone failing the puzzle should go to #5 instead.
The group killing the the final wall will often end much before the rest of the group. This lets them walk into the cemetery and pre-position on a couple of buttons before the event begins. Some groups like to send more players to the final wall for this reason.
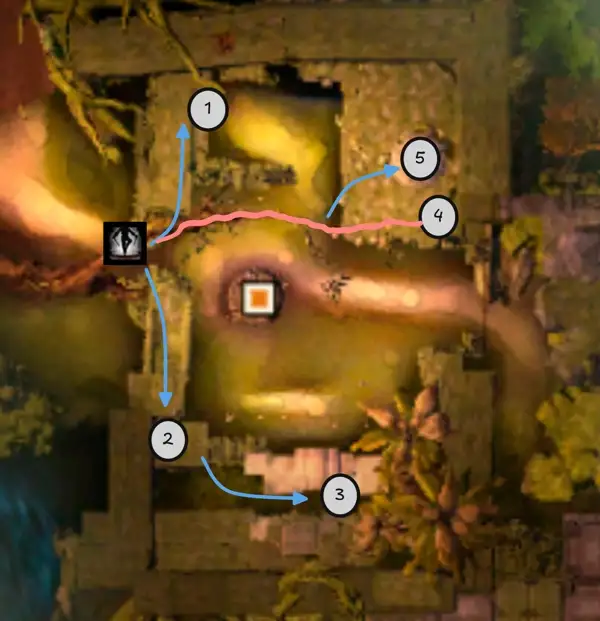
While this is ongoing, a Mesmer can place a
Portal in the center of the cemetery. Once all buttons have been pressed and the door blocking access to Gorseval has been opened, they can
Blink forward, glide into the arena, and open their portal in front of the boss for the rest of the squad to take.
The Mesmer doing this portal should make sure to walk over the trigger line just before the updraft in order to spawn the boss in. Watch a PoV to see what this looks like.
Gorseval
This boss is played using the standard strategy with the addition of a four-way split in the split phases and a portal to optimize the transition into the Sabetha pre-event.
4-way Split
The objective of this strategy is to kill all four Charged Souls simultaneously, minimizing movement between the adds.
Assign 2-3 players to each direction, trying to balance out the damage profile for each group so that the adds ideally die at the same time. Ensure that each group has sufficient access to Vulnerability and either condition cleanse or
Resistance, as the Charged Souls pulse
Weakness every few seconds.
Portal Out
It is possible to provide a portal out of Gorseval directly into the first area of the Sabetha transition. This is slightly tricky to do, but saves a significant amount of time.
During the second split phase, the group killing the North-Eastern add will additionally kill the arena wall next to their spirit. This is not very difficult to do as the wall has a giant hitbox and can generally be cleaved down along with the add, but consider sending an additional player with that group just in case.
Then as soon as the final phase begins, the portal player can prepare their Portal Entre in the center of the arena. The wall re-spawns when Gorseval begins his Ghastly Rampage (the
Defiance Bar mechanic), so just before that they should
Blink or walk out of the arena through the missing wall. They can then use the updraft to the North until the boss is dead, after which they glide down to the north and open their portal for the rest of the group.
The person placing the portal usually will be put into combat immediately after landing, so they will often not be able to swap builds. They should therefore be ready to do the entirety of Gorseval and the transition on the same build: usually this means running Mimic,
Portal and
Blink on Gorseval, relegating them to a support role. This is often a heal or celestial
Troubadour.
Transition to Sabetha
This transition requires players to kill exactly 30 bandits and get to the boss as fast as possible. Optimizing this transition is one of the most difficult parts of the wing, but also brings one of the greatest time gains.
Initial Area
The encounter begins with the players moving from Gorseval’s arena to the first area. This area contains a large number of adds, which must be killed as quickly as possible. Two main methods exist to do this efficiently:
- (Easy) Aggro all the adds and then stand behind the staircase: this will attract them all via line-of-sight to a single location.
- (Fast) Split into several groups or subgroups to efficiently cover more ground. Commonly this involves three groups of 2-3 people, with one going left, one going right and the last going straight ahead. Ensure that each group has at least one
pull.
Once the first area is cleared, the rest of the event is usually played in one of two different ways.
- A double portal strategy aiming on killing more adds towards the beginning of the transition.
- A triple portal strategy that distributes killing adds in three different locations.
Double Portals
This strategy requires players to focus more on killing adds towards the beginning of the event, especially in the first area and along the elevated path to the second one. This way, you aim to clear the kill requirement early and port directly from the second area to the boss. Doing the pre-event this way is extremely fast. However, it can be punishing to miss a bandit as you do not have as many available.
While the main group is killing bandits in the first area, three things are happening:
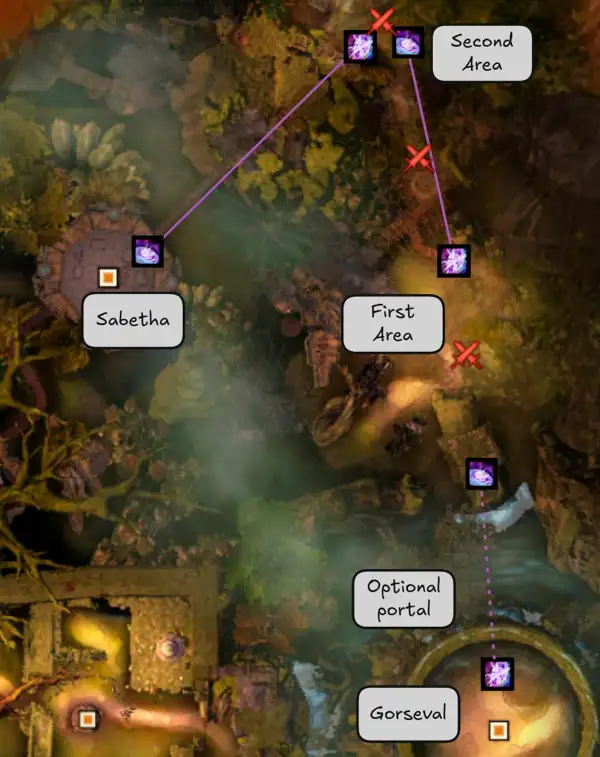
Once all adds in the first area have been cleared, the first Mesmer will open their portal, bringing the main group to the second area where they link up with the DPS coming up the walkway.
Alternatively, one of the Mesmers heading up the walkway can aggro the bandits, pulling them up towards the second area. You can then send some players down after opening the portal to clear them out. This can be seen in this PoV.
The second Mesmer will prepare their portal once they reach the second area, then use the jump pad to cross the ravine and make their way to Sabetha. The event should be complete once all bandits in the second area have been cleared, at which point they will instantly open their
Portal directly into the arena. You then have a couple of seconds (literally) before the boss spawns in and the final fight starts.
This player should be in Stealth before jumping the ravine. Otherwise, the nearby Bandit Sniper will prevent them and possibly other players from swapping templates due to its gigantic aggro range. It is recommended to use
Mass Invisibility (and run
 Prismatic Understanding) just before launching from the jump pad.
Triple Portals
This strategy kills adds in three different locations, porting between all three and keeping the main group united throughout the event. It gives the group access to more bandits overall, meaning it’s less punishing to miss a few, but can be slower than the double-portal transition.
While the main group is killing bandits in the first area, a Mesmer prepares their
Portal at the start of the walkway and makes their way up to the next area. Once all adds in the first area have been cleared, the
Mesmer
Mimic opens this portal, bringing the main group to the second area.
The second Mesmer can either follow the first one at the beginning or take the portal with the rest of the group. Once they reach the second area, they should prepare their own
Portal, cross the ravine using the jump pad and port the group to the third area once the adds in the second area are dead.
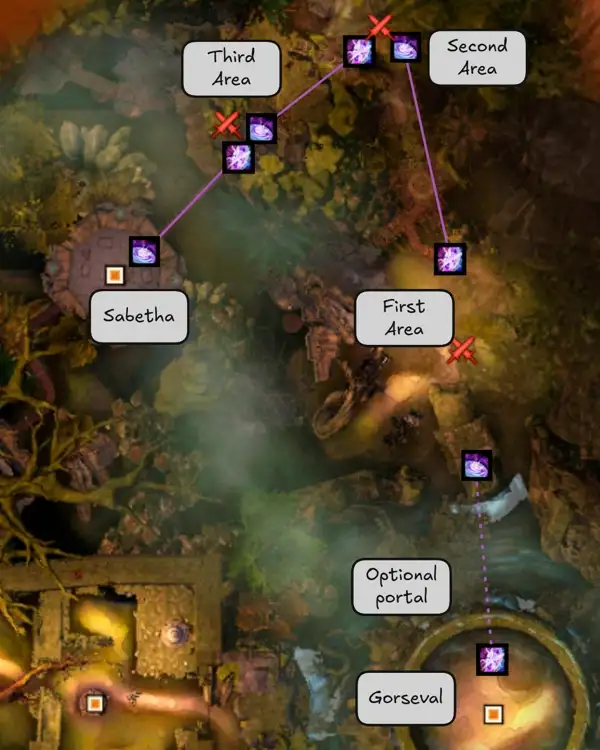
As soon as they take the second portal, the first Mesmer prepares their own
Portal again and makes their way into the boss arena, opening it instantly once the main group has killed enough bandits in the third area to complete the event. You then have a couple of seconds (literally) before the boss spawns in and the final fight starts.
Sabetha
This boss is played almost the same as normal runs. The main choice the squad will take here is which cannons to do.
Most groups will be able to comfortably kill the boss before the platform health becomes an issue, as long as you don’t let too many heavy bombs explode. However, the fight becomes significantly easier to heal if you kill even one cannon, as this will leave a quarter of the arena free from shots. Commonly this is done with the third cannon, as it overlaps nicely with “Knuckles”.
Other tips for Sabetha include:
- Prioritize bringing
 Time Bombs out of the group over anything else. If this becomes an issue, consider having a player intentionally bait them by standing closest to the boss.
 - DO NOT skillsave on the split phase adds: continue your rotation naturally and aim to kill them as fast as possible. DPS on them is as valuable as DPS on the boss.
- Try to have a boon player with a high boon radius or ranged boon capabilities kiting the Flak Shots.
Additional Resources
PoVs
This is a non-comprehensive list meant to display a diverse selection of perspectives and roles. You can find additional PoVs and logs in the Infallible Archive.
| Classes | Link | Date | Notes |
| May 2026 | Very fast run with all out-of-bounds skips and double portal transition to Sabetha. | ||
| August 2026 | Same strategy as above but complementary portals. | ||
| March 2026 | Jumping puzzle done with Thief | ||
| April 2026 | Solo Wall 3 on Spirit Race | ||
| April 2026 | Wall 4 on Spirit Race | ||
| April 2026 | Champion room skip | ||
| February 2026 | Solo-Heal on VG, Champion room skip only |
Other Useful Links
Thief Jumping Puzzle - showcase of the Spirit Race out-of-bounds skip with thief.
Mirage Jumping Puzzle - showcase of the Spirit Race out-of-bounds skip with Mirage.