< Wing 2 Return to Home Wing 4 >
Stronghold of the Faithful
| Timer | 13 minutes 30 seconds |
| Timer Start | On speaking to |
Table of Contents
Fast clears of the Stronghold of the Faithful are heavily dependant on Escort and Twisted Castle. These two encounters are run with innovative tactics that greatly reduce their clear time, making them much more impactful than the rest of the wing.
Main Points
- Escort is run with a risky strategy that aims to gain as much time as possible.
- Keep Construct is played without moving the boss from the center, aiming to skip the exposed phase.
- Twisted Castle can be run extremely quickly with a risky strategy.
- Xera is played similarly to standard runs. High DPS means that boss movement can be minimized.
Composition
Most compositions will run at least two Mesmers, a
Thief and an
Engineer, since they provide irreplaceable utility. The remaining classes are mainly determined by the group’s Escort strategy, as it has the most stringent requirements of the wing and is also where you stand to gain the most time.
Both bosses favour Power damage but have relatively long phases, meaning that burst damage isn’t as important. Stacking sigils such as
 Sigil of Bloodlust and
  Sigil of Cruelty work with some enemies in Escort, specifically Wargs and Mcleod’s phantasms. This grants a total of 8-10 stacks, which are not worth replacing another sigil over, but can be beneficial for classes that do not benefit from
 Weapon Swap.
Escort / Siege the Stronghold
- The squad will divide into two groups: a Tower group and a Ground group.
- The Tower group contains six people:
- Two
Mesmers running
Portal Entre and
Blink.
- A healer if not running a heal
Mesmer.
Druid is an excellent choice due to
Glyph of the Tides.
- Enough DPS to get to six people.
- Two
- The Tower group must bring at least three skills that can clear towers. See Clearing Towers for more information.
- The Ground group contains four people:
- A
Scrapper to provide
Glenna with
Superspeed and
Quickness.
- A healer with high
Stability uptime, such as
Guardian or
Mesmer.
- Two DPS or BoonDPS that can provide high
Blinded uptime, usually either
Elementalist,
Necromancer or
Thief (see Warg Management for more information).
- A
- One
Thief running
Prepare Shadow Portal and
Infiltrator’s Signet is required for the cave skip. This can also be done with a
Mirage, but is significantly faster and easier on
Thief.
Keep Construct
Power builds are favoured due to the boss having 36% reduced armor.
- Fairly easy to solo-heal using a single celestial healer.
- Try not to bring CC as you don’t want to break his
Defiance Bar.
“We Will Never Yield!” can be used to ignore the spread mechanic.
Twisted Castle
- Optimized strategies rely on running a pair of
Mirages.
- Non-optimized strategies will still benefit greatly from running at least one
Mirage.
- Strong cleave and
pulls will speed up killing groups of adds.
Xera
- The initial platforms can be sped up greatly with a person running
Illusionary Wave and a
pull in each subgroup.
- Having a player with enough range to kill the shard can “skip” the gliding phase, making the run much safer overall.
Siege the Stronghold
As the first encounter of the wing, Escort is usually played using an especially risky strategy. This gains an incredible amount of time compared to normal clears, and is the main hurdle for groups attempting the wing. When performed well, the rest of the raid has significantly less time pressure.
This section contains an optimized strategy that can be picked up by most groups with a reasonable amount of practice. Feel free to modify and improve it according to your needs.
All positions described in this section can be viewed in-game using marker packs.
Important Concepts
Groups
Escort speedrun strategies revolve around dividing the squad into two groups:
- A Tower group that will clear the towers, clearing space for
Glenna, usually consisting of six people.
- A Ground group that will run
Glenna through the bottom part and deal with wargs, usually consisting of four people.
Teleporting Glenna
Glenna has a mechanic that prevents her from getting stuck in terrain. Whenever a player uses
Over Here! within range, if she cannot pathfind to them (NPCs cannot jump!) she will instead instantly teleport to the player.
Groups can abuse this to quickly teleport Glenna over walls and difficult terrain. Most marker packs highlight positions where this is commonly done.
Teleporting Glenna in this manner is not accepted in most speedrun formats.
Clearing Towers
To capture a tower, the number of players within the capture point must exceed the number of enemies. Ye maximize the speed of capture by:
- Sending as many people into each capture point as possible (this is why six people are in the tower group).
- Quickly clearing enemies from capture points using skills that inflict
Knockback or
Fear in an area.
Skills that can clear towers include:
 Shadow Gust on
 Deadeye.
Glyph of the Tides on
Druid.
“Fear Me! on
Warrior.
 Shield of Absorption on
 Guardian.
Temporal Curtain followed by
Illusionary Wave on
Mesmer*.
Groups should bring at least three of these skills so that one will be ready for each tower.
* Since
Temporal Curtain requires two casts, it can leave enough time for White Mantle Cultists to summon their minions. This is an issue if capturing solo since
Temporal Curtain and
Illusionary Wave are limited to 5 targets. However, this is not an issue as long as you have multiple people aiding with the capture.
Speeding Glenna
The ground group should be arranged in the following manner:
- The
Scrapper should run slightly in front of
Glenna while giving
Superspeed to both her and the rest of the group.
- The two DPS should go ahead to clear out adds while spamming
Over Here!, but not far enough to be out of range of the
Scrapper.
- The healer should stay close
Glenna and heal her whenever she takes damage. They should also use
Over Here! as much as possible.
Warg Management
Killing wargs is not viable, since the ground group does not have enough damage and it loses a lot of time. Instead, groups should ferry Glenna around them as much as possible while applying
Crippled,
Immobile and
Blinded to prevent them from hitting her.
Blind in particular is extremely important, as in certain parts you can have as many as 4 wargs trying to hit Glenna simultaneously. For this reason, it’s important to have at least two players with skills that pulse
Blinded. Standard picks include
Necromancer with
Well of Darkness,
Elementalist with
Sandstorm and
 Dust Storm, and
 Thief with
 Black Powder or
 Infiltrator’s Arrow.
Strategy
This section contains a play-by-play description of an optimal escort run. You may choose to include or exclude certain parts according to your group’s preferences and substitute them with standard gameplay.
0. Instance Preparation & Dialogue Skips
Before you start a run, you want to prepare the instance so that the bridge at the beginning is up and the gates are open. This lets players blink up from the bridge to the adjacent wall, enabling successive skips. There are two ways to do this:
- The normal way involves speaking to
Glenna, having her begin the encounter, then triggering a wipe by /GG-ing. This is commonly done for Infallible runs, since it’s easier and Escort will remain in a prepared state until you clear it.
- The fast way additionally has multiple players /GG-ing at specific instances to skip up to 40 seconds of dialogue. This requires some coordination and is often done in speedruns, but has no advantage in Infallible runs apart from not having to listen to
Glenna yap.
If the triggered wipe happens too early, it can bug the encounter and you will have to reset the instance. Have at least one person stay alive until the “Escort Glenna to the stronghold’s courtyard” text starts disappearing.
Click to view dialogue skip instructions
-
One player should approach
Glenna as soon as the wing is open to give her
Superspeed. They should then /GG during their first line of dialogue after she gets into position. This will skip the rest of the pre-Escort dialogue.
-
While at least one other player is alive in the wing, another player should interact with Glenna and select the first option. As soon as their first line of dialogue appears they should /GG to skip the rest of the post-Escort dialogue. This window is very tight so ideally they should have pre-typed /GG in their chat.
-
Finally, trigger a wipe as soon as the encounter begins by having everyone /GG.
-
After respawning,
Glenna will again appear on the right. You can give her
Superspeed again and then interact with her to immediately start the encounter.
In step 1, do not /GG before Glenna gets to her spot: this will result in her becoming un-interactable, making it necessary to reset the instance. If you are late and she’s already speaking, wait for her next line to /GG.
1. Initial Glenna Port & First Room Skip
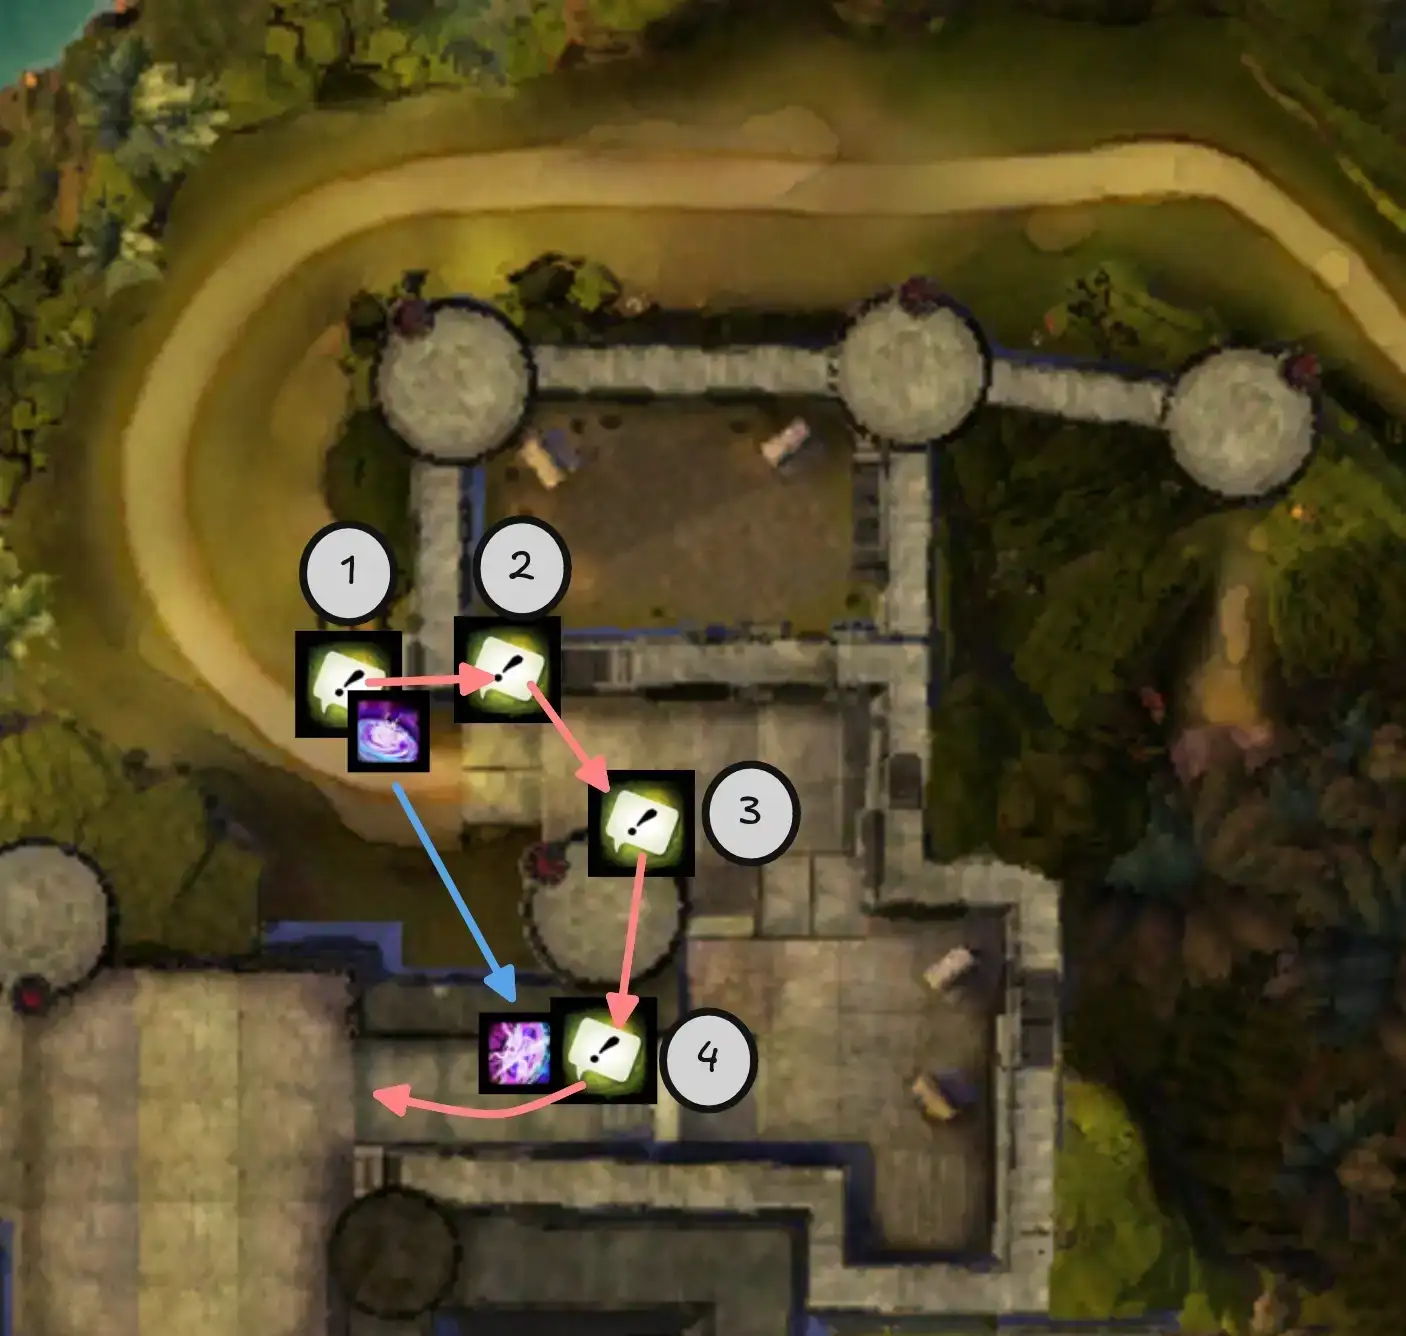
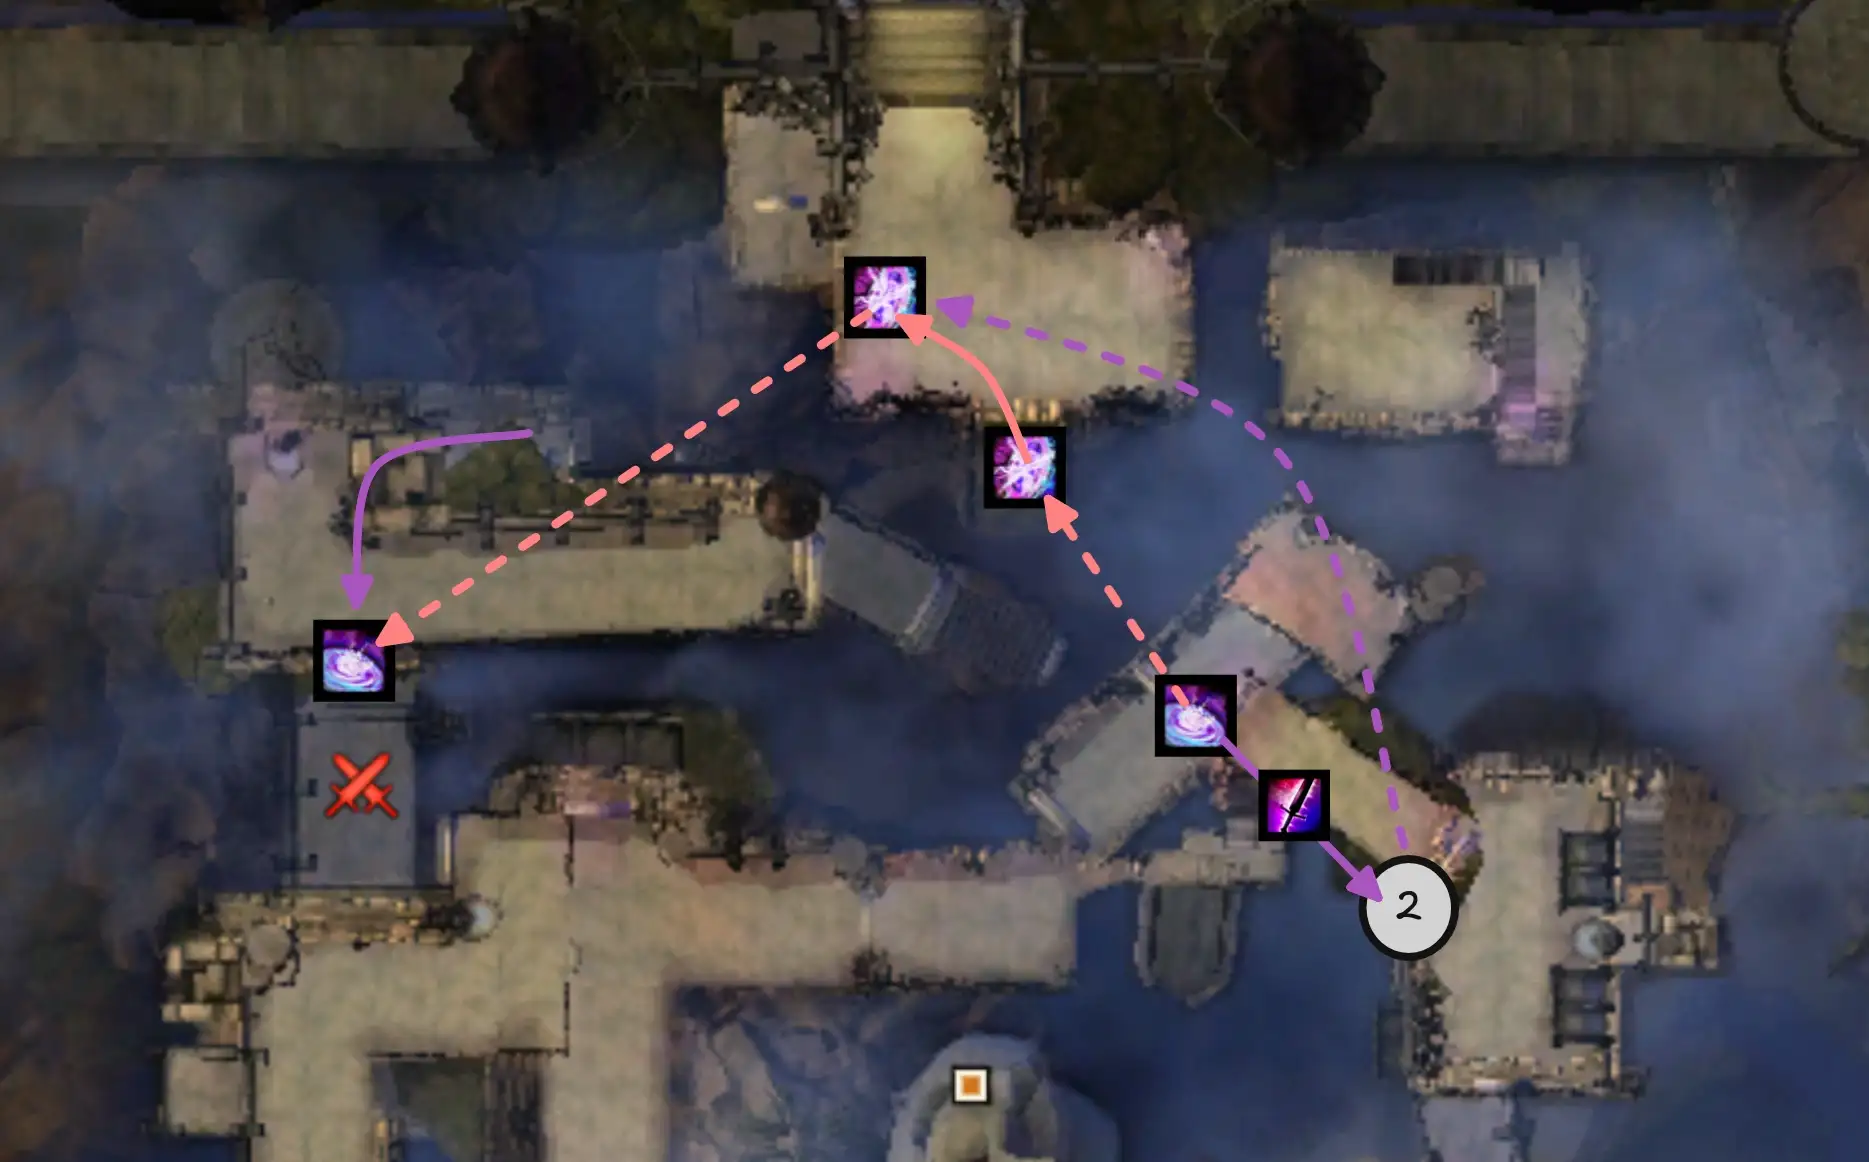
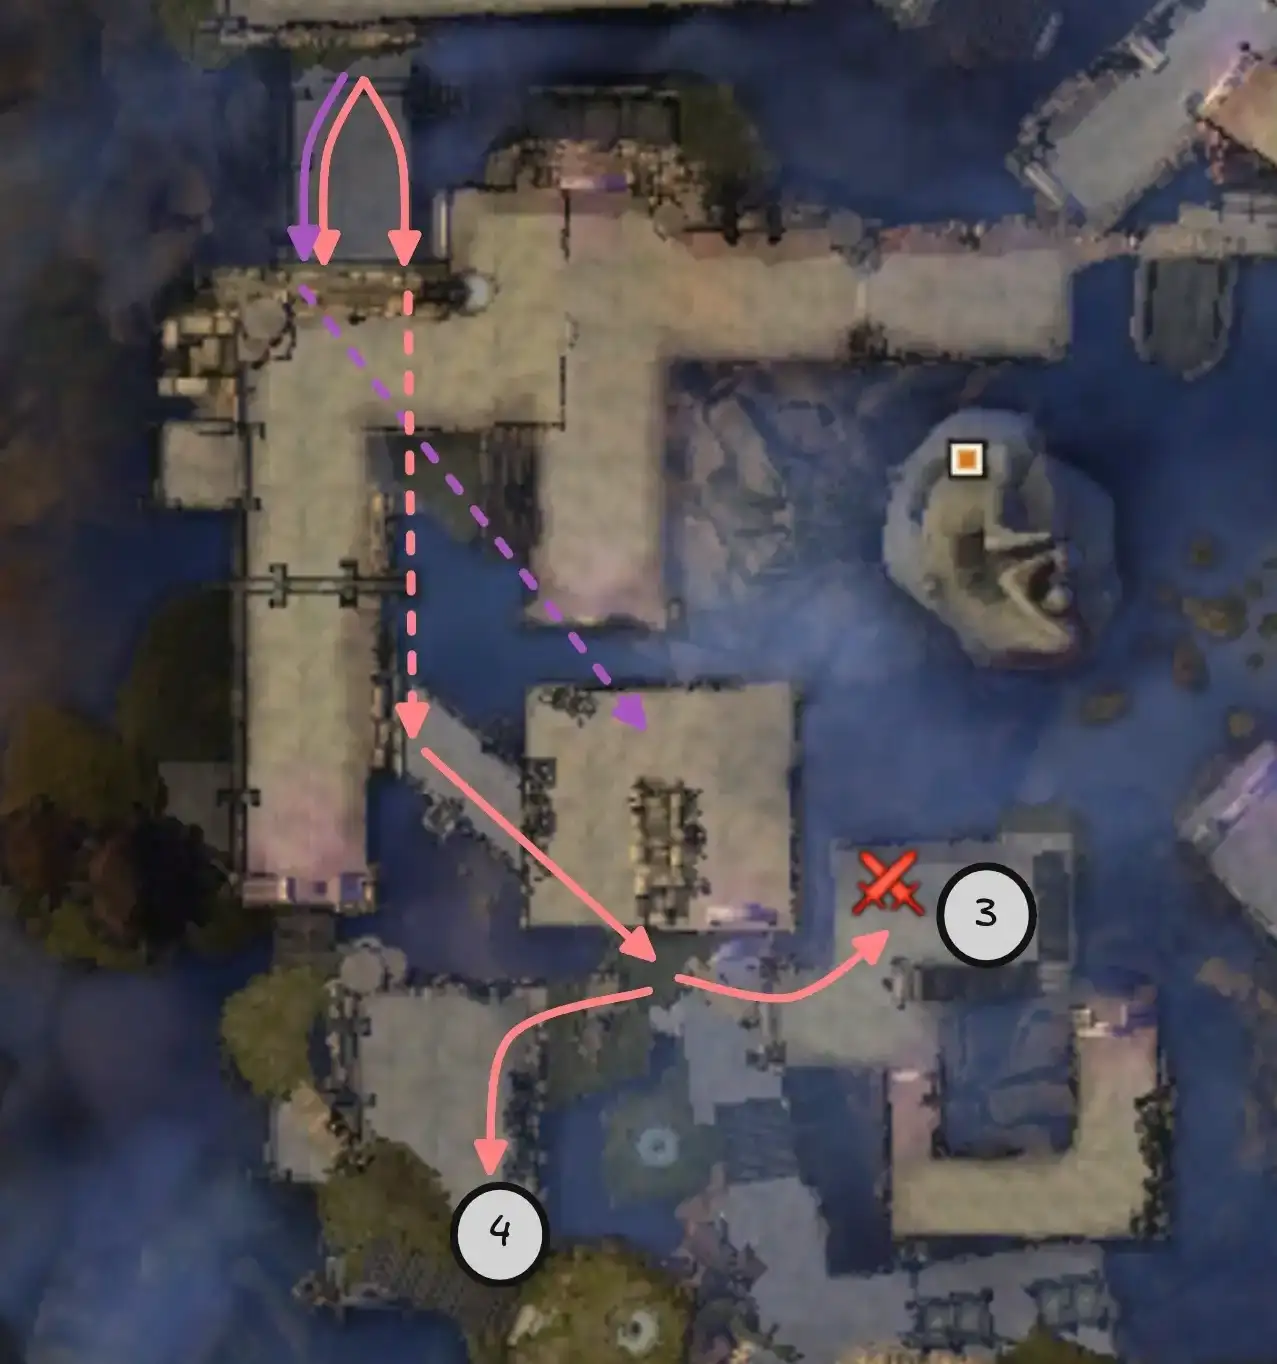
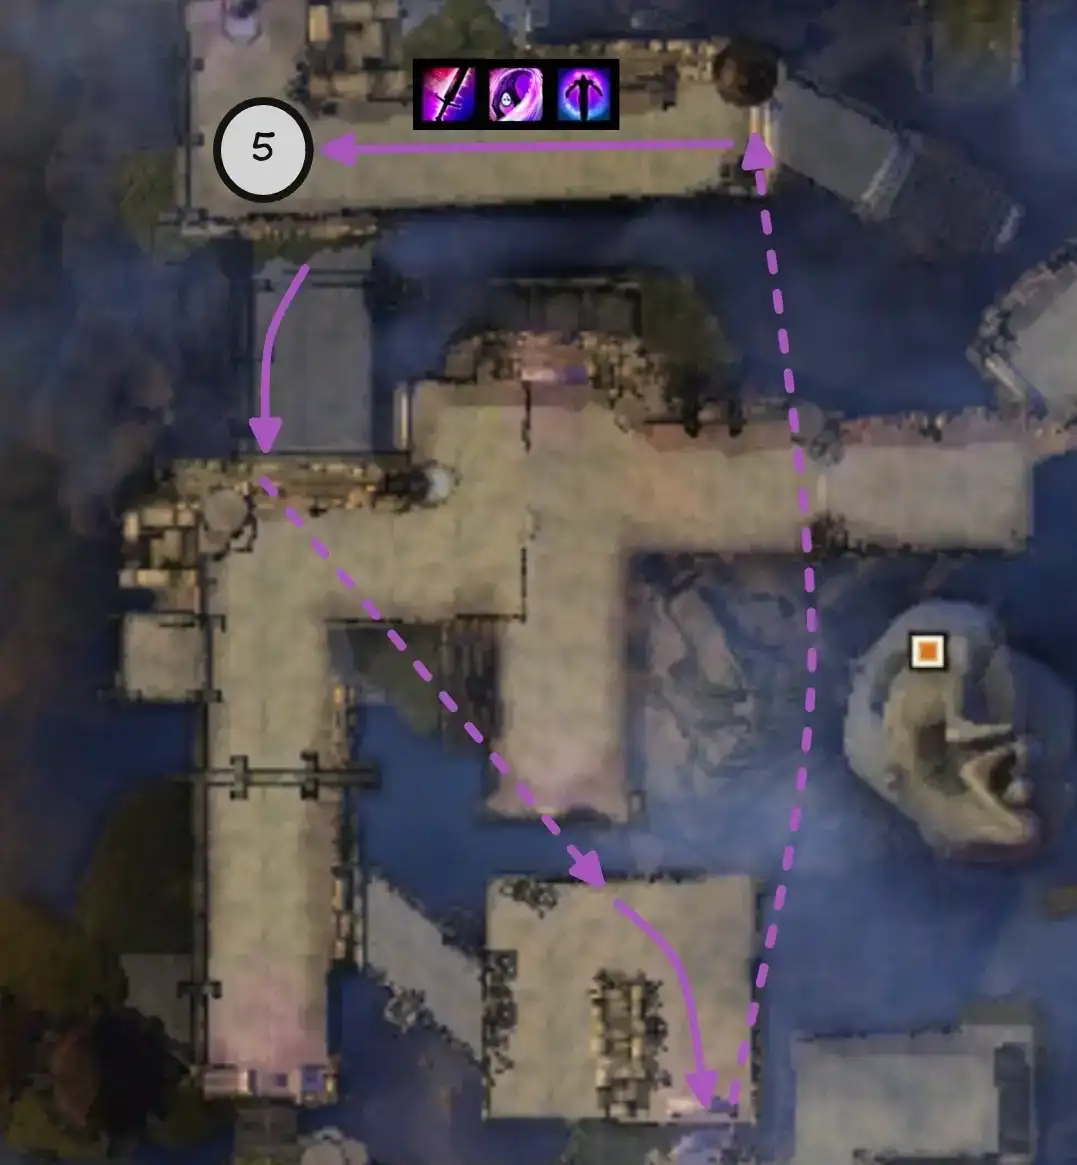
Assign a player to each of the spots shown in the image (these positions are also displayed in the marker pack). When the encounter starts, two things happen simultaneously:
- The players assigned to the markers use their
Over Here! in sequence to port
Glenna to position 4 in the map.
- A
Mesmer
Blinks up to the wall above the bridge, places their
Portal Entre, then glides down and opens it below where the rest of the squad can access it.
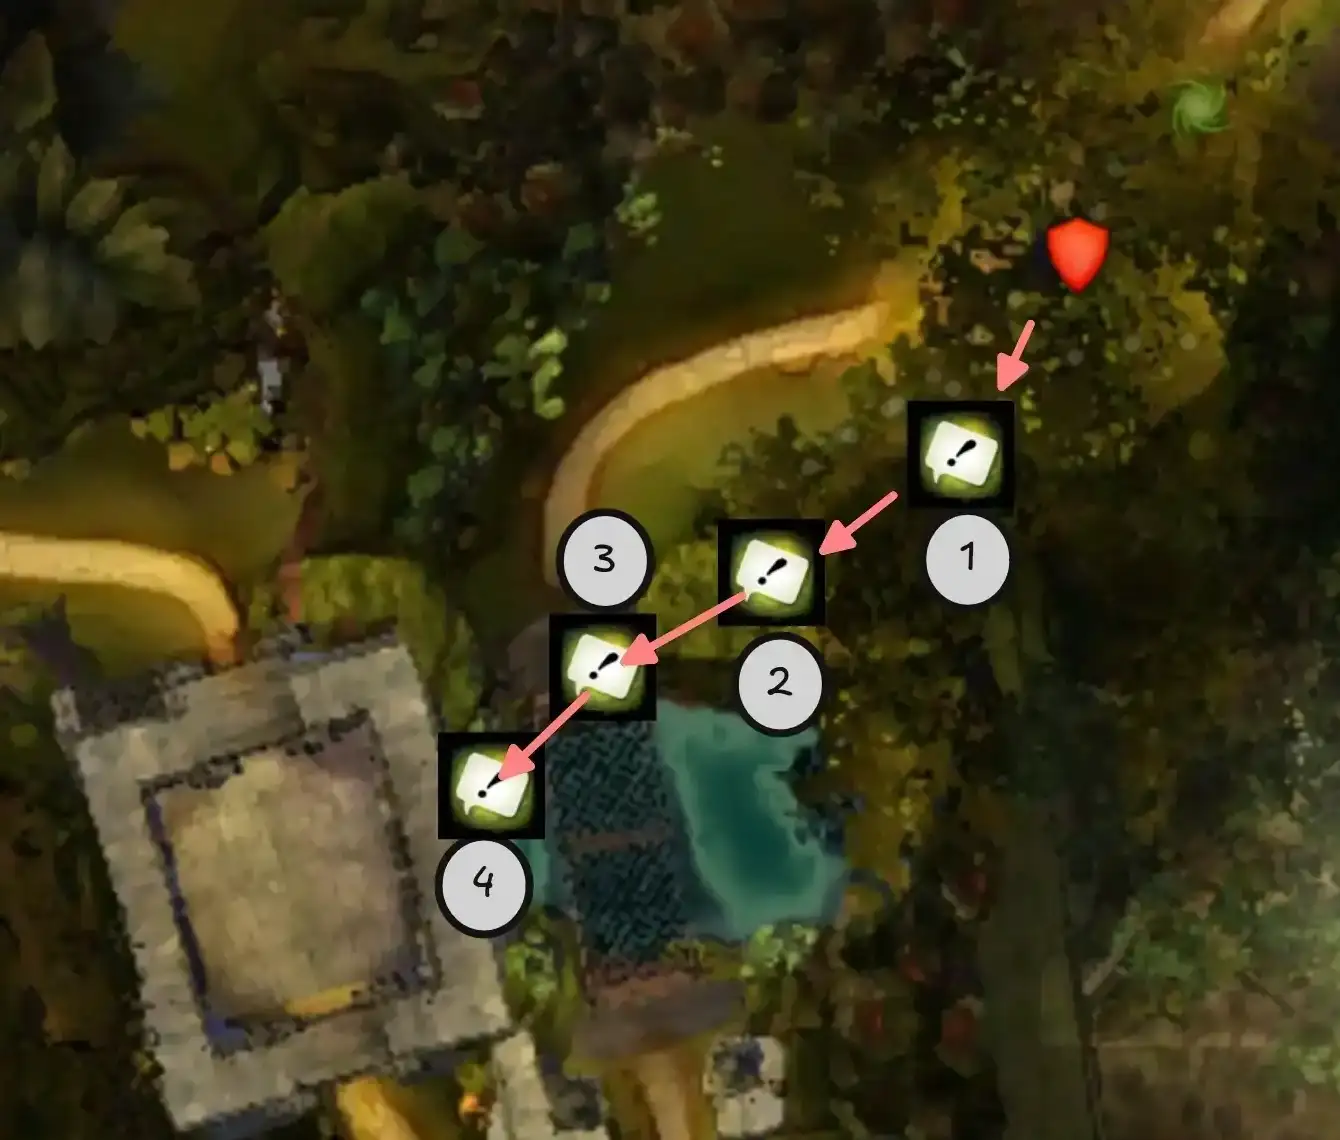
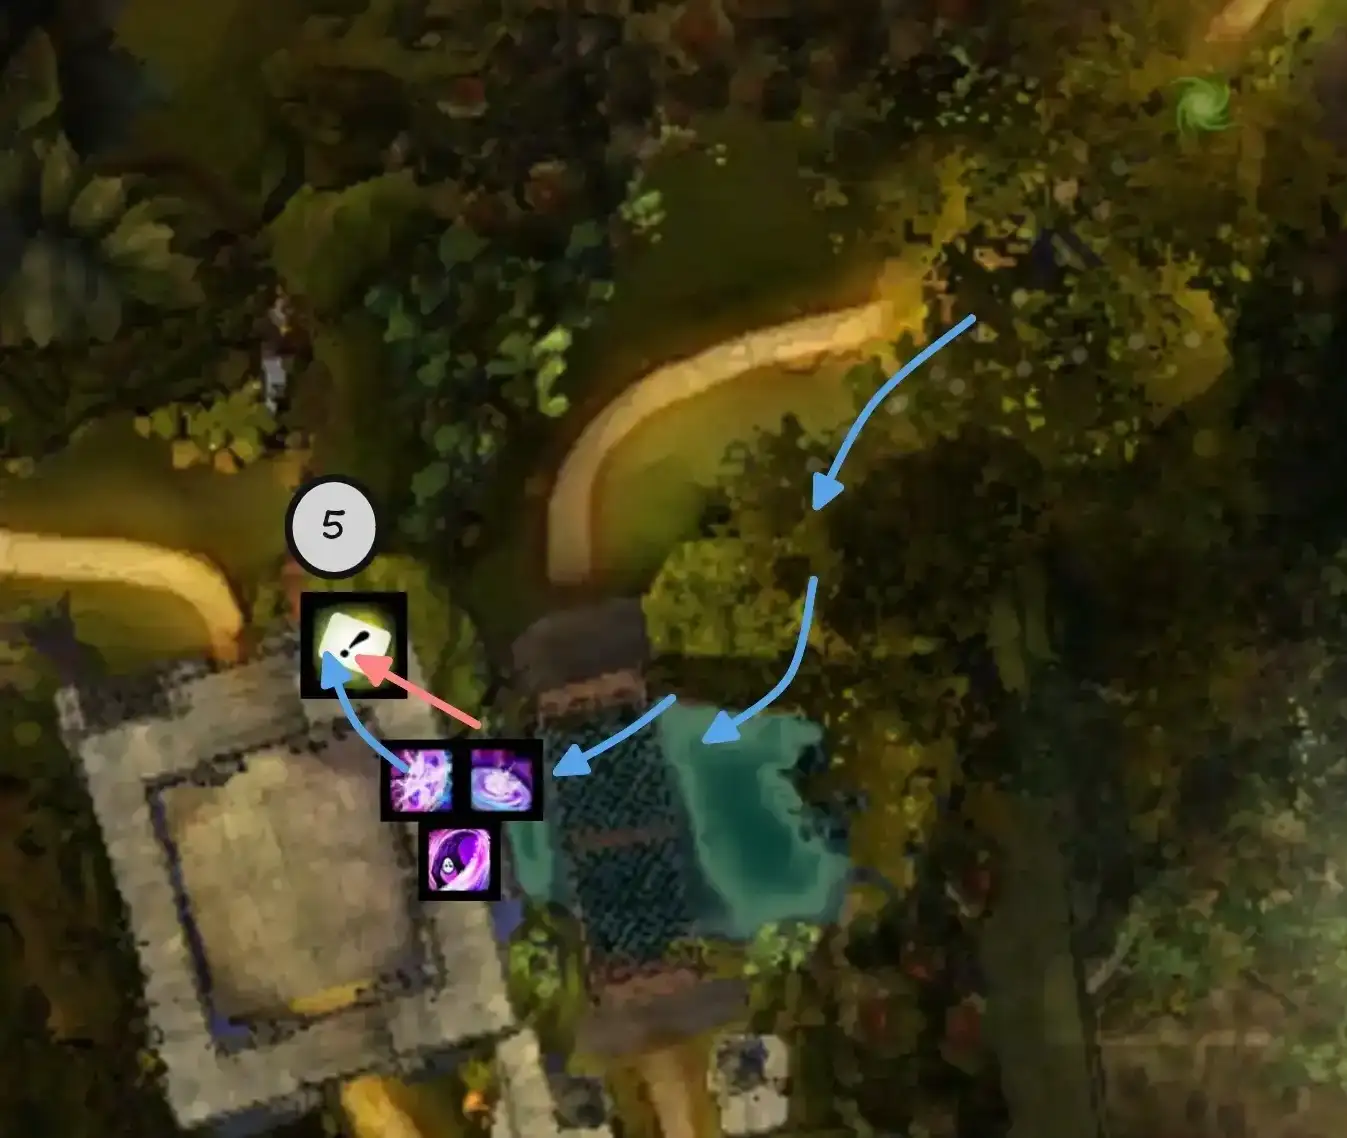
Once everyone takes the portal, they can use Over Here! in position 5 to port
Glenna over the wall, ignoring the first rooms entirely.
2. Cave Skip & Tanking Tower Shots
After taking the portal, the Thief can skip the cave in its entirety by teleporting to an add using
Infiltrator’s Signet, placing a
portal at the bouncing mushroom or on top of the tower, and porting their squad through.
![]()
![]() Cave Skip PoV
Cave Skip PoV
![]()
![]() Cave Skip Done Fast PoV
Cave Skip Done Fast PoV
The most difficult part of performing this skip is targeting the enemies inside the cave. This is best done by enabling autotargeting or using the “Lock Autotarget” keybind. Both use the maximum range on your weapon skills, so equipping a rifle will let you reach the adds from the top of the wall, speeding up the sequence overall.
This skip can be practiced in a solo instance: read here for more information.
This skip can also be done with
Mirage, but
Thief is significantly easier and faster to pull off.
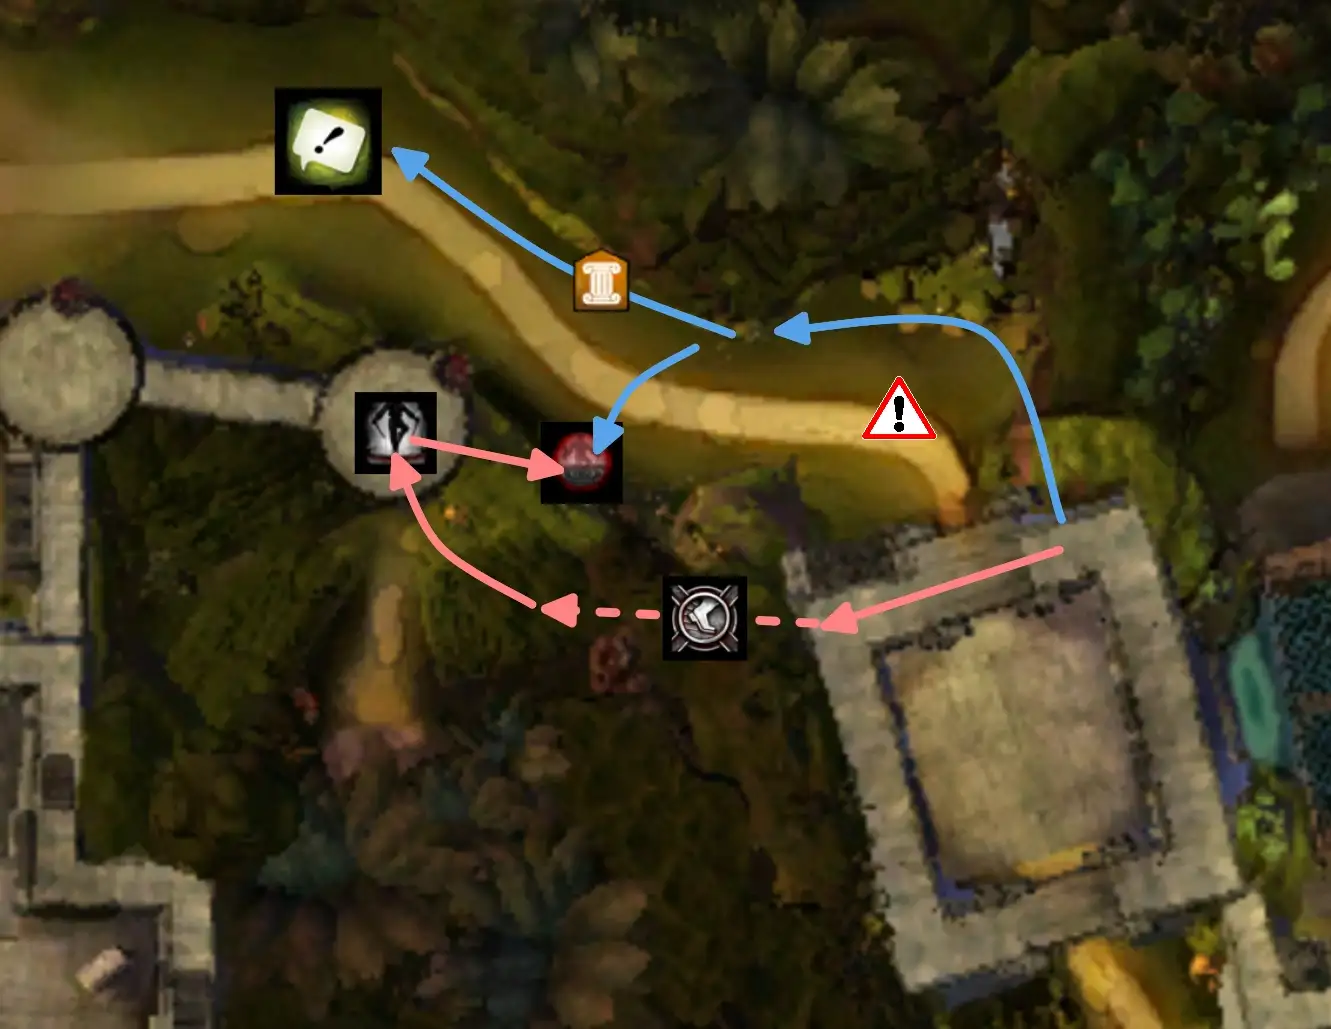
The rest of the squad will glide off the building to the North. Avoid the center of the area immediately after the building, instead sticking to the walls. This will prevent any White Mantle reinforcements from spawning for the rest of the encounter. The tower group will then take the portal to the first tower.
White Mantle Reinforcements, where a red orb summons group of hostile adds, are triggered by players walking into invisible bounding boxes. However, these triggers are only active once the previous reinforcements in an area have been summoned: by not triggering the first reinforcements, no other reinforcement triggers will be activated for the rest of the encounter.
In the meanwhile, the ground group can start bringing Glenna to the first white circle. Until it is captured, the tower will keep bombarding this position: to avoid a wipe, the healer should spam
Stability and healing to
Glenna and the rest of their group. This is usually not an issue as the tower group should capture it very quickly.
![]()
![]() Ground Healer PoV
Ground Healer PoV
3. Towers and Glenna Ports
These towers are captured similarly to the normal strategy. Since no wargs will have reached Glenna yet, it is possible to speed her under the third tower so as to not require any mines to be cleared.
After the second tower, one player runs to the south and prepares
portal on the final stairway just before the boss arena. They then glide down and join up with the ground group.
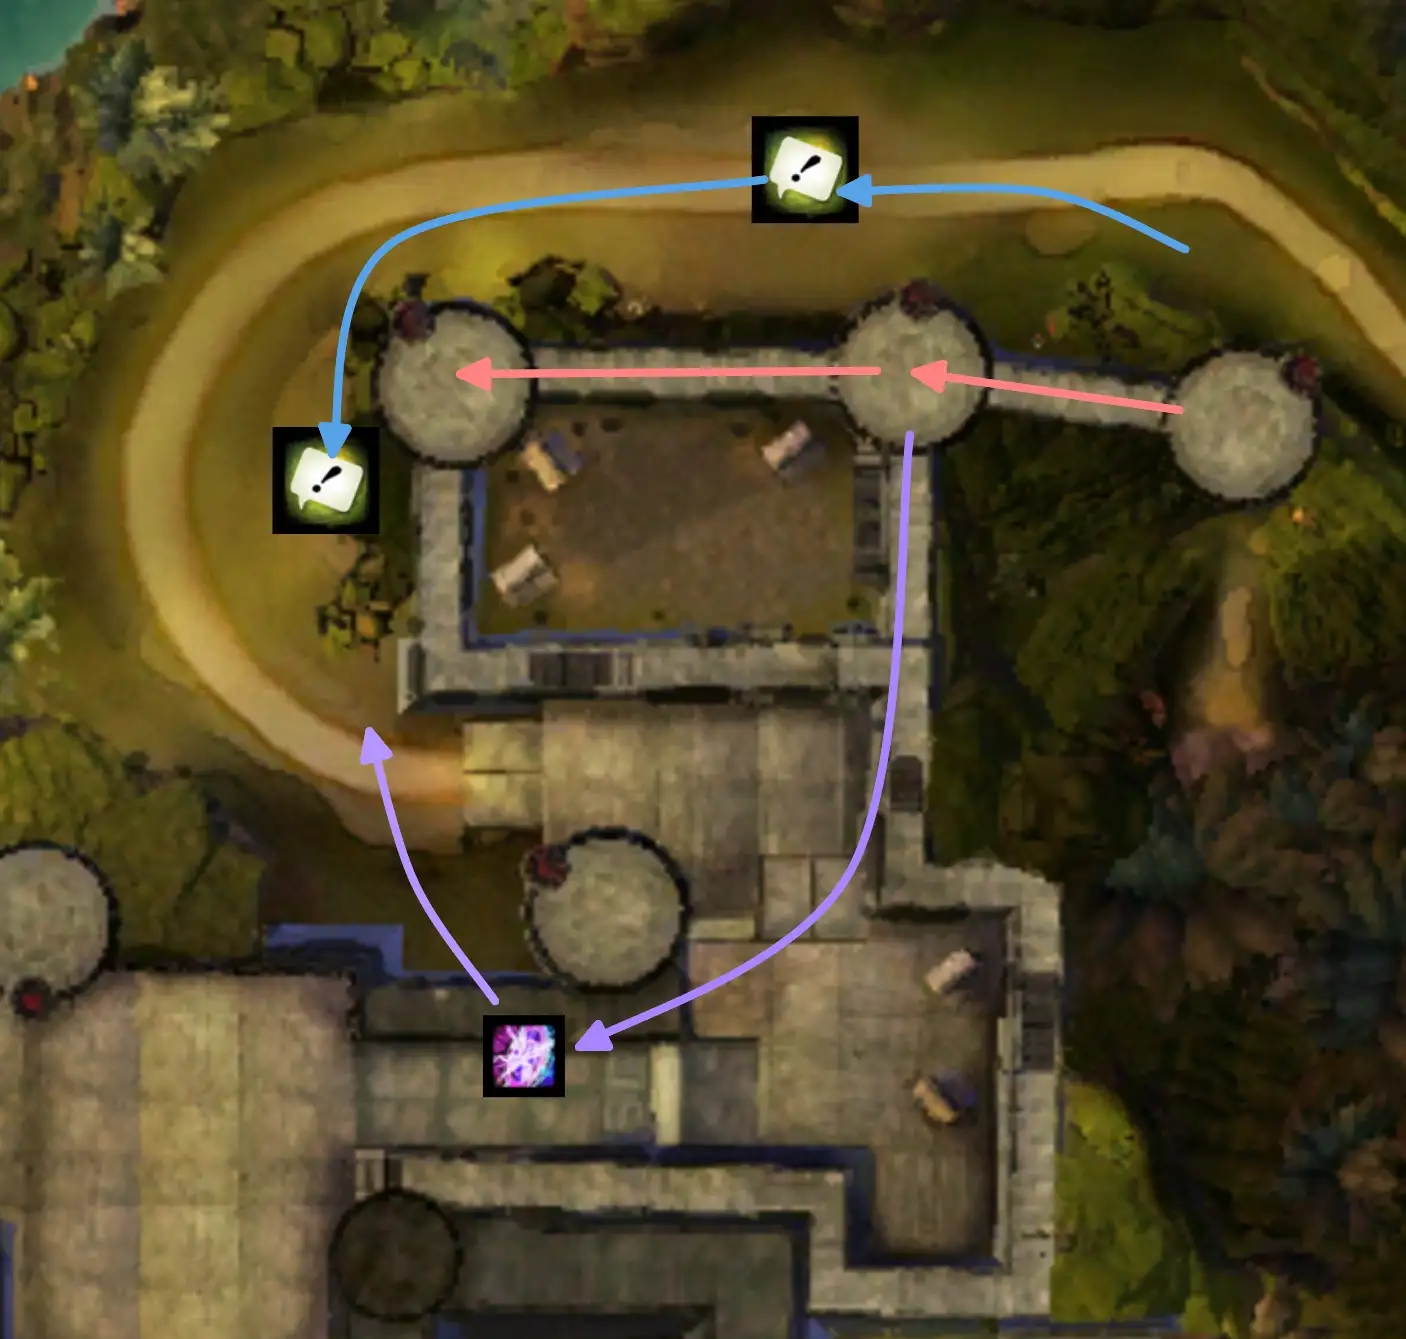
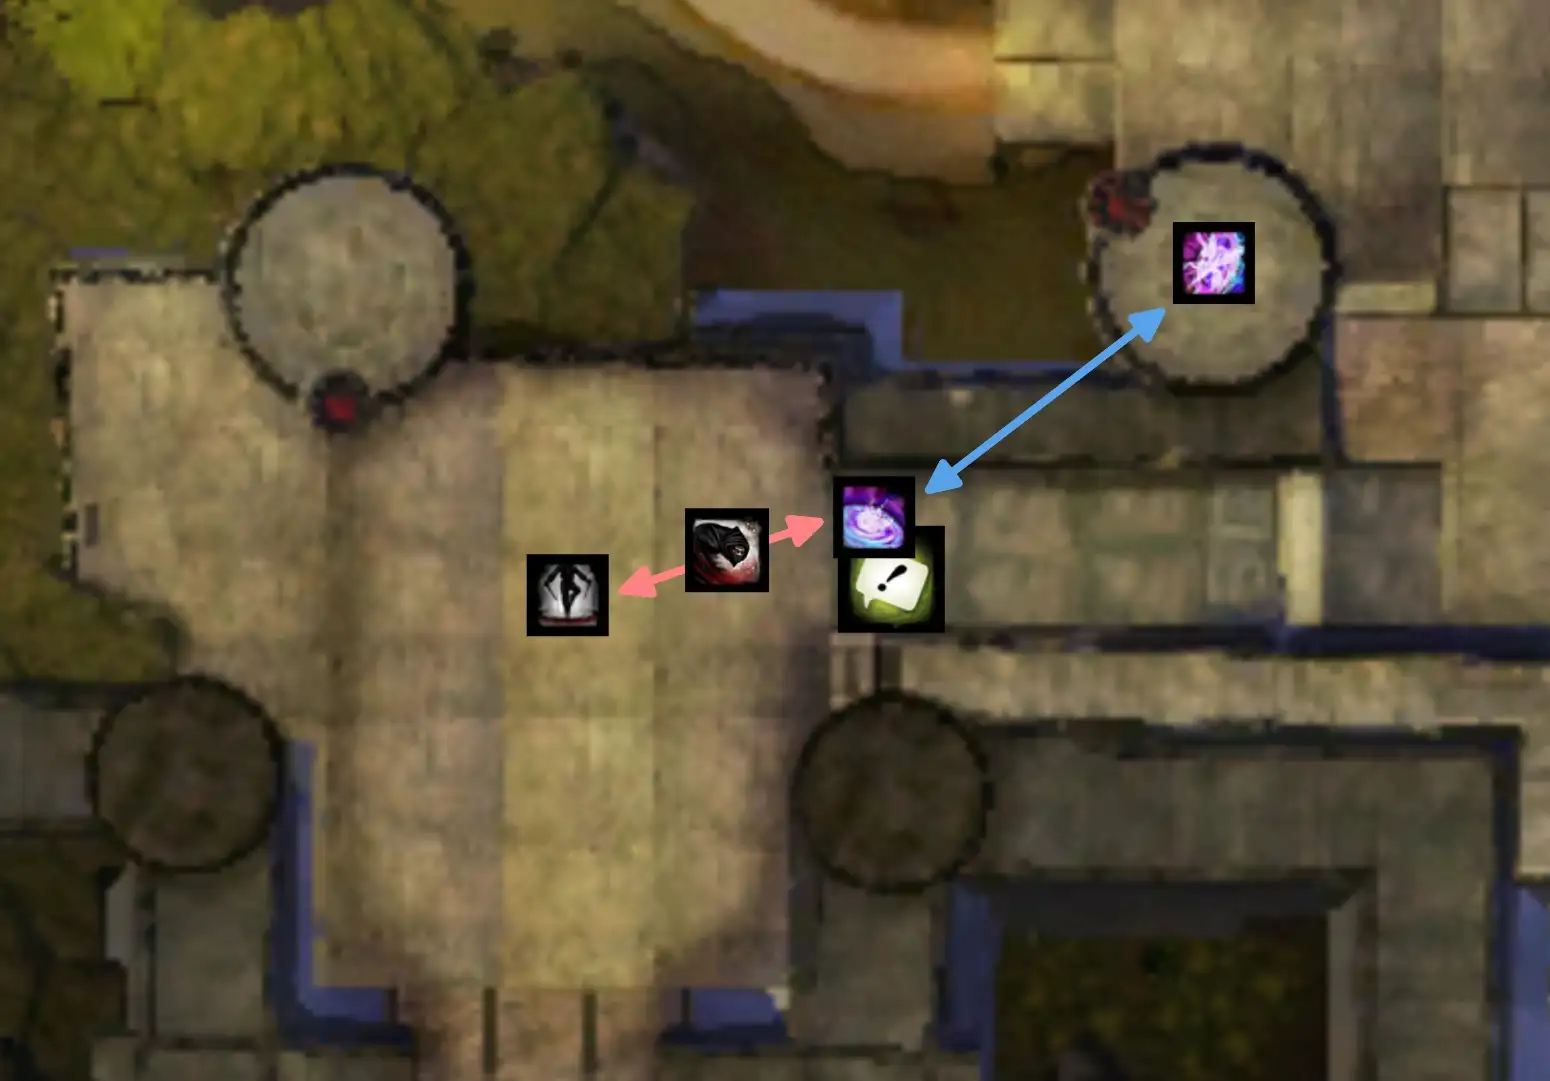
After activating the leyline to the fourth tower, it is possible to teleport Glenna almost directly to the fifth and final white circle. The group should first pull Glenna to position 1 as shown in the image below. The Mesmer will then open their
portal,
Blink up the building to position 2, use
Over Here!, then take their own
portal back to the group.
When in position 2, Over Here! is only available when you are standing so far off the edge that your elevation changes. See this PoV for an example.
Position 3 can be reached by either another ground group player with a blink ( Necromancer has
Summon Flesh Wurm and
Elementalist has
Lightning Flash), a tower player gliding down from the third tower, or by the same person who did position 2 gliding over after using
Over Here!. As soon as Glenna is in position 2, they can use
Over Here! then glide down to reach the group.
Position 4 is reached by the rest of the ground group once they take the portal. They can then pull
Glenna to the final circle.
All positions referenced in this section are included in the marker pack.
4. Final Portal and Mcleod
The final sequence involves setting up a portal down from the fifth tower to the courtyard. This prevents Mcleod from teleporting up to the tower at the beginning of the boss phase, since he always targets the furthest player with this skill.
After the fourth tower is captured, the first Mesmer prepares their
Portal Entre, glides down, and opens it on top of the stairs. The
Thief then takes this portal,
Shadowsteps to the center of the courtyard, places their
Shadow Portal, then
Shadowsteps back and re-takes the
Portal Entre to the tower.
It is highly recommended to provide the Thief with
Stability as they risk getting interrupted by tower shots.
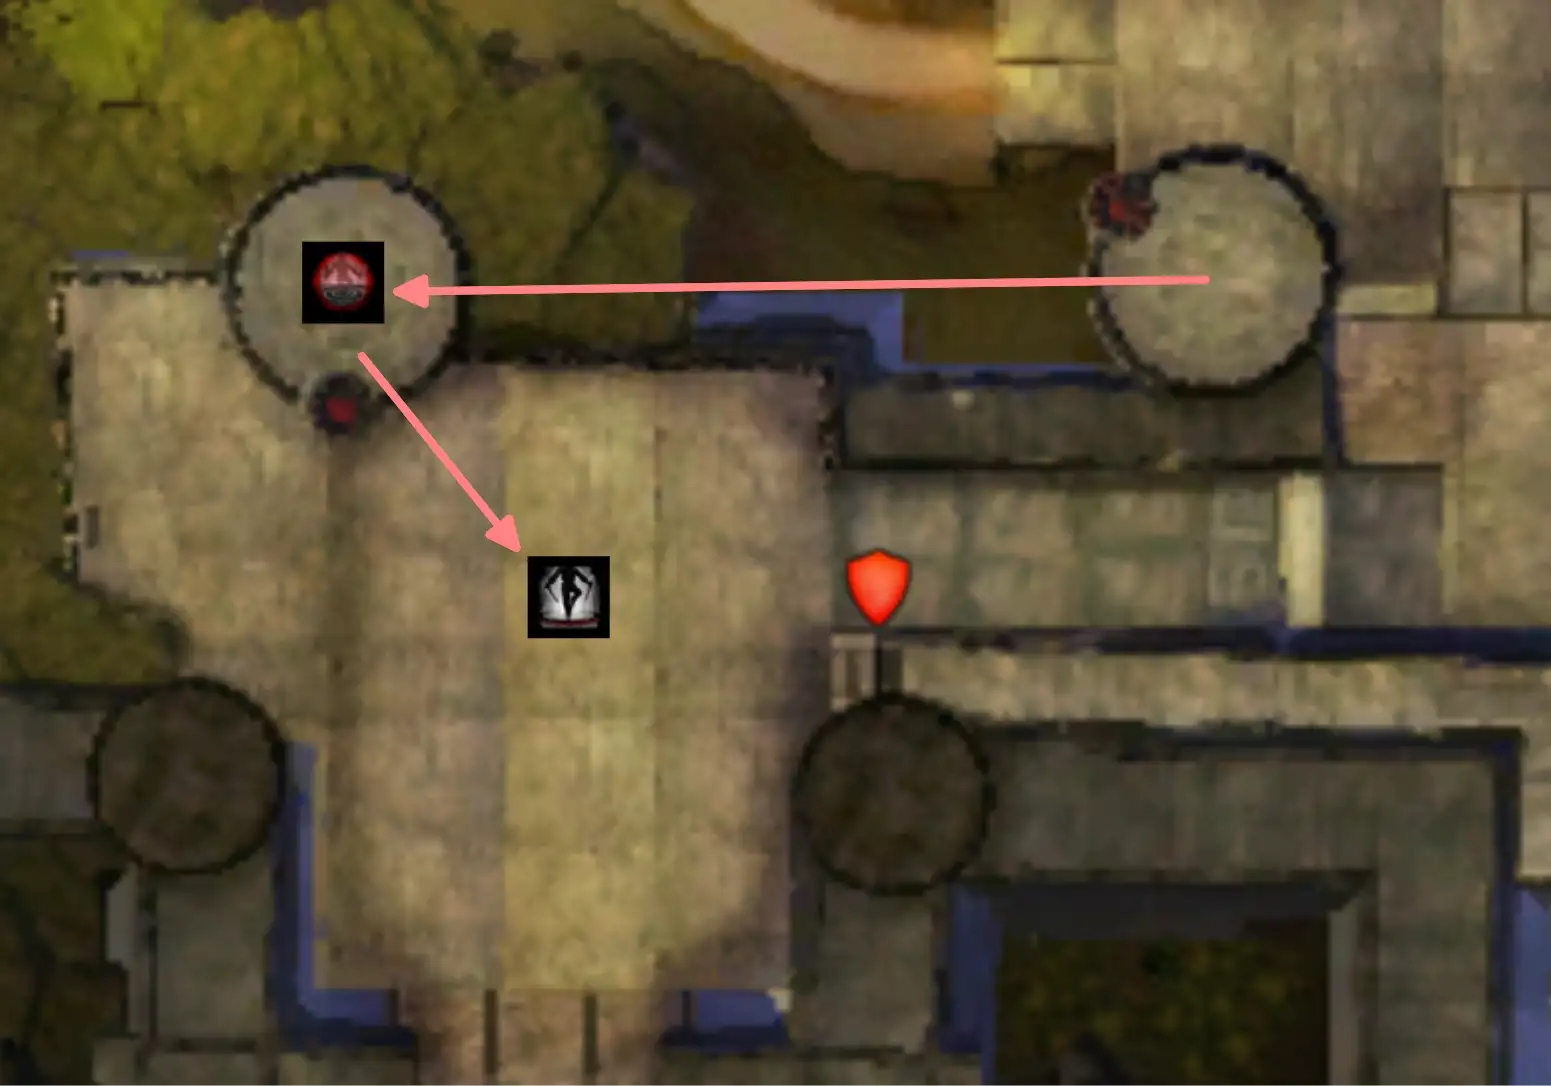
This is a critical moment for the run since Glenna will be surrounded by several wargs attempting to kill her. It is extremely important at this point to spam skills that apply
Blinded in an area, such as
Well of Darkness and
Sandstorm, otherwise she will die and the run will fail.
Everyone who is not providing Blinded should take the
portal and help with capturing the final tower. Take the leyline as soon as it appears; the
Thief will then open their
portal in the center of the tower as soon as they land, and everyone should take it when the tower is captured.
Once Mcleod has spawned, the status reset will destroy any portals present in the instance. It’s important therefore to take the portal as soon as possible after the tower is captured, as you risk remaining stranded and making the boss teleport to the tower.
An alternative strategy is to have a
Chronomancer do the final portal. They can gather clones on the fourth tower, then
Continuum Split, glide down,
Blink to the center of the arena, prepare
Portal Entre, then
Continuum Shift.
This has the advantage that the
Thief can stay with
Glenna to provide
Blinded; the disadvantage is that
Portal Entre does not open instantly upon activation, unlike
Shadow Portal. This increases the chances of stranding someone on the final tower, forcing McLeod to teleport.
Capturing the tower will begin the boss phase, despawning all wargs. The rest of the encounter is played as normal. Once the boss is dead, make sure to provide Superspeed to
Glenna so she gets to the final gate faster.
When Mcleod splits into two clones, if you do not see a coloured icon above your character’s head, it means that you are on the white clone. This is a fairly common graphical bug.
Keep Construct
A fairly straightforward boss, which is played with only two major deviations compared to the PUG strat. Keep Construct is fairly sensitive to your group’s overall DPS: with enough damage, it’s possible to completely skip over some of the phases, significantly speeding up the fight overall.
Transition from Escort
Once Glenna blasts the gates open, there are 45 seconds before Keep Construct spawns in the middle of the arena. These cannot be shortened or skipped in any way. You should use this time to:
- Enable the Challenge Mote.
- Swap builds and/or subgroups.
- Change food and utility.
- Preposition in the center of the boss arena in preparation for when it spawns.
Center Strategy
Groups should aim to keep the boss in the center of the arena for the full duration of the fight. This makes it easier to deal damage, as overall movement is minimized and players can simply stand still and do their golem rotation.
Skipping the Exposed Phase
In the standard Keep Construct strategy, after breaking his Defiance Bar you unlock the ley-rift and exposed phase. In speedruns, however, these phases lose an incredible amount of time, as you will already be very close to 66% or 33% when entering them. It is thus desirable to skip them, forfeiting the damage bonus from
 Compromised but resulting in a much faster clear overall.
The easiest way of doing this is to avoid stripping both stacks of  Xera’s Embrace from the boss, therefore never unlocking the breakbar at all. To do this either:
- Ignore the tethers, thus letting the statues combine and killing the powered-up statue in the collection phase.
- Have one of the players move slightly out of the center so that their statue does not die, while cleaving the second down. The statue will then despawn upon reaching the collection phase.
The second option is generally preferable for most purposes, as it’s less inherently risky. However, groups often opt for the first option in pursuit of extra damage, especially in the final 33% as skipping the jump is a big timesave.
If something goes wrong and the Defiance Bar is unlocked, make sure to call it out so that the group does not use any CC skills.
Skipping Mechanics with DPS
With enough damage, players can skip important mechanics that they otherwise would be required to play. These mechanics are:
- (Easy)
 Radiant and
  Crimson Phantasms - the mechanic takes 15 seconds so aim to phase before.
 - (Hard)
 Xera’s Fury a.k.a spreads - the spreads pop 10 seconds after spawning. If your group can consistently phase before, it’s worth stacking them since spreading reduces your DPS.
 - (Medium) Jump - 40 seconds after becoming vulnerable in the final phase, the boss jumps into the air and remains untargetable for 12 seconds. Try to kill him before.
Twisted Castle
This is an encounter that, similarly to Escort, can be made much faster with a risky strategy. In this case we take advantage of the exceptional mobility provided by Mirage Thrust.
All skips in Twisted Castle can be practiced in a solo instance: read here for more information.
Fast Strategy
To use this strategy you will need at least two Mirage players running a
skip build.
Once Keep Construct is dead, run down the stairs to the South and Pull the first group of adds together. Once these are dead, the encounter will start. Both
Mirages should place
Portal Entre and use
Mirage Thrust to get to the next platforms.
The first Mirage runs straight forward and drops down to the platform with the second set of adds. After opening their
portal, they can then use a second
Mirage Thrust to reach the druid button.
The second Mirage runs to the right and leaps down to the platform, using
Weapon Swap to gain additional distance. This jump is not the easiest and requires some practice to be doable under pressure.
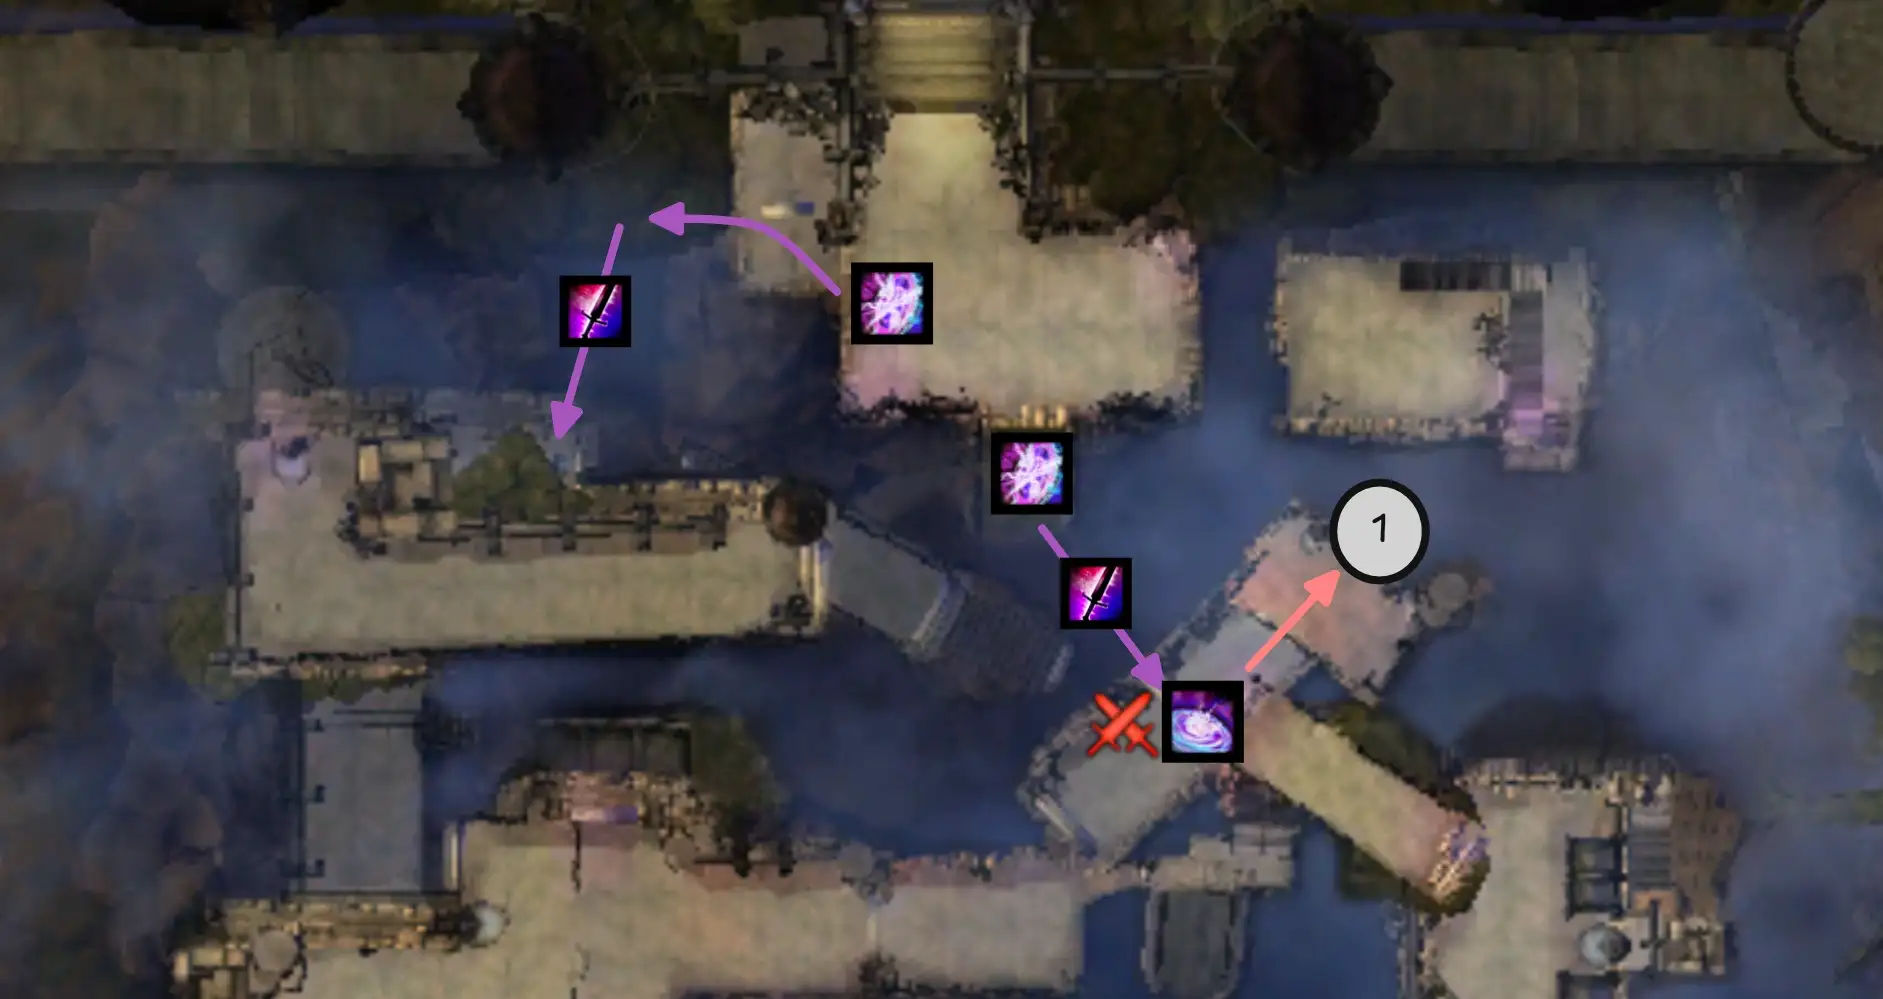
The rest of the squad takes the portal opened by the first
Mirage and kills the group of adds there. Once they’re dead, one player takes the gateway to the North and does the fountain button, while the rest take the
portal back to the beginning. The first
Mirage can walk into the statue next to the button to do the same.
Killing the second group of adds will also open the door in front of the second Mirage. They can then open their own
portal for the rest of the squad, who then kills the third group of adds after the door. The gateways at the end of the room will activate once they’re dead.
The main group can take the gateway on the left to reach the next two buttons. Once this is done, they can walk into a statue to get ported back to the beginning of the encounter, and wait next to the ley rift.
Meanwhile, the two Mirage players will instead take the right gateway to do the final button and skip.
One Mirage will walk to the left after the gateway, take a second gateway, and get ported to the five statues area. Here they can use their mobility to get past the statues to the last button.
Once this is done, they can walk into a nearby statue to get ported back to the beginning, and position next to the ley rift with the rest of the squad once they come back.
The other Mirage will instead go right and do the branch skip. This is a difficult skip that requires two precise
Mirage Thrusts in sequence.
Speedrun groups will often send both Mirages to do this skip for more reliability, though this is not an option for Infallible groups as failure usually kills the player.
The player that completes the skip can then run directly to the end of the encounter.
Make sure that everyone has taken a statue back before interacting with the final door!
The branch skip can also be performed with other classes, most notably Thief with
 Vault and
 Engineer with
 Jump Shot
  Rocket Boots are both easier to execute compared to
 Mirage, which is played mostly because it’s faster on the sprint to the final door.
Once the door is open, the encounter is complete and everyone can take the ley rift to Xera. The player who did the skip can instead take the gateway after the door.
When interacting with the ley rift, make sure to not select the “Return to Aerodrome” option!
Fast or Slow?
Doing the strategy described above can save over a minute compared to a normal clear. However, the strategy is very risky and relies on the Mirages successfully completing several difficult skips, including the branch skip.
Most of the time, with a well-optimized escort, groups will not need this additional time-save. In this case, they may decide to instead complete the encounter with the normal PUG strat. This also simplifies group requirements, as you only need to bring one Mesmer. This player can already bring more than enough utility to simplify the encounter for the rest of the group.
Xera
Xera is a relatively straightforward fight, with minor differences compared to PUG runs. Improving your kill time comes down to higher damage, slightly different tanking strategies and optimized island clears.
Xera’s damage pressure is low on everyone except the tank, so groups should try to solo-heal if possible. Celestial healers are viable and recommended, as long as they can confidently survive her  Blurred Frenzy.
Island Optimization
On the side islands where you have to push orbs into rifts, it is possible to speed things up significantly with coordinated crowd control.
Usually this is done via an initial Knockback that launches the two closest Conjunctions into their rifts, followed by a
Pull to complete the last one.
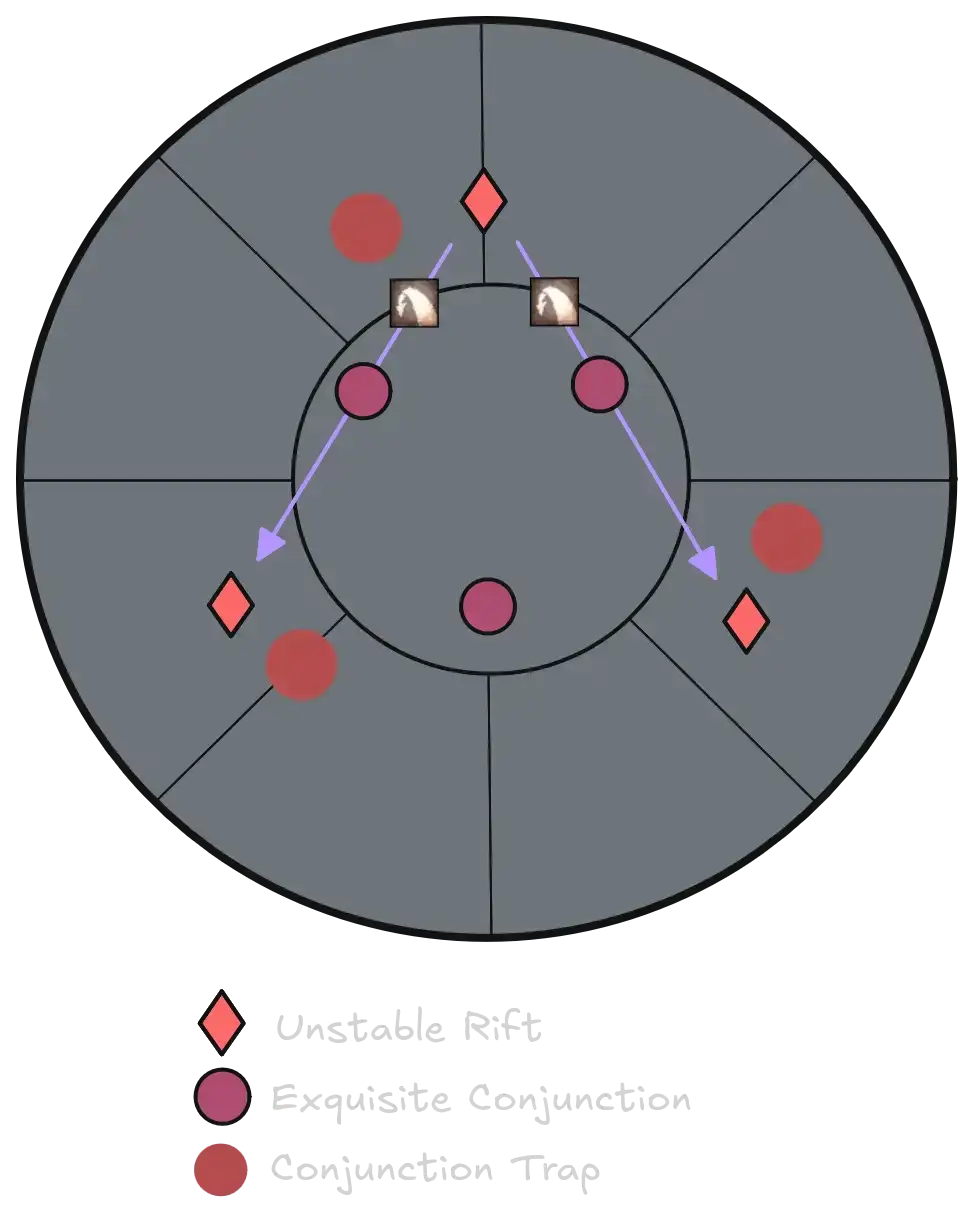
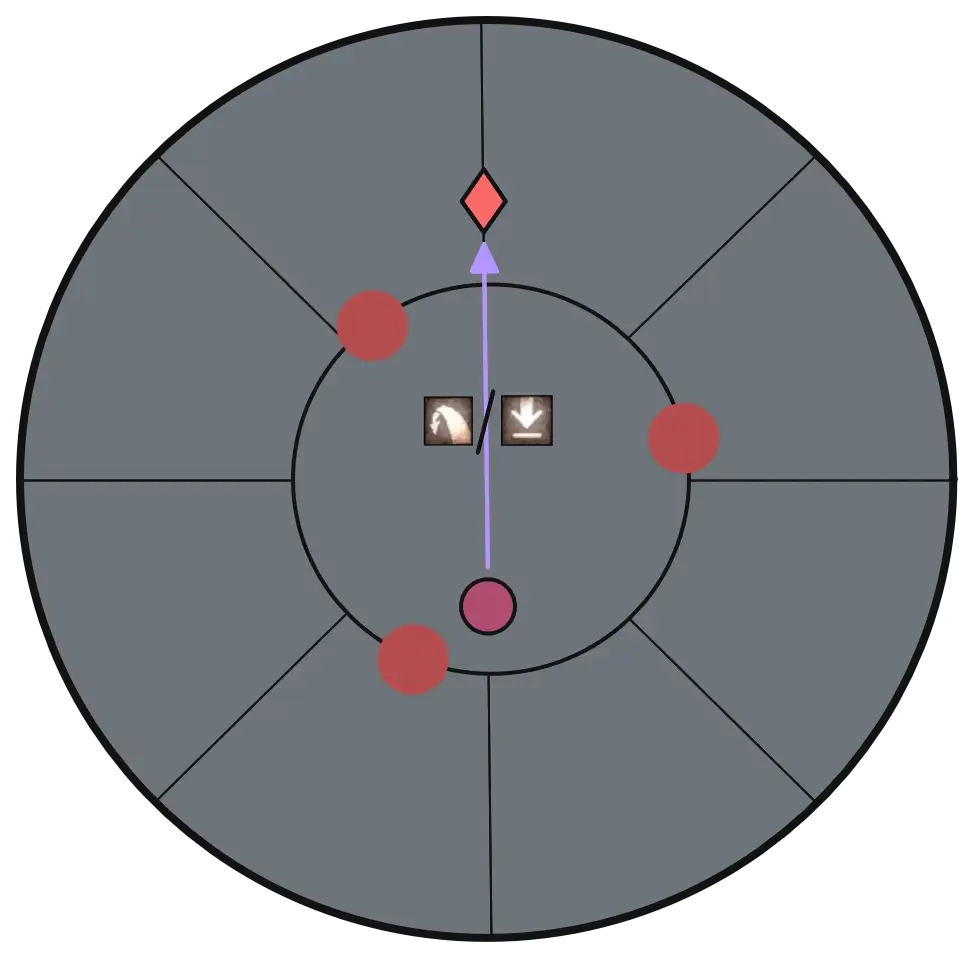
The initial push is most reliably done by a Mesmer with a Greatsword:
- Target the bloodstone shard while gliding to the island.
- Stand on the Unstable Rift.
- Cast
Illusionary Wave.
For the final Pull, there are several options. Some of the most used include:


Tanking
With speedrun groups, guaranteeing a certain level of damage allows you to tank in fixed positions for the entirety of the fight. Keeping the boss standing still will then increase damage overall.
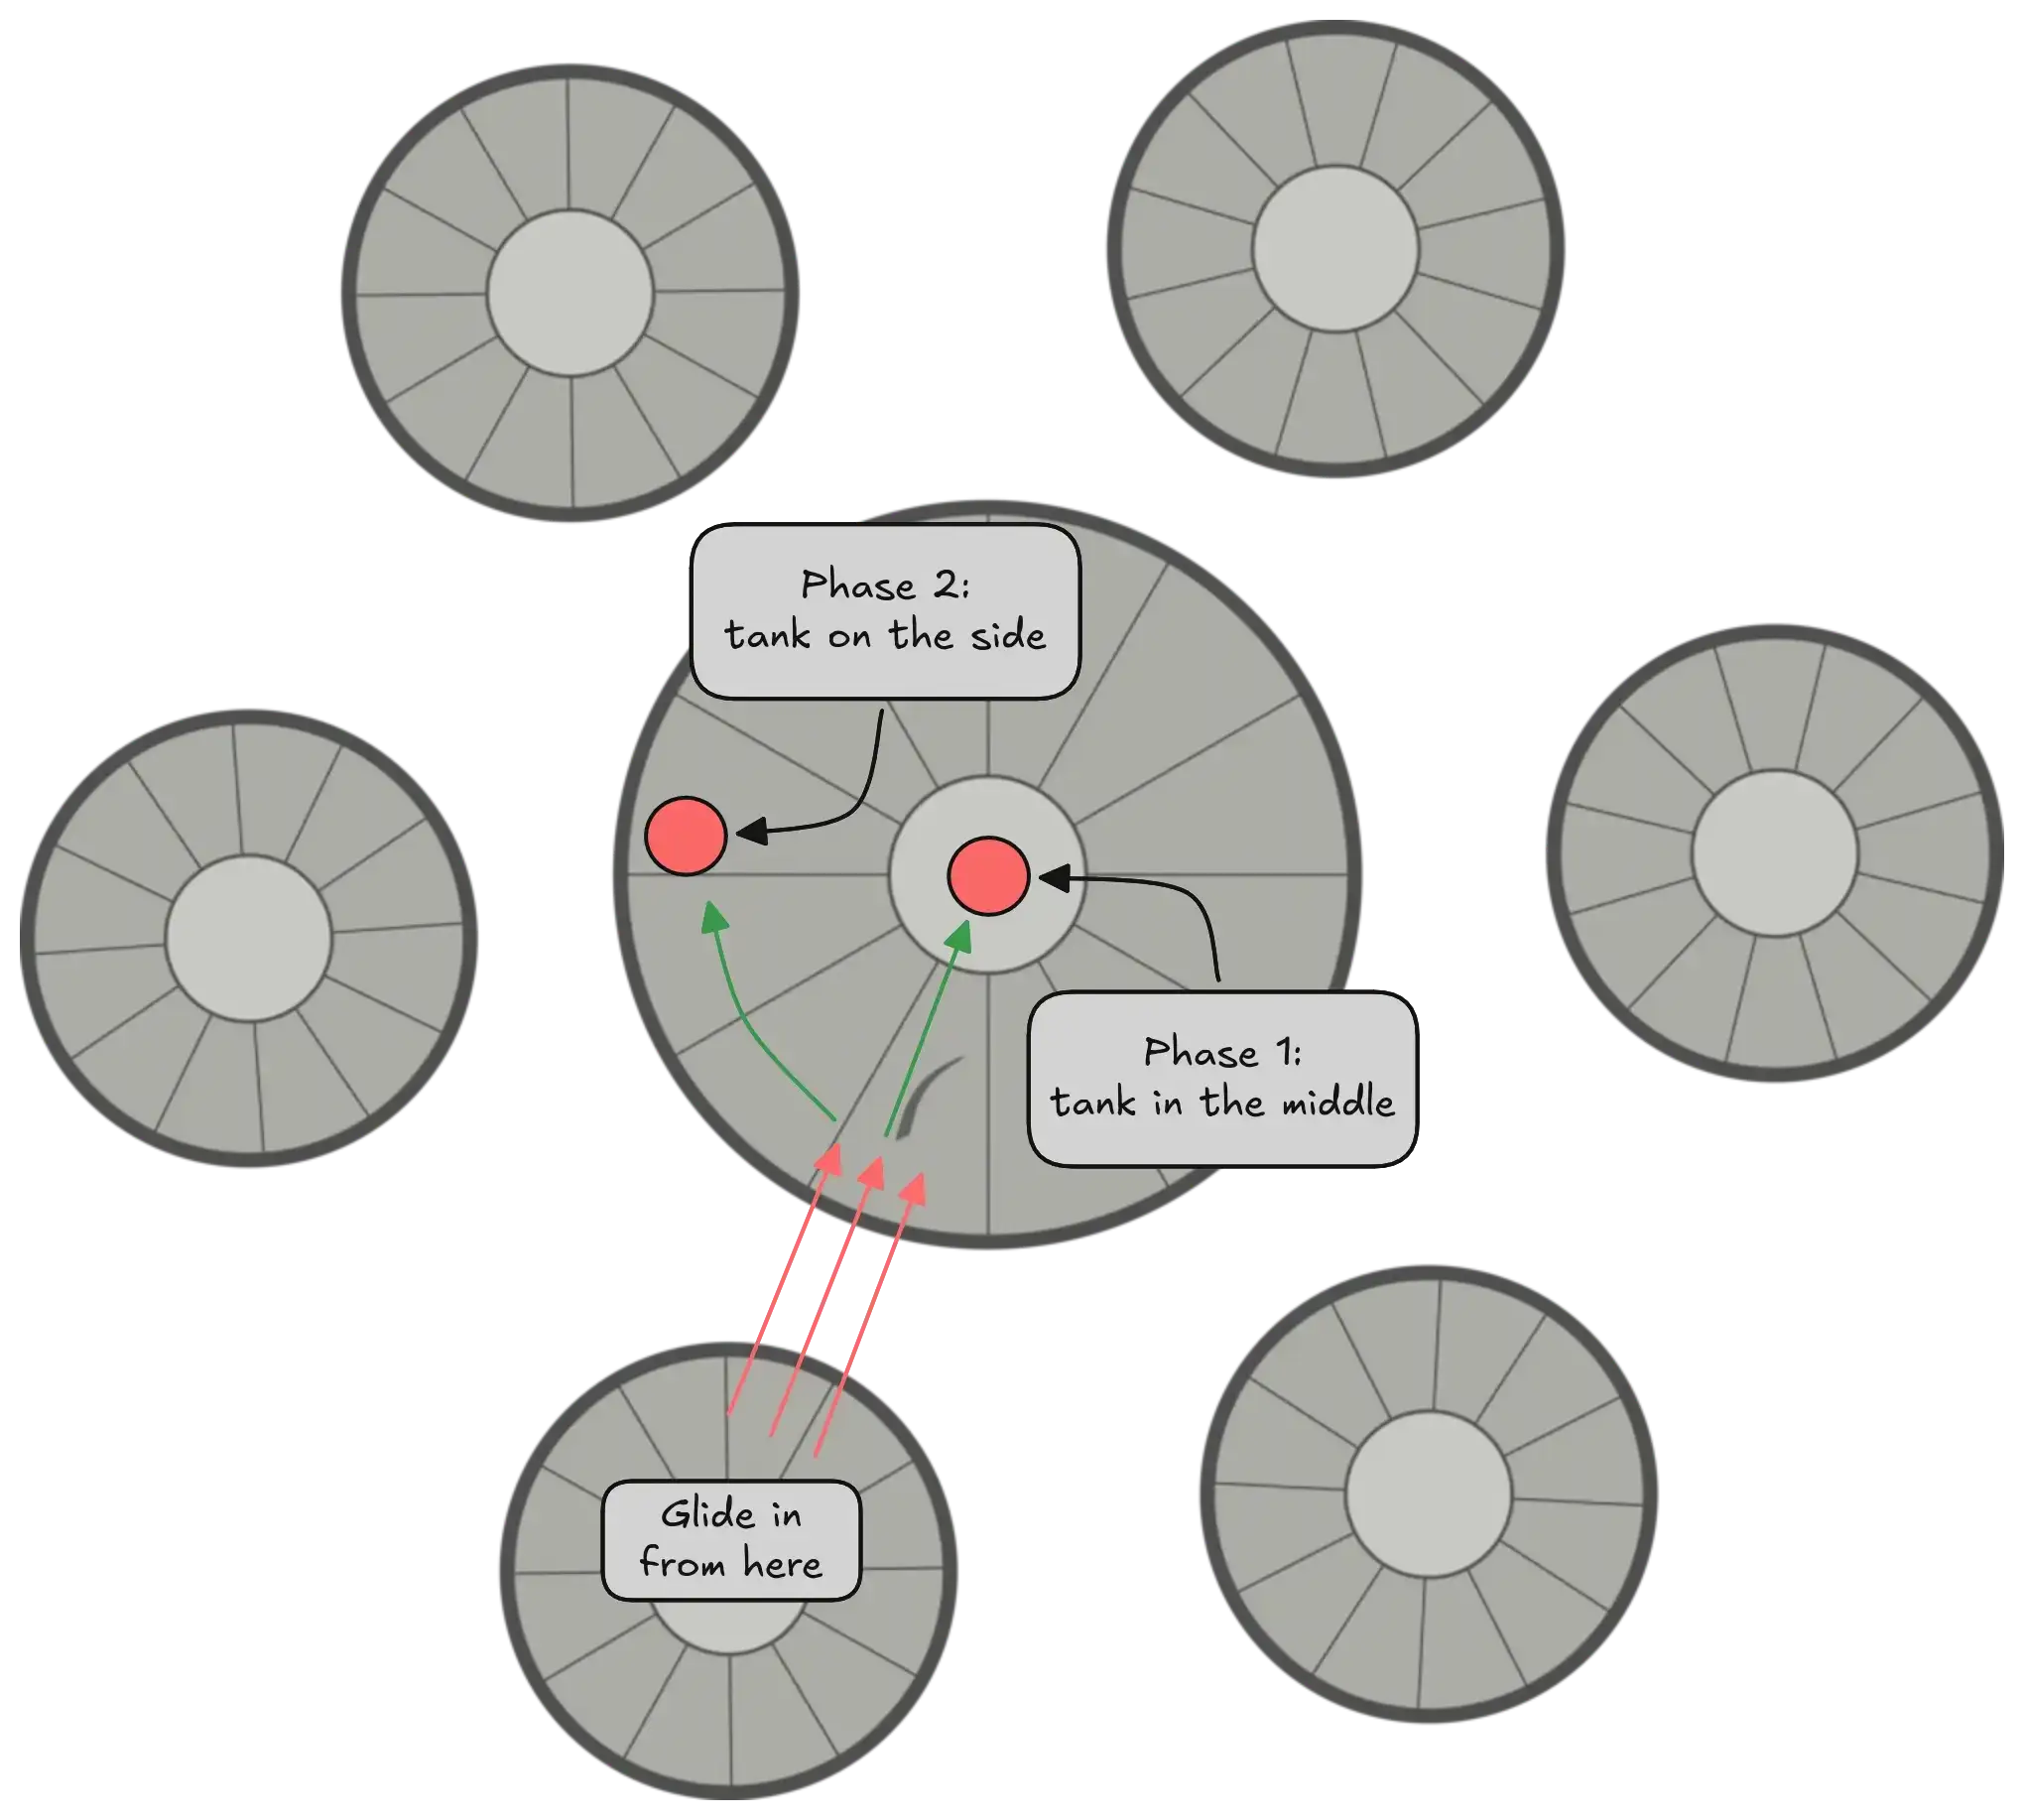
With high enough DPS, you won’t need to bring Xera as far in the second phase: you can kill her before any bloodstones spawn on her position.
Skipping Gliding
One of the most common reasons for deaths in Xera is failing the gliding section. It’s possible to skip this section entirely by spawning in the leyline from the final island to the starting island, then using it to glide until the split phase ends.
To do this, you must kill the Charged Bloodstone on the final platform from the starting platform. This can be done in several ways:
- Longbow on
Ranger, rifle on
Deadeye and
 Elite Mortar Kit can reach it due to having 1500 range.
 Deadeye and
Elite Mortar Kit may run into issues with obstructions. - Traps such as
 Prepare Thousand Needles can cover areas that potentially could be obstructed.
Doing this will not save any time overall as the phase has a fixed duration, however it will give you peace of mind and a moment to gather your wits before the next phase.
Additional Resources
PoVs
This is a non-comprehensive list meant to display a diverse selection of perspectives and roles. You can find additional PoVs and logs in the Infallible Archive.
| Classes | Link | Date | Notes |
| March 2026 | First Mesmer on Escort, Normal TC, Gliding Skip on Xera | ||
| March 2026 | Second Mesmer on Escort, Fast TC | ||
| March 2026 | Glenna Heal, Fast TC | ||
| March 2026 | Tower Heal on Escort, Fast TC |
Practicing Skips on This Wing
Many of the skips described in this guide can be practiced solo:
Cave Skip - can be done by parking
Glenna at the beginning of the encounter: use
Over Here! to get her to the first teleport spot then move to the second. Monitor her
 Surveilled stacks: when they reach zero, seekers will spawn on her. The moment they do, use
 Over Here! to teleport her to the second spot. The seekers will now be stuck on the rock and Glenna will be safe, as new ones cannot spawn unless the previous ones die.
Twisted Castle Initial Skips - can be accessed at the start of Twisted Castle by opening an instance cleared up to Xera.
/
Branch Skip - can be accessed by opening an instance cleared up to Xera, taking the portal at the beginning of Twisted Castle, and then gliding down from the staircase.
Other Useful Links
Comprehensive Escort Speedrun Guide by Areki - very useful video guide for advanced the Escort strategies.
Twisted Castle Speedrun Explanation by Areki - long explanation of the standard TC speedrun strategy.
1:54 Escort by [MCA] - while more than most groups will need, this the peak of Escort gameplay. The video description contains more PoVs of the run.
0:37 Twisted Castle by [Vs] - showcases great execution of a fast clear. The video description contains more PoVs of the run.
Fast Orbs on Xera by HasHka - shows some ways of doing fast island clears on Xera.