< Wing 4 Return to Home Wing 6 >
Hall of Chains
| Timer | 16 minutes 30 seconds |
| Timer Start | On entering combat with Soulless Horror. |
Table of Contents
Hall of Chains speedruns mostly revolve around optimizing River of Souls and Statues of Grenth. While the Infallible timer for this wing is rather lenient, the achievement can be very punishing overall due to the length of the wing and how easy it is to go Downstate on both Statues and Dhuum.
Main Points
- Soulless Horror is played with a standard strategy.
- River of Souls is played by killing Hollowed Bombers before they explode.
- Eyes are cleared using a portal to move the squad from one eye to the other.
- Eater of Souls and Broken King are played simultaneously.
- Dhuum is throne tanked to reduce movement and increase damage uptime.
Composition
Most groups will benefit from a core roster of:
- One
Ranger
- One
Mesmer
- One
Necromancer
- One
Engineer.
These provide utility that vastly simplifies certain mechanics and is difficult to replace otherwise. Apart from these, run whatever your squad is most comfortable on.
Soulless Horror
- You will need a pusher to manage Tormented Dead. This is traditionally a
Druid running
Glyph of the Tides and longbow for
 Point Blank Shot, but
 Engineer can also work by combining
 Overcharged Shot,
  Personal Battering Ram and
  Air Blast in
  Flamethrower.
  Epidemic can help with killing Tormented Dead and wurms.
- Projectile negation such as
Feedback and
Corrosive Poison Cloud can be useful if your tanks are struggling to stay alive.
River
- A
Scrapper is almost always run to provide
Superspeed to
 Desmina.
 Portal Entre and
Sand Swell can provide useful mobility.
- High burst classes that can quickly apply
Vulnerability are extremely important for killing Hollowed Bombers in time. Examples include
Engineer with
 Steel-Packed Powder and
 Necromancer with
 Death Spiral.
Statues
- The speedrun strategy on Eyes requires a
Chronomancer running
Portal Entre and
Blink.
- Increasing
Daze length will make Eyes much easier. This is best done by
Druid running
 Moment of Clarity and
  Superior Sigil of Paralyzation.
 - Eater of Souls should be run with
Power builds to provide greater burst and damage control.
- Eater of Souls greatly benefits from large amounts of CC.
- Broken King is commonly run with two to three healers.
Specter and
Ritualist can cheese the Broken King with their shroud.
Dhuum
Mass Invisibility or another source of
Stealth is required for throne tanking.
Sand Swell and
Portal Entre provide good mobility for managing greens, bombs and Greater Death Mark.
Summon Flesh Wurm and
 Healing Turret trivialize management of the reaper on
 .
- Your kiter should play a class with good mobility, capable of giving boons in large bursts or at range.
Chronomancer,
Troubadour and
Scourge are common picks for this reason.
Druid can also be played but is harder to maintain good uptime with.
- Make sure to have enough boonstrip for Greater Death Mark.
- Bring ranged CC to free any players caught by the Echo.
Soulless Horror
This boss is played with a relatively normal strategy. The most noticeable difference compared to standard runs is the tendency to compress the tank and pusher role into a single push-tank, commonly played by a Druid. Alternatively, if the pusher is not confident, it’s possible to have a DPS or BoonDPS tank instead, alongside the other healer.
Overall, aggressive compositions are not very punishing due to the boss being the first of the wing.
Platform Start
It’s possible to start Soulless Horror on the boss platform, which saves a few seconds. To do this:
- Start the fight by dropping down to the arena.
- Everyone
/GGs once in combat. - Rush back to the platform before the boss re-spawns.
River of Souls
This encounter is optimized by making Desmina travel as quickly as possible, which involves:
- Providing her with permanent
Superspeed.
- Killing all Hollowed Bombers so they don’t force her to stop.
With an ideal execution, Desmina should be able to run from the beginning to the end of the encounter without any interruptions.
It is highly recommended to run a marker pack that shows the spawn position of Hollowed Bombers and Enervators.
Transition from Soulless Horror
This transition involves a bit of dialogue, followed by Desmina walking from whenever she ended up in the previous encounter to the beginning of the River. Her walk is affected by Superspeed, and can be further optimized by killing her close to the East side of the arena, where the river starts.
Strategy
The speedrun strategy for River of Souls involves the Scrapper staying within
Desmina’s protective dome, providing her with permanent Superspeed while the rest of the group runs ahead of her and clears out all enemies, including Hollowed Bombers.
While Desmina is dialoguing, everyone except for the Scrapper can pre-position on the spawn of the first Enervator using mounts. It will spawn as soon as the encounter commences: kill it and then walk back towards
Desmina, killing the Hollowed Bomber when it spawns. You can use Sand Swell to get to and back from this bomber, but it is not strictly necessary.
Enervators will spawn as soon as the encounter commences, but Bombers only spawn when Desmina get close.
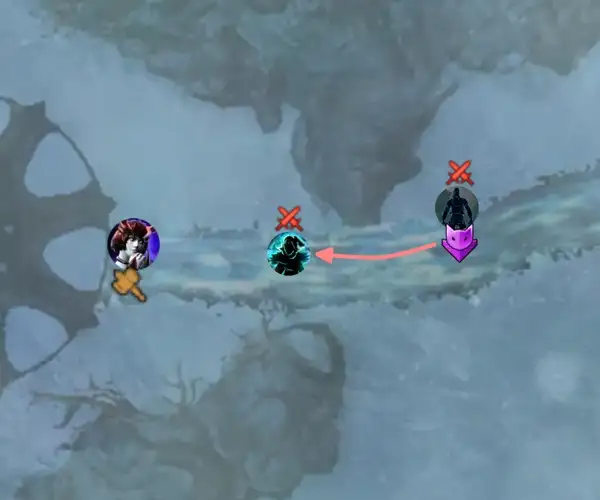
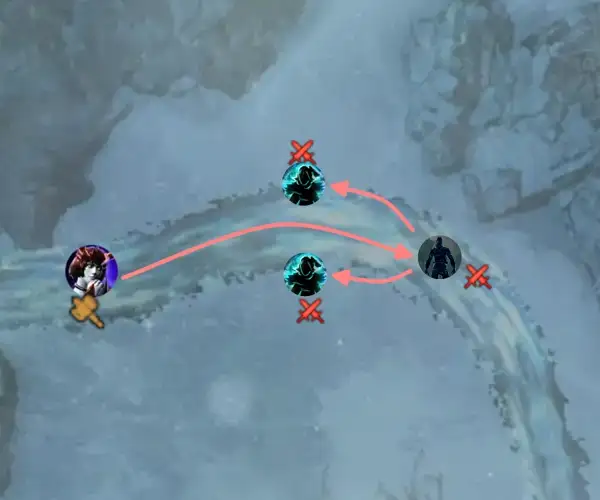
Once the Bomber is dead, you can run ahead to the next Enervator, after which you must split into two subgroups to kill two Bombers that spawn simultaneously.
You should kill these adds within 3-4 seconds of them spawning to prevent Desmina from stopping. For this reason it’s important to have classes capable of quickly stacking Vulnerability.
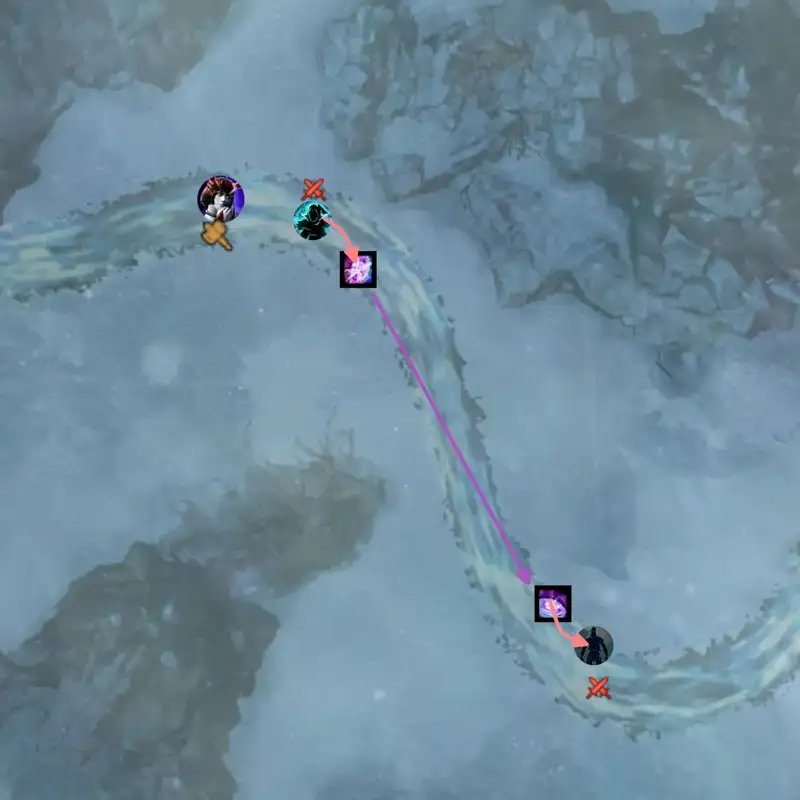
Once the two adds are dead, the group must kill an additional Hollowed Bomber. While they are doing so, a Mesmer can run ahead to prepare a
Portal Entre to the next Enervator. The portal can be opened as soon as the bomber is dead.
The Mesmer should take care not to down if off-stack for extended periods.
Move to the next Enervator. Kill it, then once again separate into two subgroups to kill the Hollowed Bombers spawning simultaneously in front of Desmina. After this final split, the rest of the encounter consists of two more Bombers and one Enervator that you can get rid of one after the other in a straightforward manner.
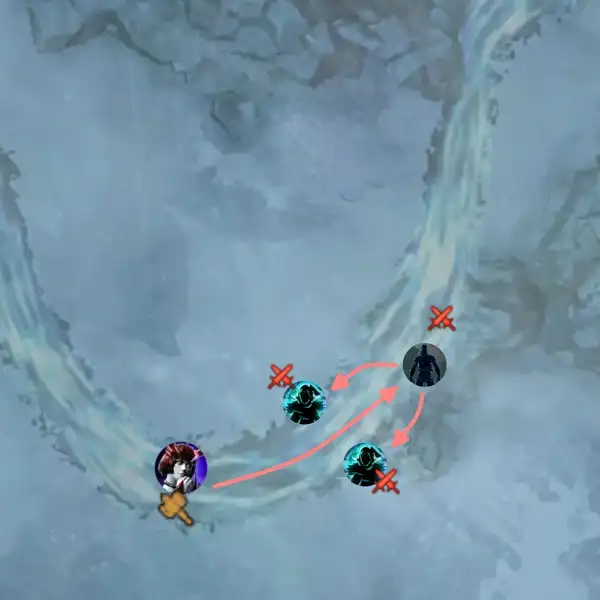
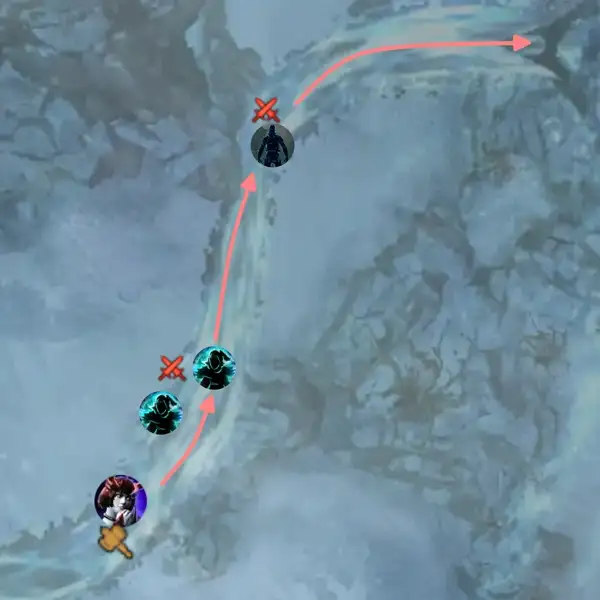
Three walls will spawn in sequence just before the final Enervator. One of these walls can spawn directly on top of the group in certain conditions, leading to avoidable deaths. There is a safe spot where you should wait for all three walls to spawn before continuing with the encounter, which is shown in the marker pack. Otherwise, you can provide a portal to the last Enervator and skip over the walls entirely.
Once everything is dead, you can run to the end of the River.
Statues of Grenth
Statues is the encounter where it is easiest to gain time. Strategies here differ greatly from the norm:
- Eyes are usually done with a strategy involving
Portals.
- The Eater of Souls and Broken King are usually done in parallel.
Statue of Darkness
This is normally the first encounter done after River, as pre-positioning is simple while Desmina is running through the final part of the encounter. A Mesmer can
Mimic a portal down to the center platform for the
Scrapper if necessary.
The typical speedrun strategy for Eyes requires four special roles:
- A
Druid running
Moment of Clarity and Superior Sigil of Paralyzation that picks up the Light Orbs and uses Flare. This can optionally be replaced with any other class, but the
Daze provided by
 Flare will be shorter.
 - A
Chronomancer running
Portal Entre and
Blink.
- One player to
 Throw Light twice. Usually this is done by the
 Scrapper, as their abundant CC can make DPSing the Eyes difficult.
- Two players to Throw Light once. This can be done by any class.
Start on the Eye of Judgement (to the North in-game). The Scrapper and two other players can pick up the Light Orbs and throw them to the squad.
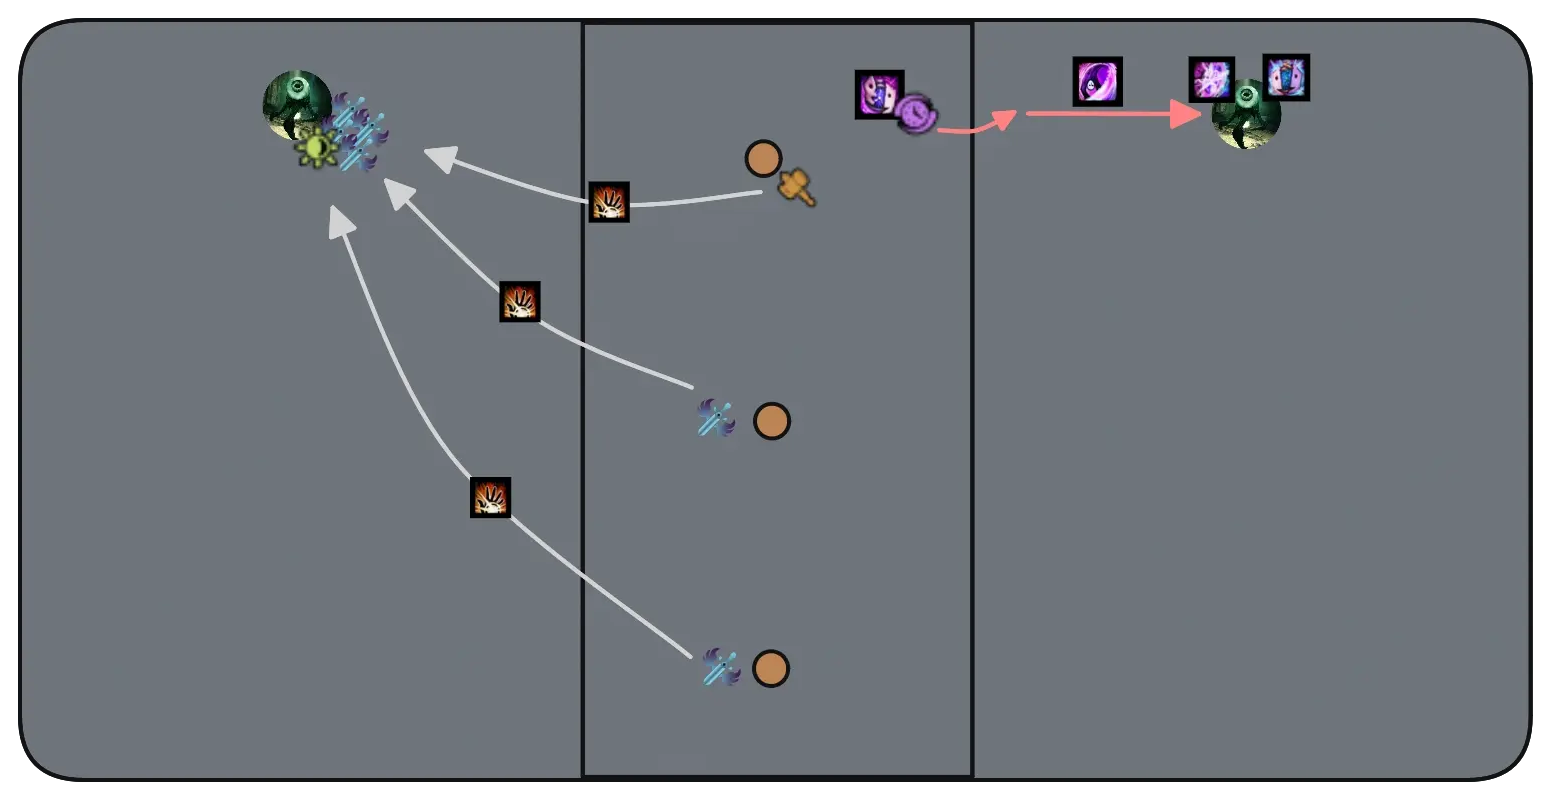
As soon as the encounter starts, the Chronomancer will gather clones using the adds on the upper platform. Once they have a few, they can open their
Continuum Split, drop down towards the Eye of Fate,
Blink to the Eye, prepare their
Portal Entre and
Continuum Shift to get back to the upper platform.
Both single throwers should glide to the Eye of Judgement immediately after throwing. The Druid will pick up a light as soon as possible and
Flare the Eye. Burst it down once it’s vulnerable, taking care not to use any CC skills. The
Druid will have to
Flare it a second time in this interval.
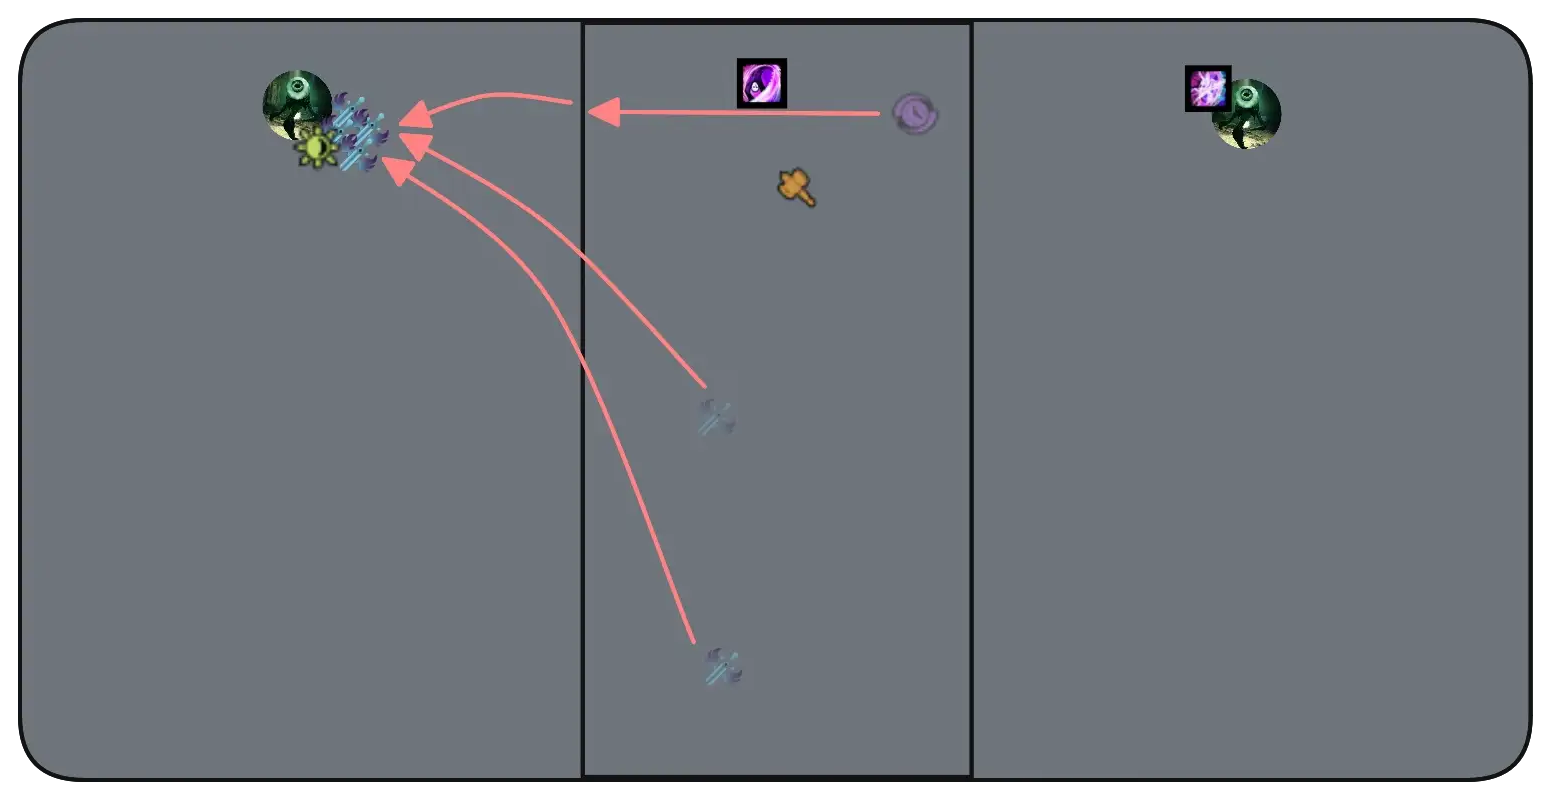
Once Judgement is close to dying, the Chronomancer will open their
Portal Entre to the other Eye. The
Druid should pick up the final light before taking the portal and use it immediately on the other Eye. The
Scrapper should remain up top and throw one final Light Orb to Fate, after which they can join the rest of the group for the final burst. The
Druid should pick up this light to cast one final
Flare when necessary.
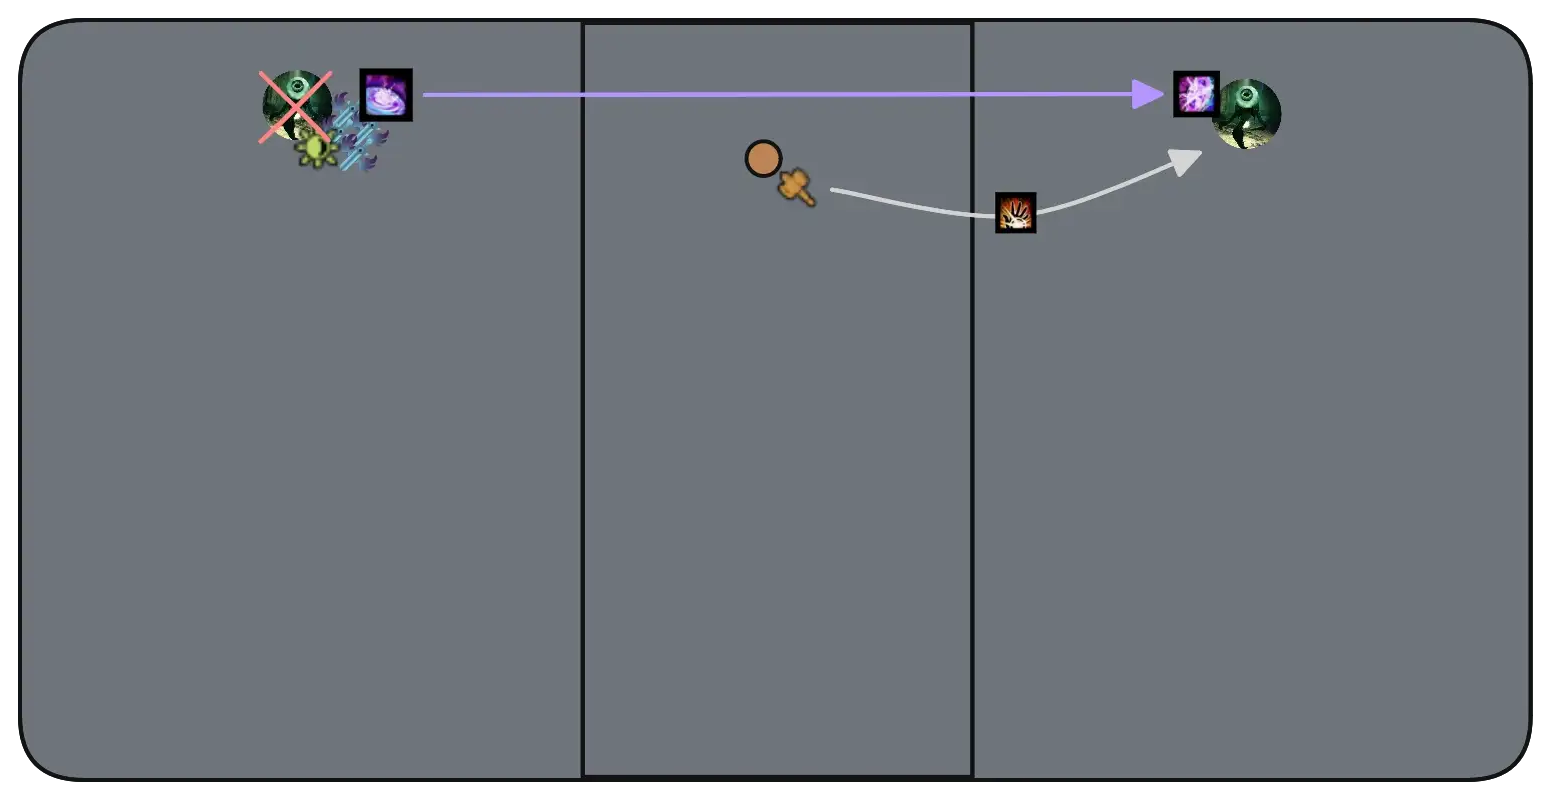
Remember not to /GG at the end of the encounter: instead use the Sand Portal to get back to Death’s Landing.
If you have access to an additional portal on another player, they can be one of the single throwers. This allows them to prepare their
portal in front of the
Sand Portal after throwing, opening it as soon as the encounter is over. This saves a few seconds in the transition to the other statues.
Since you will already be on the Jackal when you reach Death’s Landing, the fastest way to then get to the remaining Statues is by spamming
 Blink over the chasm in combination with
 Bond of Vigor.
Statue of Death and Resurrection
This encounter is usually done in parallel with the Broken King by sending a subgroup to each. The overall strategy is similar to the standard PUG strat, with the exception that two players go up in the first green and two in the second.
In Infallible runs, you cannot send additional players up in these greens: if there are insufficient orbs, some players will not be able to collect enough to return to the platform.
When the Eater is killed on a charged platform, there is a small chance that multiple orbs spawn in the same location. This may result in players not collecting enough orbs to complete the mechanic and going Downstate. Splitting the group between two greens results in fewer simultaneous orbs in the air, reducing the likelihood of this bug.
The first green should spawn roughly when the squad is killing the Eater for the first time, after charging the first platform. The second one should spawn a bit after killing him the second time. Be aware of when the green is about to spawn, and move towards it early if necessary.
Be careful with Reclaimed Energy: wasting this skill will force you to kill an additional Twisted Spirit in order to charge the platform completely. This commonly occurs when:
- A player who already has
Reclaimed Energy walks over an uncollected orb. This will destroy the orb without granting an additional cast.
- A player misses the platform when casting
Reclaimed Energy. This can happen if they are out of range, or if they are moving while casting the skill. To charge the platform safely: make sure you are within 900 range and completely still before using this skill.
Whenever any players go up in a green, the rest of the squad should CC the Eater as quickly as possible. Players in spirit form must not fly close to the Eater until its Defiance Bar has been broken, as it is easy to get sucked in and go
Downstate.
The same attack can pull players down into vomit, applying a lethal dose of conditions. Players in spirit form should be aware of any vomit on the platform and avoid it until the Defiance Bar has been broken. Whoever is tanking the Eater should avoid pulling it through the center of the arena, as vomit spawning there can be very dangerous.
Example
Immediately after the first green, the Twisted Spirit spawns on the opposite side of the arena.
Bad: the players not doing the green immediately move to the Twisted Spirit. This can result in the Eater using its suction or vomit in the center of the arena, making life very difficult for the players in spirit form.
Better: the players not doing the green continue DPSing the Eater until he gets his
Defiance Bar. Once it is broken, they immediately move to the Twisted Spirit.
This encounter is usually much quicker than the Broken King: once you are done, take the Sand Portal back to Death’s Landing and join the rest of the group at the Statue of Ice. Use your
Skyscale’s
 Dash in combination with
 Bond of Vigor to do so: anything else can place you too low when you enter combat, resulting in not being able to reach the platform by gliding.
Once you reach the Broken King, immediately glide into any unoccupied greens before dealing any damage to the boss.
Statue of Ice
This encounter is usually done in parallel with the Eater of Souls by sending a subgroup to each. The strategy is otherwise identical to the PUG strat.
Manage your DPS to keep less than five stacks of Shield of Ice on the boss. This allows players to stand in one green each without over-collecting. As it is easy to upkeep this amount of stacks even with two or three DPS, you can run multiple healers with no downside.
Normally, players Glaciate and are
Stunned upon getting a fourth stack of
 Frozen Wind, but some transformation skills can be abused to go over this limit:
Specter’s
 Shadow Shroud: getting a fourth stack deals some damage and kicks you out of shroud, but prevents both
 Glaciate and
Stun.
Necromancer shrouds, including
 Ritualist Shroud,
  Harbinger Shroud and
  Reaper’s Shroud: getting a fourth stack deals some damage, kicks you out of shroud, prevents
 Glaciate but does not prevent
Stun.
Running several of these classes allows you to accumulate more stacks on the boss with less risk.
As a Necromancer, be careful not to take a fourth stack of
Frozen Wind if there are no cracks on the ground. If you are unlucky, the cracks can spawn directly underneath a Stunned player, making them take a lot of damage and potentially go
Downstate.
Once the other subgroup has killed the Eater of Souls, they will join you on the Broken King. At this point you should increase your DPS to maintain around 8 stacks of Shield of Ice on the boss.
Broken King tends to bug out when at 10 stacks or above: players may not be counted inside greens, which can then fail, likely resulting in
Downstates. Aiming to keep the boss at 8
stacks gives you a safe margin while still being more than sufficient timer-wise.
Remember not to /GG at the end of the encounter: instead use the Sand Portal to get back to Death’s Landing.
Dhuum
The standard strategy on Dhuum implements slightly suboptimal gameplay for the sake of safety and consistency. This results in significant differences between a normal pull and a speedrun.
Transition from Statues
After Broken King dies, the Scrapper should take the
Sand Portal to Death’s Landing while the rest of the squad waits behind. They can then give
Superspeed to
Desmina while she walks up to the reapers.
While the dialogue is occurring, the rest of the group can take the portal through and move ahead, swapping builds and otherwise preparing for the fight. The Scrapper stays behind with
Desmina after the dialogue concludes, continuing to provide her with Superspeed.
You should ideally begin the fight the instant Desmina is in position and interactable.
Getting the Echo Stuck
It is possible to start the encounter in such a way that the Echo gets stuck next to the entrance. It will then remain stuck until its position is reset at the first big dip, letting you do optimal DPS for the first phases.
This is very easy to do with a marker pack:
- Have a player with a portal position on the marker and look at the second marker on the wall.
- This player then opens their portal next to Desmina.
- Everyone should take the portal and stand still on the exit.
- The kiter talks to Desmina to begin the encounter, then immediately also takes the portal.
You can move off the portal exit when the Echo starts moving towards the group. Mark it with an to make its position visible on the minimap.
Remember to pay attention once the Echo gets un-stuck after Greater Death Mark.
Throne Tanking
This strategy involves tanking Dhuum close to his throne for most of the fight. This reduces movement, resulting in higher damage uptime overall.
You will have to designate a green 3 player that is not the tank. Tanking itself does not require much healing, and can be done by any player with additional toughness. Green 2 is done by the kite as normal and green 1 by a DPS.
Begin the pre-event as normal. At ~8:00 or less remaining on the timer, just before the boss spawns, a Mesmer should use
Mass Invisibility on
. This
Stealths the reapers on
and
, forcing the Enforcer to target the reaper on
. While walking towards it, it will get cleaved by the group on the boss.
Make sure you are far enough from the group that your players do not get Stealth instead of the reapers.
This can also be done with other classes by Stealthing the
reaper first, then the
one after the Enforcer gets close.
The reapers will extend most incoming Stealth applications to a fixed duration of 20 seconds. You therefore have a lot of leeway in when to apply it: the ~8:00 suggested by this guide is indicative. The important thing is that the reapers are invisible when the Enforcer spawns in.
Once Dhuum is about to spawn, the tank should position in front of the throne so that the boss swivels around to hit them after walking out. You will then get a long DPS phase with the squad behind the boss and the tank absorbing the aggro. In this period, the Green 1 will come back from and the Green 2 will complete
.
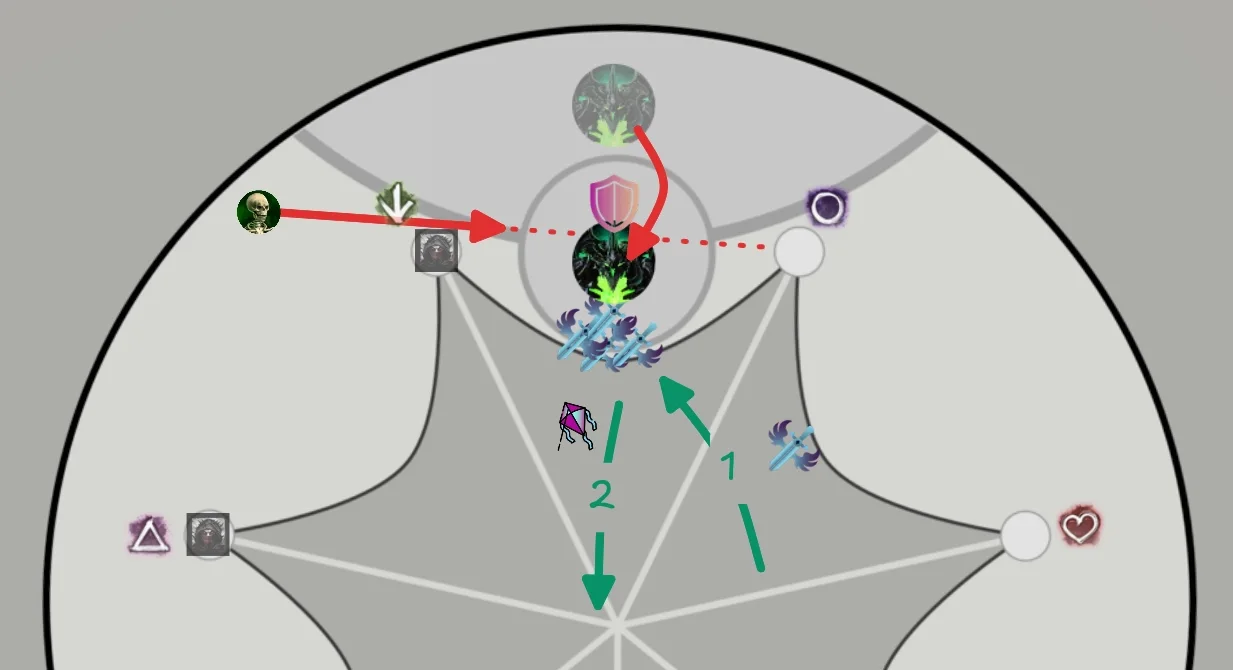
Before the Death Mark at 7:07, the squad should walk forward into the tank. This forces the dangerous AoE to spawn close to the throne, where it is out of the way for the rest of the fight. Wait for him to swipe his scythe at 7:10, then walk in. The tank can then walk the boss out of the AoE while the Green 3 player goes to .
It’s convenient to pull Dhuum towards , as this brings the Green 1 closer to
while also positioning the group in a favorable position for Greater Death Mark, as you will not have any dangerous areas behind you.
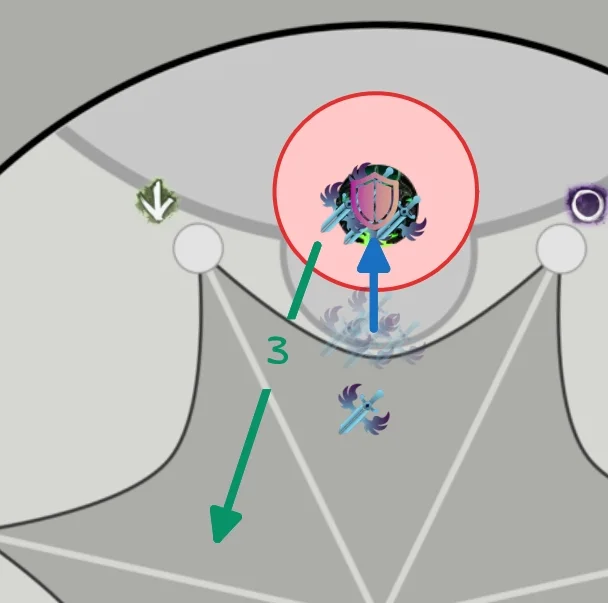
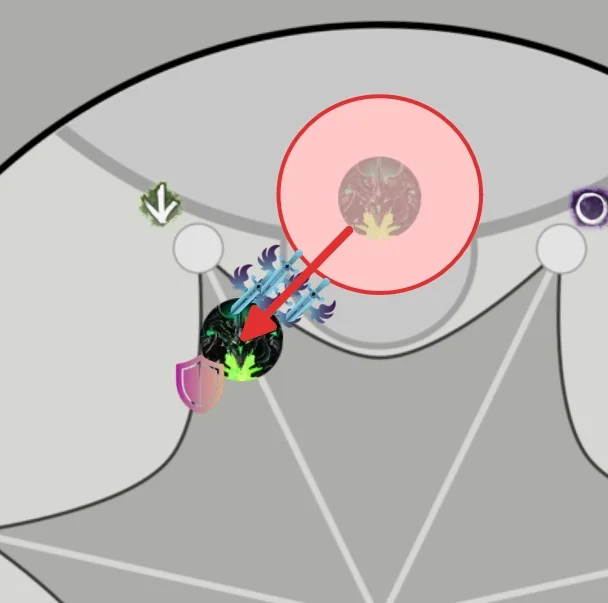
The Green 3 should try to collect a medium orb while completing , as this will prevent a Messenger from spawning during Greater Death Mark. If they don’t manage to do so, they should alert the kiter.
Greater Death Mark is one of the critical moments in the fight, as you will have many overlapping mechanics: stripping Dhuum, cleansing conditions and re-applying boons, the Echo re-spawning and running straight for the group, the suction pulling players in, and a Messenger if the Green 3 did not collect the medium orb.
One way to manage this sequence is by:
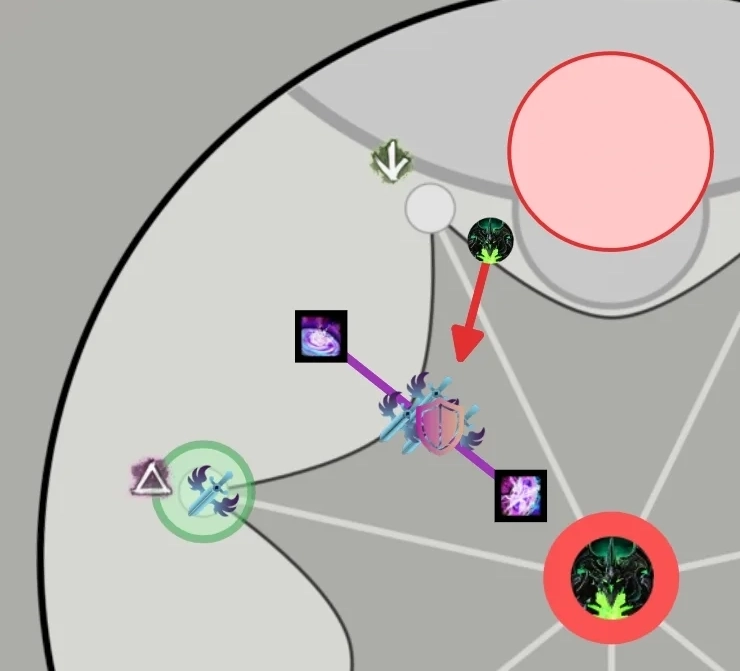
Before taking any portal, make sure that the exit is safe from the Echo. If it isn’t, call it out to the rest of the group.
Once the suction ends, it’s convenient to leave Dhuum in the center of the arena. The tank should position to avoid any rogue swipes on the group, which can lead to downs if players do not have Protection or
Aegis. Shortly before the next Death Mark at 5:47 on the timer, the tank should walk into the rest of the group so that the red spawns slightly off-center. They can then pull the boss out of the red, keeping it in the center. From this position you can easily access the greens on
,
and
.
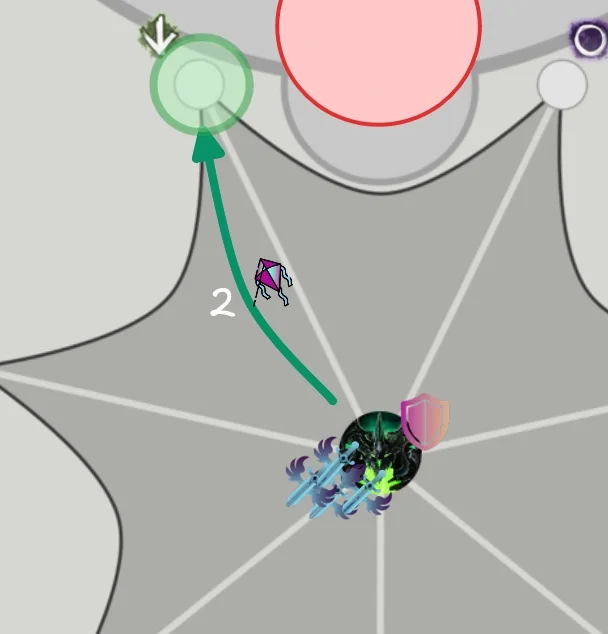
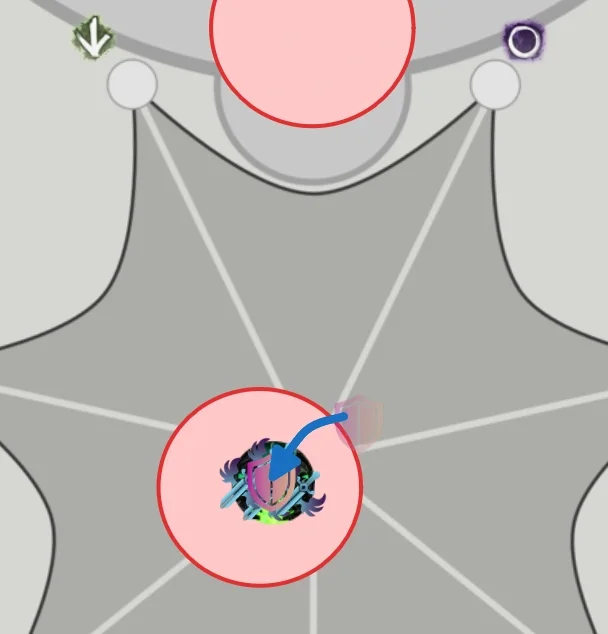
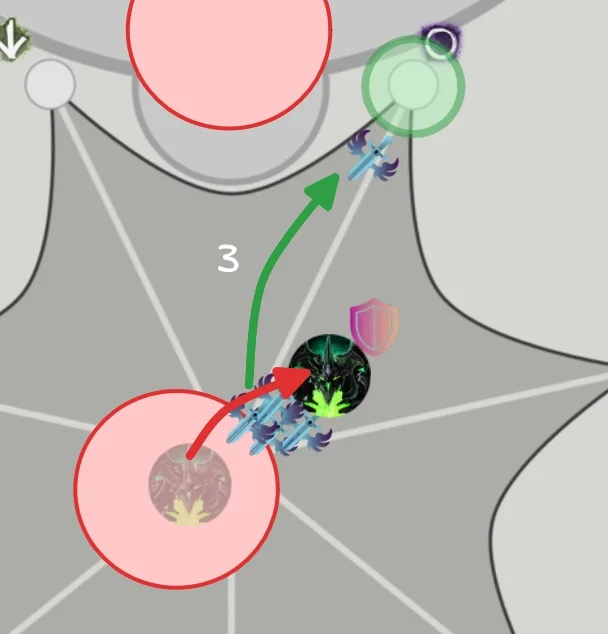
You can then walk Dhuum out of the red as before, and continue DPS keeping him close to the center. From this position you can easily access the greens on ,
and
.
High-damage groups should be able to phase the boss before the next Greater Death Mark. If you have to play this mechanic, treat it identically to the first death mark: stay stacked, walk backwards out ot the Echo’s path, and provide a portal out. You should not see an additional Death Mark.
Skipping the Collection Phase
Normally after phasing the boss to 10%, everyone is separated into their spirit form and has to collect five orbs before returning to the platform. It is possible to skip this process by getting picked up by the Echo just before getting your soul ripped out. This results in the player spawning in the center of the safe area as if they had collected their orbs normally.
This can also be done using transformation skills such as shrouds, by transforming just before the soul rip.
Additional Tips
- Use
Sand Swell to port players out of the group when they get
 Arcing Affliction (bomb).
 - Use
Dimensional Aperture and
Portal Entre to port returning players from greens.
- Explode Arcing Affliction at 6:35 on the timer to overlap a bomb with the big dip. The dip will remove the bomb effect, making the run much safer.
- Green players are responsible for clearing the
reaper from deathlings, especially when doing greens on
and
.
- Apply
Quickness,
Swiftness and
Protection to all players before they go out to channel seals.
Additional Resources
PoVs
This is a non-comprehensive list meant to display a diverse selection of perspectives and roles. You can find additional PoVs and logs in the Infallible Archive.
| Classes | Link | Date | Notes |
| March 2026 | Broken King on Statues | ||
| March 2026 | Eater of Souls on Statues, standard Dhuum tanking | ||
| April 2026 | Broken King on Statues |
Other Useful Links
River and Eyes Portals by xBourne - good visualization of
Mesmer
Portals for these encounters.
Heal Chronomancer Kiting with MI and Portal by HasKha - while NM, this showcases the process overall.
Throne Tanking Dhuum by Christine - while relatively old, the positioning in this run is still relevant.
Getting the Echo Stuck - shows how to bug out the Echo at the beginning of Dhuum.