Return to Home Mechanical Reference
UNIT Strat
UNIT, named after the guild who originally developed the strategy, is one of the two common strategies for ToF CM, alongside Flower. It was designed to facilitate PUG runs, since it requires few specialized roles, is relatively forgiving to mistakes, and it frees up strong defensive options for DPS players.
The downside of this strategy is that it forces most of the squad to play certain predefined builds, without much space for alternative play-styles.
Table of Contents
Main Points
UNIT compresses almost all mechanics into the two heal roles, covered by a Scourge and
Chronomancer. Both of these classes bring strong utility that is used to manage many of Cerus’s attacks:
- Rage is avoided by transporting the squad out of range using
Sand Swell and
Portal Entre.
- Malice is mitigated by dropping the adds on the edge of the arena using portals, then either killing them, immobilizing them using
Dark Pact, or phasing before they become an issue.
- Regret is killed during the first split phase so that it becomes trivial.
- Gluttony is killed during the second split phase, and projectile reflection is provided by
Corrosive Poison Cloud and
Feedback.
- Envy is managed using some positioning tricks that take advantage of portals.
- Despair, especially in its empowered state, benefits from using portals to place the dangerous pools far from the boss.
Marker Pack
All markers referenced in this guide can be set up with the Commander Markers module for Blish HUD, using the marker pack provided below.
Click to view markers
 Paste the following code into Commander Markers to use this marker pack:
eyJlbmFibGVkIjp0cnVlLCJuYW1lIjoiUHVnIFN0cmF0IiwiZGVzY3JpcHRpb24iOiJkZXNjcmlwdGlvbiIsIm1hcElkIjoxNTIwLCJ0cmlnZ2VyIjp7IngiOjAuMCwieSI6MC4wLCJ6IjowLjB9LCJtYXJrZXJzIjpbeyJpIjoxLCJkIjoibWFya2VyIG5hbWUiLCJ4IjotNC44MjQ2NjEsInkiOi0xMDcuNzc0NzEyLCJ6IjoxNzguNjcxNH0seyJpIjozLCJkIjpudWxsLCJ4Ijo2LjQ3MDMyMiwieSI6LTEwMC40MTkxMjEsInoiOjE3OC42NzE2fSx7ImkiOjYsImQiOm51bGwsIngiOi05LjQ2MTc1MSwieSI6LTExMS44Njg0LCJ6IjoxNzguNjcxNDQ4fSx7ImkiOjUsImQiOm51bGwsIngiOi04Ljk4NjU3OSwieSI6LTEzMi42Njk3ODUsInoiOjE3OC42NzE0NDh9LHsiaSI6MiwiZCI6bnVsbCwieCI6MjcuNjA4MjI2OCwieSI6LTE0OC4wNzI4NzYsInoiOjE3OC42Njk4fSx7ImkiOjcsImQiOm51bGwsIngiOjM0LjU3NjY3NTQsInkiOi0xMDMuNDM1ODA2LCJ6IjoxNzguNjcxNjE2fSx7ImkiOjQsImQiOm51bGwsIngiOjI4LjEwNjk5LCJ5IjotOTQuMjAxODcsInoiOjE3OC42NzE2MTZ9LHsiaSI6OCwiZCI6bnVsbCwieCI6NC40MTk4OTEzNiwieSI6LTU1LjkxNDcwNzIsInoiOjE3OC42NzE2fV19
Composition
The constants present in every group are:
- A heal
Chronomancer running
Feedback,
Portal Entre and
Blink.
- A heal or celestial
Scourge running
Corrosive Poison Cloud and
Sand Swell.
For boonDPS, while any provider is fine in theory, Herald is the most common choice due to its good boon coverage, strong condition damage and the added defensive utility of
Infuse Light.
UNIT strongly favours ranged builds with cleave and good personal defensive skills. Condition Virtuoso is by far the safest and best performing build for this reason. This does not mean you cannot use other builds, however, it is best that you gain confidence with the fight before attempting to do so.
Most groups will run with 4-6 virtuosos, since their cleave is required to kill Malice adds safely.
Builds and PoVs
This is a non-exhaustive list of playable builds with this strategy. If anything is outdated, you can find up-to-date information on Void Lounge.
| Build | Role | PoV | Last updated |
| Heal & Portals | PoV, 10% PoV | May 2026 | |
| Heal & Portals | PoV, 10% PoV | May 2026 | |
| Condition Quickness | PoV | May 2026 | |
| Condition Quickness | PoV | May 2026 |
Strategy
UNIT strat, at its most basic level, consists of a series of scripted sequences. Since the order of mechanics does not change, players should know in advance all actions the boss and its Embodiments will undertake.
Most of the progression on with this strategy thus involves learning these sequences and executing them with enough precision to satisfy all mechanical requirements while maintaining enough damage on the boss.
The rest of this guide will explain these sequences in detail, divided by phase.
First Phase
Mechanics are relatively simple and forgiving. Use this time to do as much damage as possible.
- Avoid
Empowered on the boss. Stacks commonly result from miscommunication during Gluttony or Malice. You should be ending this phase with zero
Empowered stacks.
- Practice the timing of dodging Despair spreads with little or no consequences.
- A new embodiment will perform their mechanic every 30 seconds.
1. Regret, Malice & Despair, Envy

- Glide into the arena and stack in the green in front of the boss.
- Shortly after the green pops, the
Chronomancer activates their
Continuum Split, prepares a
Portal on the group,
Blinks to the North-East corner of the arena, and opens their portal before exiting
Continuum Split.
- Everyone spreads to the south with Despair, and dodges inwards. Whoever is targeted by Malice takes the portal and places their add on the edge of the arena, then takes it back after dropping their Despair.
- Stack up and sidestep Envy to the left once its indicator appears.
![]() Chronomancer POV
Chronomancer POV
Extra Information
- The add from the Malice needs to be placed far enough to the North so as to take advantage of its pathfinding: if the add starts walking directly towards the center, then the portal was outside of the correct zone.
- Players should not move after taking the portal, as it runs the risk of placing the Malice in an incorrect position or falling off the platform.
2. Malice, Despair & Gluttony
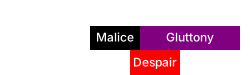
- The
Chronomancer prepares their
Portal Entre on squad, then
Blinks to the North-Western edge of the arena and opens it after Envy disappears.
- Whoever gets targeted by Malice takes the portal and leaves their add on the edge of the arena.
- Everyone else spreads horizontally for Despair, then rolls forward and focuses on collecting Gluttony. Use
Feedback or
Corrosive Poison Cloud on the boss to prevent it from gaining
Barrier.
- When spreading, the
Scourge should weapon swap to dagger and use
Dark Pact to
Immobilize the Malice add coming from the north of the arena. The
Chronomancer can also use
Mind the Gap into
Phantasmal Lancer to
Immobilize and
Journey to
Cripple the add.
![]() Chronomancer POV
Chronomancer POV
3. Rage, Regret & Envy, Despair
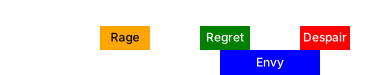
- Once Rage appears, the
Scourge uses
Sand Swell to get the squad out of the AoE.
- The squad takes the portal back and stacks for Regret on the eastern side of the boss, so as to avoid Envy.
- Once Regret pops, walk through the boss to the other side and drop Despair.
- If squad DPS is low or you’re playing LCM, you may have to play a second Envy. Just sidestep it to the left.
![]() Scourge POV
Scourge POV
Extra Information
- Throughout this sequence, continue applying
Immobilize to the Malice as necessary.
- Groups will usually phase around when Regret spawns.
First Split Phase
Cerus will separate into his six Embodiments, which will start doing attacks. The first attack will almost always be Gluttony, while the second and further are random.
- The squad should kill
Regret, so as to disable the Triple Green mechanic.
- Do your full DPS rotation on the add, never skill-save. With enough damage, the squad can skip the second mechanic, which can be crucial in case the mechanic is
Regret (see Scourge/Chrono PoV for an example).
- The two healers and a boonDPS should go collect Gluttony. Sort out which boonDPS goes beforehand.
- Whoever opened instance should stand west of the squad to bait
Envy, in case it performs its attack. The rest of the squad should be ready to jump the fast wall.
- Walk back to the boss once Regret is dead.
![]() Chronomancer POV
Chronomancer POV
![]() Herald POV
Herald POV
![]() Scourge POV
Scourge POV
Second Phase
Two Aspects, Envy and Rage, will be Empowered, increasing the challenge posed.
- Avoid
Empowered on the boss. Stacks commonly result from miscommunication during Gluttony or Malice.
- The double Despair followed by double
Envy 75 seconds in is the first true difficulty spike of the encounter.
- During this phase, an Embodiment will spawn and perform their attack every 20 seconds.
1. Regret, Rage & Despair, Envy

- Run to the south of the boss and stack in Regret.
- Shortly after the green pops, the
Scourge will provide a
Sand Swell out of the
Rage.
- Spread for Despair after taking the portal. Dodge into the portal to avoid the damage, and take it once you see the “Evaded” tick.
- Once the indicator for
Envy appears, run forward and to the right of it. After the wall spawns, chase the fast wall around the boss.
![]() Scourge POV
Scourge POV
Extra Information
- If the group has limited access to
Swiftness, it becomes important for
Virtuosos for provide it via
Temporal Curtain during
Envy.
- Try to avoid taking the
Sand Swell back too early as this can result in getting hit by Rage or dropping Despair pools on top of the boss.
2. Gluttony2 & Malice2, Rage

- After
Envy, the
Chronomancer activates their
Continuum Split, prepares a
Portal on the group,
Blinks to the eastern edge of the arena, and opens their portal before exiting
Continuum Split.
- Whoever gets targeted by Malice takes the portal and drops the add on the edge. The rest of the squad focuses on collecting the two consecutive Gluttony mechanics. Alternate
Feedback and
Corrosive Poison Cloud on the boss to prevent it from gaining
Barrier.
- After the last orb is collected, the
Chronomancer prepares a
Portal on the group,
Blinks to the add, and opens their portal.
- Whoever gets targeted by the second Malice takes the portal immediately, the rest of the squad takes it as soon as
Rage appears.
- Stack behind the adds and cleave them down while targeting the boss. Players who are melee can take the portal back for more DPS provided cleave is sufficient.
![]() Chronomancer POV
Chronomancer POV
Extra Information
Chronomancers should delay opening their portal as much as possible: this allows melee players to take it back after the Rage, increasing their damage uptime.
- There is an invisible Embodiment (Regret) on
Triangle: ensure the
Portal is placed slightly south of the horizontal line, or this add will block some projectiles, making it more difficult to cleave the Malices.
- The player targeted by the second Malice should try to drop their add on top of the previous one, to make cleaving them together easier.
3. Regret, Despair2, Envy2

- Regret appears while the squad is stacked behind the Malices.
- A soon as the green pops, spread out with the first Despair in a crescent far from the boss.
- Dodge forward once Despair drops, and position on the inside of the pools for the second set.
- Dodge forward again and quickly stack up on
Heart to bait
Envy from the boss.
- Once the wall’s indicator appears, run to the right of the boss and chase the fast wall back to
Heart. You should be on
Heart when the Embodiment starts casting their own
Envy.
- Circle the boss to
Arrow, jumping over the fast wall when it crosses the squad.
![]() Virtuoso POV
Virtuoso POV
Extra Information
- The first set of spreads will no longer deal damage once the Embodiment of Despair disappears. Melee classes can therefore place them closer to the boss to greed for a bit more damage.
- After jumping the fast wall, support players should cleanse conditions, strip boons from Cerus and re-apply boons on the squad in case anyone failed their jump.
4. Malice, Gluttony & Regret
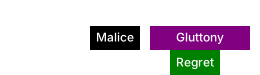
- The
Chronomancer prepares their
Portal right as
Envy is about to end, then they
Blink to the southern edge and open their portal.
- Whoever is targeted by Malice takes the portal and drops their add on the edge.
- Gluttony will happen at the same time as Regret. Each subgroup should follow their marked person to collect, this way there will always be at least five people in the green even when the squad is spread. Use
Feedback or
Corrosive Poison Cloud on the boss to prevent it from gaining
Barrier.
![]() Chronomancer POV
Chronomancer POV
5. Rage2, Regret
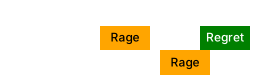
- The
Scourge uses their
Sand Swell south to the add as soon as the
Rage indicator appears.
- Take the portal back and walk out of the second
Rage.
- Optionally: stay stacked behind the add and cleave it down while targeting the boss. Regret’s green will spawn while everyone is still stacked.
- You should be phasing shortly after the green. Otherwise, you will have to play a final Despair.
![]() Scourge POV
Scourge POV
Extra Information
With good damage, it is possible to phase during Rage, either the Cerus’s or the Aspect’s. In this case the boss’ Rage will be effectively cancelled as soon as he gains his
Defiance Bar, becoming purely visual. However, the Aspect will continue casting until the defiance bar is broken.
Second Split Phase
Cerus will again separate into his Embodiments, which will start doing their mechanics. The first one will almost always be Gluttony, while the second one and on are random.
- Kill
Gluttony.
- Do your full DPS rotation on the add, never skill-save.
- In Legendary Mode, you should not collect orbs. Any
Empowered gained by Gluttony will be lost once it dies.
- In normal CM, you instead should collect, since
Insatiable will wear off before it becomes an issue. Try not to gain more than 3 stacks.
- Healers can use
Feedback or
Corrosive Poison Cloud to reduce the amount of
Barrier gained by Gluttony, slightly speeding up the phase overall.
- Whoever opened instance should stand south of the squad to bait
Envy in case it performs its attack. The rest of the squad should be ready to jump the fast wall.
Third Phase
Four adds, Despair, Envy, Malice and Rage, will be Empowered, requiring careful coordination from the entire squad to manage the combined mechanics.
- Large difficulty spikes come from double
Despair into double
Envy, 55s and 130s into the phase. Surviving these sequences intact will determine if you get to 10%.
Rage & Gluttony 100s into the phase, known as “bad collection”, is one of the harder mechanics to do correctly, and may result in many stacks of
Empowered on the boss if misplayed.
- Transitioning into the final 10% is best done at certain specific moments, otherwise some attacks risk carrying over to the final phase, potentially screwing up the entire run.
- During this phase, an Embodiment will spawn and perform their attack every 15 seconds.
1. Regret, Rage, Envy

- Run to the left of
Heart (when looking at the boss) and stack in Regret.
- Once the
Rage indicator appears, the
Scourge casts
Sand Swell to
.
- Everyone takes the portal to avoid the AoE and stands still on the portal exit. The
Envy indicator will appear on top of the squad.
- Everyone takes the portal back to
as soon as Rage pops.
- Chase the fast wall around the boss.
![]() Scourge POV
Scourge POV
Extra Information
Virtuosos can use their
Signet of Illusions and
Thousand Cuts in their opener. For the rest of the fight, they should only use them at specific moments.
- This sequence is commonly called the “Feep-Foop”.
- The marker positions for placing
Sand Swell in these sequence are a reference: the important part is angling the portal enough so that
Envy does not hit the squad.
2. Gluttony2, Malice, Rage
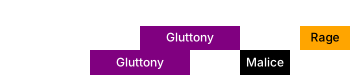
- During the
Envy in the previous sequence, the
Chronomancer can run out and prepare their
Portal on
Triangle.
- Each subgroup follows their marker to collect all orbs during the two consecutive Gluttony mechanics. Alternate
Feedback and
Corrosive Poison Cloud on the boss to prevent it from gaining
Barrier.
- Once players get targeted by
Malice, the
Chronomancer opens their portal on the boss. All tethered players take the portal and drop the adds on the exit.
- Everyone else takes the portal once the indicator for
Rage appears, and stacks behind the adds, cleaving them down while targeting the boss.
![]() Chronomancer POV
Chronomancer POV
3. Despair2 & Malice, Envy2 & Regret2

- Form a line in preparation for
Despair while cleaving the Malices. All
Virtuosos should stack just in range of the boss, in front of
.
Heralds should be in front of them, while the
Scourge and
Chronomancer remain behind everyone else.
- Optional: the
Scourge prepares a
Sand Swell from
for the melee players: see the PoV below.
- When the
Despair spreads drop, dodge them towards
.
Virtuosos should use their
Distortion to ignore the initial damage, the Chronomancer and Heralds should save their defensive skills for the second drop.
- Players will get targeted by
Malice during Despair. Everyone who is targeted should take care to drop their add on
Square. The tighter the adds are grouped up, the easier it will be to kill them.
- Prepare for the second set of
Despair. Virtuosos should reset their
Distortion with
Signet of Illusions and stack with the Heralds on square. Heralds should swap to
Legendary Dragon. Healers should remain off stack, usually a bit to the right looking at the boss.
- Dodge the second set of
Despair forward. Virtuosos should use their
Distortion, Heralds should use
Infuse Light.
- Stack behind the Malices in Regret and cleave thm while targeting the boss. Virtuosos should use their
Thousand Cuts now.
Envy will spawn from the add.
Jump the fast wall, then once the adds die move to
Arrow to avoid the slow wall.
- A second
Envy will spawn from the boss. Run to the right and follow the fast wall around the boss.
![]() Chronomancer POV
Chronomancer POV
![]() Scourge POV
Scourge POV
![]() Herald POV
Herald POV
![]() Virtuoso POV
Virtuoso POV
Extra Information
- Remember that
Distortion and
Evasion only work for the initial
Despair damage.
- DO NOT DODGE EARLY! Early dodges will leave your pool at the end of your dodge, potentially killing your teammates. Wait for the spreads to drop, using your defensive skills to soak up the initial damage, and then use your dodge to get out of the pool faster. You have about a second to get out before you down.
Infuse Light also works on the pools, so heralds can be even more patient. They don’t even need to dodge and can just walk out of the pools.
- For the first set of spreads, the
Chronomancer can stack far off group and then
Blink to
after they drop, giving a bit more space to the others.
- After the second dodge, the pools on the left facing the boss are purely visual. Don’t hesitate to walk through them to cleave the
Malice.
- The adds will die relatively easily in normal CM. In Legendary Mode, it is crucial that all
Virtuosos save their
Thousand Cuts and use it on the second set of Malices. Similarly it is also extremely important that everyone stacks precisely on
so that they are neatly stacked far from the boss.
- After jumping the fast wall, support players should cleanse conditions, strip boons from Cerus and re-apply boons on the squad in case anyone failed their jump.
- This sequence is commonly called “Double Drops”.
4. Gluttony2 & Rage2

- Move to
Heart.
- As soon as the Embodiment’s
Rage indicator appears, the
Chronomancer opens
Continuum Split, prepares a
Portal,
Blinks to
Swirl, opens their portal, and terminates their
Continuum Split.
- Everyone takes the
Portal out of
Rage, or walks out keeping an eye for any Gluttony orbs they can collect on the way.
- Once
Rage pops, players should take the
Portal back to the boss to grab any orbs that were not yet fully collected.
- The
Scourge prepositions north of the boss, towards
X. When the boss’s
Rage’s indicator appears, they should
Sand Swell towards the marker.
- Everyone takes the
Sand Swell before Rage pops. The
Chronomancer runs out and prepares their
Portal on
X.
- Everyone takes the
Sand Swell back to the boss and quickly collects all orbs. Marked people should call out where they’re moving.
- As soon as the final orb is collected, the
Chronomancer opens their
Portal on the boss.
![]() Chronomancer POV
Chronomancer POV
![]() Scourge POV
Scourge POV
Extra Information
- The
Chronomancer can start saving their clones once
Envy disappears: the portal is much easier to place with three clones.
Heralds can give
Superspeed during the first
Rage with
Chaotic Release, and can get back to the boss quickly with
Frigid Blitz if they are running Axe.
Scourge can quickly move out of Rage with
Path of Gluttony.
- This sequence is commonly called “Bad Collect”.
5. Malice2, Despair2, Envy2 & Gluttony

- As soon as
Malice chooses targets, everyone immediately takes the
Portal to
. The players targeted by tethers will drop the adds on top of the portal exit.
- Spread with
Despair along the northern edge of the arena. Take all the space you need, and then
dodge forward.
- Stack inside Regret while in range of the boss. The adds will walk into your cleave, so there is no need to focus them specifically.
- The
Scourge, if they don’t have the green, can move in front and to the left of the stack. As soon as the second
Despair spawns, they
Sand Swell behind the boss, immediately taking it back.
- The squad stacks to the right of the portal, leaving enough space in front of them for the healers. Prepare to dodge the second set of despair. Virtuosos should use their
Distortion, Heralds should use
Infuse Light.
- The indicator for
Envy from the boss will appear on top of the squad while the it is stacked. Dodge the
Despair to the left, and take the
Sand Swell to avoid the wall.
- Chase the fast wall around the boss and run back to
in time for the add’s
Envy. When it spawns, follow the slow wall to
and jump the fast wall.
- Gluttony will happen while the slow wall is still up. You may have to go through the wall to collect orbs.
![]() Chronomancer POV
Chronomancer POV
![]() Scourge POV
Scourge POV
![]() Herald POV
Herald POV
![]() Virtuoso POV
Virtuoso POV
Extra Information
- If everyone takes the
Portal immediately once it opens, no-one will be in range for the second
Malice, and you will have to deal with one less mechanic. If some players do get tethers, they should try to place their adds on top of the previous set.
- Remember that
Distortion and
Evasion only work for the initial
Despair damage,
Infuse Light however also works on the pools, so the
Heralds don’t even need to dodge.
- The
Scourge can spam Interact (default F key) to instantly take their
Sand Swell back after casting it.
- After jumping the fast wall, support players should cleanse conditions, strip boons from Cerus and re-apply boons on the squad in case anyone failed their jump.
- This sequence is commonly called “T-drop”.
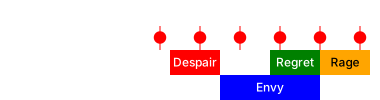
Phasing to 10%
Once you finish the T-drop sequence, you are within range of phasing and you should start planning out when exactly to transition to the final 10%. This is not a straightforward matter: based on mechanics of the transition, we can divide the final part of the fight into several sections based on phasing convenience:

Green sections represent periods where the phasing is more convenient. Carried over mechanics will be inconsequential, or mechanics will be cancelled by the transition.
Yellow sections can be managed with small deviations from the normal strategy.
Orange sections are inconvenient timings that should be avoided, but are not run-ending.
Red sections represent bad timings that should be avoided at all costs.
The rest of this section analyzes the final sequences of the third phase with an eye towards transitioning.
1. Regret, Rage2, Malice, Despair

- Stack in Regret south of the boss. When
Rage spawns, the
Scourge uses their
Sand Swell towards the
marker, and the whole squad takes it, then takes it back once the AoE pops.
- The
Chronomancer opens their
Continuum Split and creates a
Portal from
to
. Everyone targeted by Malice will take this portal and place their add on the edge of the arena.
- Everyone who did not get Malice should stay outside of the Embodiment’s
Rage.
- Before
Despair starts, everyone should spread in a semi-circle around the boss. Players who stayed on
should favor spreading more to the left, leaving space for the Malice players once they get back from the portal.
- Dodge
Despair towards the boss.
![]() Chronomancer POV
Chronomancer POV
![]() Scourge POV
Scourge POV
Extra Information
- Don’t use
Distortion or
Infuse Light for
Despair: you will need them at the start of the final phase.
- The
Portal can be done both from
to
or from
to
, choose which suits you best.
- Players who don’t get targeted by
Malice should tend to spread left with their
Despair, leaving more space for their teammates once they come back with the portal.
Phasing
![]() Before
Before ![]() Rage
Rage
High damage groups should aim for this window. Once Regret spawns, you will get a green leading into the final phase, but this is very easy to deal with.

![]() After
After ![]() Rage
Rage
This requires a small adaptation: the Sand Swell out of the
Rage should be replaced by a
Continuum Split
Portal, so that
Sand Swell will be available for the start of the final phase. If the Embodiment of
Rage spawns, remember that it will always conclude its attack, even if you phase. Depending on the timing of the attack, the commander may make the call to play the start of the final phase from
.

View Animation
![]() Chronomancer POV
Chronomancer POV
Note: in this PoV, the squad dps was not enough to phase during the Rage mechanic, so damage was held in order to phase at the beginning of the following sequence. However, its a good showcase of the CS portal. ![]() During
During ![]() Malice
Malice
If you phase while Malice tethers are active, the tethers will not disappear, and you will get an extra set of adds persisting through to the next phase. This is extremely inconvenient, since usually the squad will not be ready to cleave them, resulting in a full 15 stacks of
Empowered on the boss, and a wipe. You should generally try to phase Cerus before he puts his wings to the floor, or hold damage and try to phase at the start of the next sequence.

![]() After
After ![]() Malice
Malice
Phasing here will result in the Malice adds despawning. However, you will always get Gluttony persisting through the beginning of the final phase. While not catastrophic, this is however a significant increase in difficulty, and should be avoided. You should hold damage and try to phase at the beginning of the next sequence.

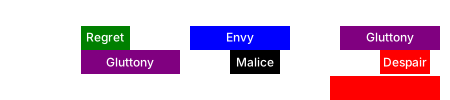
2.Gluttony & Regret, Envy & Malice (Despair)
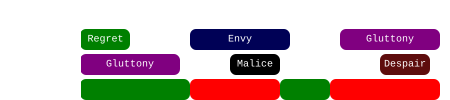
- After dodging
Despair, stack on the boss for the green.
- Use Feedback and
Corrosive Poison Cloud during Gluttony to avoid the boss getting
Barrier. Focus on collecting.
- When
Envy spawns, run to the right, then chase the fast wall around the boss.
- Whoever gets targeted by
Malice should run out in the space between pools, and drop the adds as far as possible.
- Phase as soon as possible after the adds spawn. Be ready to break Cerus’s
Defiance Bar.
Phasing
![]() During Gluttony
During Gluttony
A generally good moment, normal damage groups should aim to phase here, as soon as the green appears. Any Gluttony orbs already present on the map will despawn, and both attacks will be invalidated.
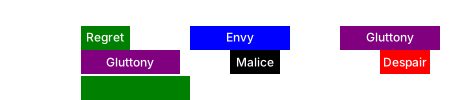
![]() During
During ![]() Envy
Envy
The wall appears as soon as the Malice Embodiment spawns. If you phase here, Malice will complete their attack and you will get an extra set of adds persisting through to the next phase. This usually leads to 15 stacks of
Empowered on the boss and a wipe.
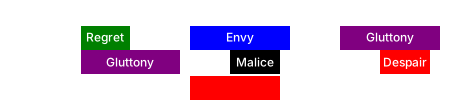
![]() After
After ![]() Malice
Malice
This is the final safe phasing point. As soon as the Malice adds spawn, phasing will make them despawn, leading to a safe transition.
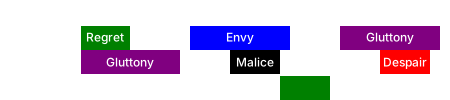
![]() Fast
Fast ![]() Despair
Despair
Phasing too late after Malice means that
Despair will spawn and complete its attack. This results in an extremely inconvenient set of pools that will persist throughout the final phase, usually leading to a wipe. Phasing after the despair is also usually fatal, since at least one set of adds will walk in.
Final Phase
The most difficult part of the fight. Ever-increasing damage accompanied by relentless successive mechanics make for a challenging mechanical, healing and damage check, as you try to finish the fight before Cerus kills you all.
- Cerus will start casting his Enraged Smash every four seconds, progressively gaining more stacks of
Empowered. Meanwhile, a new Embodiment will spawn and perform their mechanic every 5 seconds.
- The superposition of other damage sources with the Enraged Smash is one of the most common reason for downs. Most commonly this happens with Regret or
Malice.
- Large difficulty spikes come from the
Despair stacks, 5 and 35 seconds into the phase.
- 65-70 seconds is usually the limit for concluding this phase: beyond this point, the combination of a third Despair, Malices walking in and the boss having more than 50
Empowered almost always results in a wipe.
Virtuosos should not use their healing skill during this phase: the passive healing is more important than the phantasm reset. Only use it if you need the active heal.
1. Despair, Envy, Rage
- Stack on the
side of the boss.
- Once the
Despair indicator appears, the
Scourge uses their
Sand Swell to
.
- Everyone takes the portal and stays on the portal exit, except for the healers, who can stack behind the rest of the squad.
Dodge
Despair to the right.
Virtuosos use their
Distortion,
Heralds use
Infuse Light.
- After the dodge, the
Chronomancer prepares their
Portal next to the pools.
- Run east towards
Envy and chase the fast wall around the boss.
- Run to either
or
to avoid the slow wall.
is safer but
allows melee builds to greed more damage.
- Stack in Regret when it spawns, and sidestep
Rage.
![]() Chronomancer POV
Chronomancer POV
![]() Scourge POV
Scourge POV
![]() Herald POV
Herald POV
![]() Virtuoso POV
Virtuoso POV
Alternative: North-East Portal
An alternative way of playing this first sequence is by casting the first Sand Swell towards the North-East, as shown in the image below, then dodging forwards. This has the advantage of immediately placing the group in melee with the boss, but can be difficult to play in certain situations, such as when the Rage add is casting right after the phase transition.
In this situation, the Chronomancer should prepare their portal during,
Rage, while the entire group is moving out of the center.
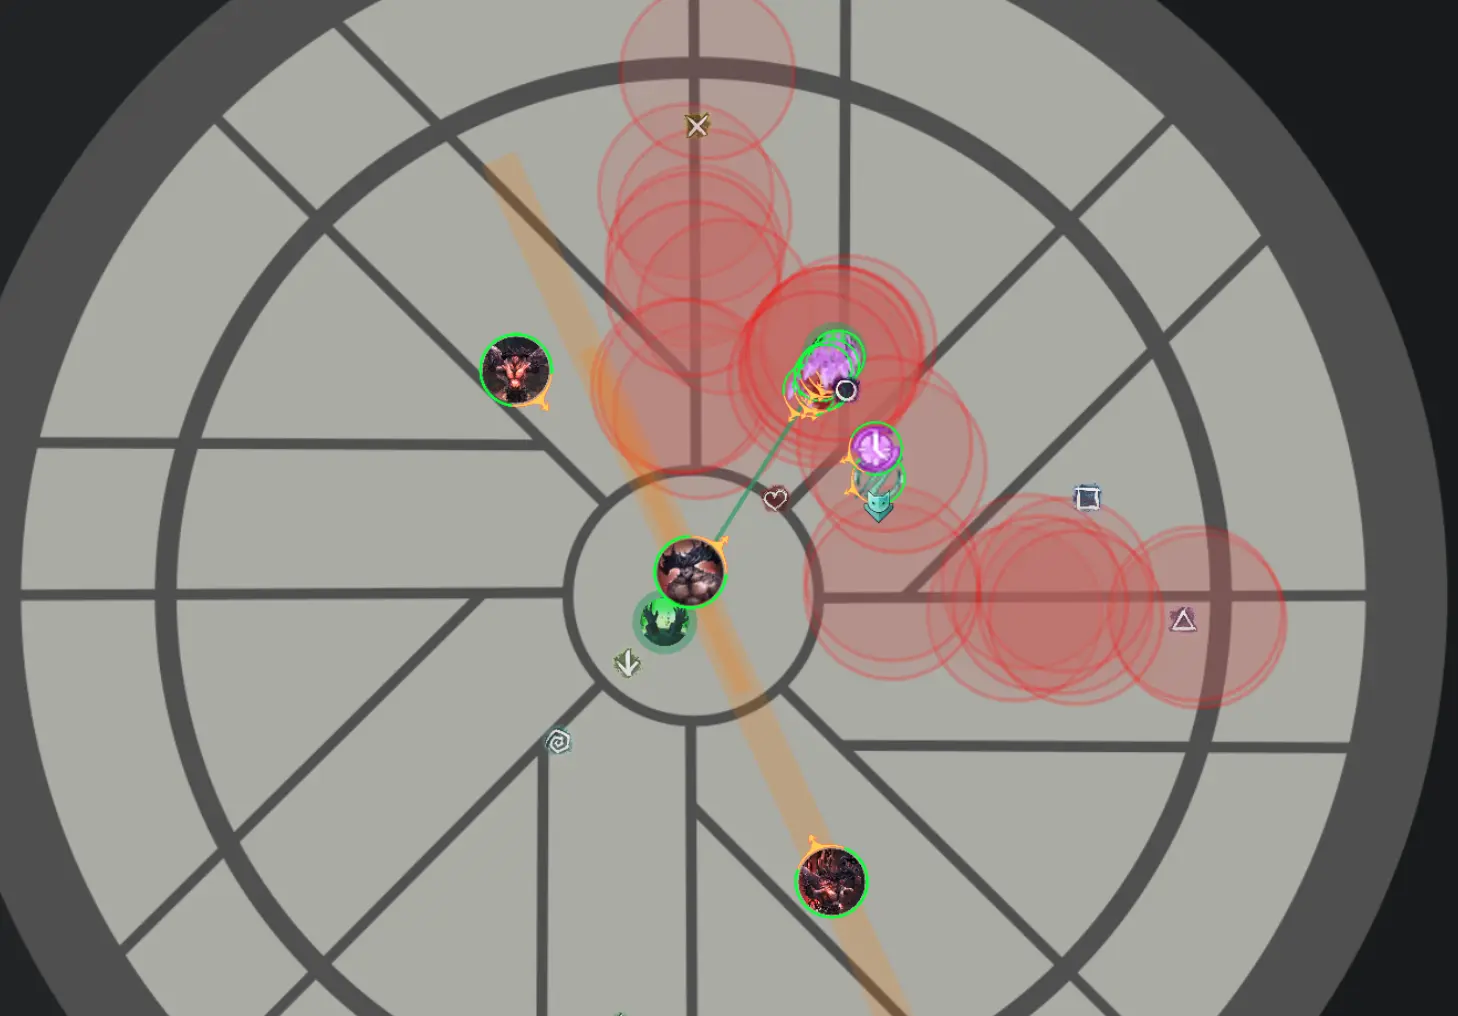
![]() NE Portal POV
NE Portal POV
Extra Information
- Any players who go down due to
Despair and aren’t immediately revived should /gg. This will avoid you getting targeted by Regret while off-stack, which usually means a wipe.
- If the
Chronomancer didn’t use
Continuum Split to place the final portal of the previous phase, they will not have their portal available now, and will have to
Blink out and place it in the following sequence.
Virtuosos should reset their
Distortion with
Signet of Illusions soon after the dodge.
2. All Embodiments Go
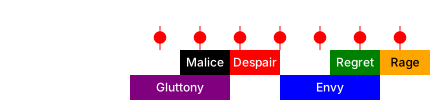
- Focus on collecting Gluttony. Use
Feedback and
Corrosive Poison Cloud on the boss to prevent it from gaining
Barrier.
- As soon as
Malice tethers spawn, the
Chronomancer opens their
Portal on the boss. Targeted players should wait until they are full health after the smash at ~32s, then take the portal. Drop the adds on the portal exit.
- Once
Despair spreads spawn, everyone takes the portal and prepares to dodge. The majority of the squad should stack on top of the exit while the healers move behind. Virtuosos should use their
Thousand Cuts now while targeting the boss to cleave the adds.
Dodge
Despair to the right.
Virtuosos use their
Distortion,
Heralds use
Infuse Light.
- Run east towards
Envy and chase the fast wall around the boss.
- Run to either
or
to avoid the slow wall.
is safer but
allows melee builds to greed more damage.
- Stack in Regret when it spawns, and sidestep
Rage.
![]() Chronomancer POV
Chronomancer POV
![]() Scourge POV
Scourge POV
![]() Herald POV
Herald POV
![]() Virtuoso POV
Virtuoso POV
Extra Information
- It is important that players targeted by
Malice wait until after the smash to take the portal. This will give the healers time to bring them to full health, otherwise they will likely downstate on the smash right after
Despair spreads spawn.
Virtuosos targeted by
Malice should try to
[Block] the tethers to reduce incoming damage, since they will be far from their healers when they complete.
- If you are missing some damage, it is best to move to
after
Envy, so you can cleave the adds. If they walk in, the squad will die very quickly.
3. Gluttony, Malice, Despair
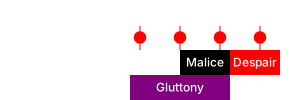
This sequence is identical to the Gluttony, Malice, Despair at the start of the previous sequence.
- Focus on collecting Gluttony. Use
Feedback and
Corrosive Poison Cloud on the boss to prevent it from gaining
Barrier. Avoid barrier at all costs: one single orb going in means 4-5 more seconds of dps. That’s an extra smash to deal with: often the difference between a kill and a wipe.
- Players targeted by
Malice can try running out. Don’t run too far, or else you will quickly die to smashes.
- If
Despair spawns: spread, DPS, pray.
- You are dead.